Version 26.1 for Sparkrock 365 2025 release wave 1 release notes Published May 9, 2025
These release notes include supplemental information about version 26.1 for Sparkrock 365 2025 release wave 1.
Video
The following video includes information about the new features and enhancements in version 26.1 for Sparkrock 365 2025 release wave 1.
Highlights
The following sections highlight the major accomplishments in this release.
Automatically remove an employee's incomplete HR tasks when the employee is terminated
Control duplicate email address handling for new hire and rehire HR requests
Define a maximum number of days to transfer for cause of absence code balances
New features and changes
Version 26.1 for Sparkrock 365 2025 release wave 1 introduces exciting new features and enhancements to existing functionality.
Update 26.1 for Microsoft Dynamics 365 Business Central 2025 release wave 1
The base Microsoft Dynamics 365 Business Central platform that powers Sparkrock 365, has been updated from 26.0 to 26.1.
To learn more about update 26.1 for Microsoft Dynamics 365 Business Central online 2025 release wave 1, go to Update 26.1 for Microsoft Dynamics 365 Business Central online 2025 release wave 1 (26.1).
To view a detailed list of cumulative platform fixes that are available from Microsoft, see Update history for Microsoft Dynamics 365 Business Central.
Introducing Microsoft Copilot
Version 26.1 for Sparkrock 365 2025 Release Wave 1 introduces AI capabilities powered by Microsoft Copilot.
With Copilot you can:
Ask questions about your data using natural language
Summarize reports, lists, and documents
Automate routine tasks, such as generating and processing records
These AI-driven features are fully integrated into Sparkrock 365, helping you work more efficiently and make better decisions.
To learn more about Copilot in Business Central, go to Copilot in Business Central overview and Configure Copilot and agent capabilities.
Data residency considerations for Canadian customers
Many of our customers in Canada, particularly in the K–12 and nonprofit sectors, have strict requirements around data residency. Microsoft Copilot in Sparkrock 365 uses the Azure OpenAI Service, which is currently hosted in data centers that are located in the United States. To learn more about the Azure OpenAI Service and Business Central data, go to Azure OpenAI Service and Business Central data.
If your organization requires that data remain within Canada, you can disable Copilot, which prevents data from being sent to services that are hosted outside the country. To learn more about allowing data movement across geographies, go to Allow data movement across geographies. To learn more about Copilot data movement, go to Copilot data movement across geographies.
Granular control of Copilot features
Sparkrock 365 provides the capability for you to enable or disable individual Copilot features. This level of flexibility supports alignment with your organization’s preferences and policies.
For example, a new SO (Sales Order) icon may appear in role centers.
If your organization does not require AI support for sales order entry or automation, you can Deactivate the Sales Order Agent on the Copilot & agent capabilities page.
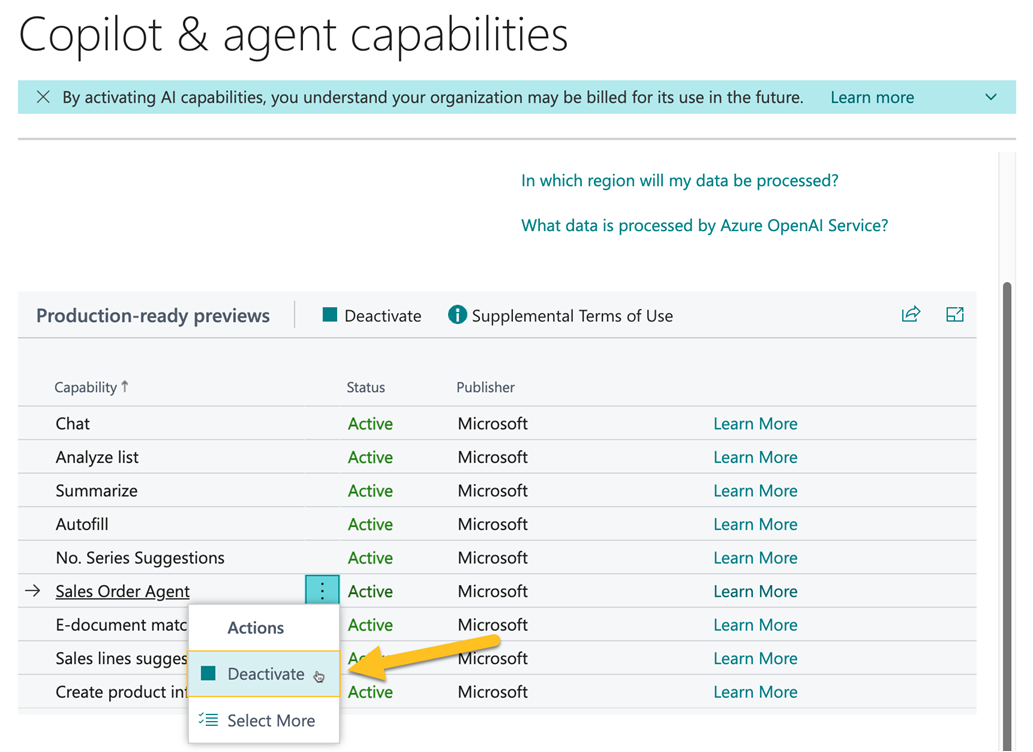
To learn move about how to activate or deactivate Copilot features, go to Activate features.
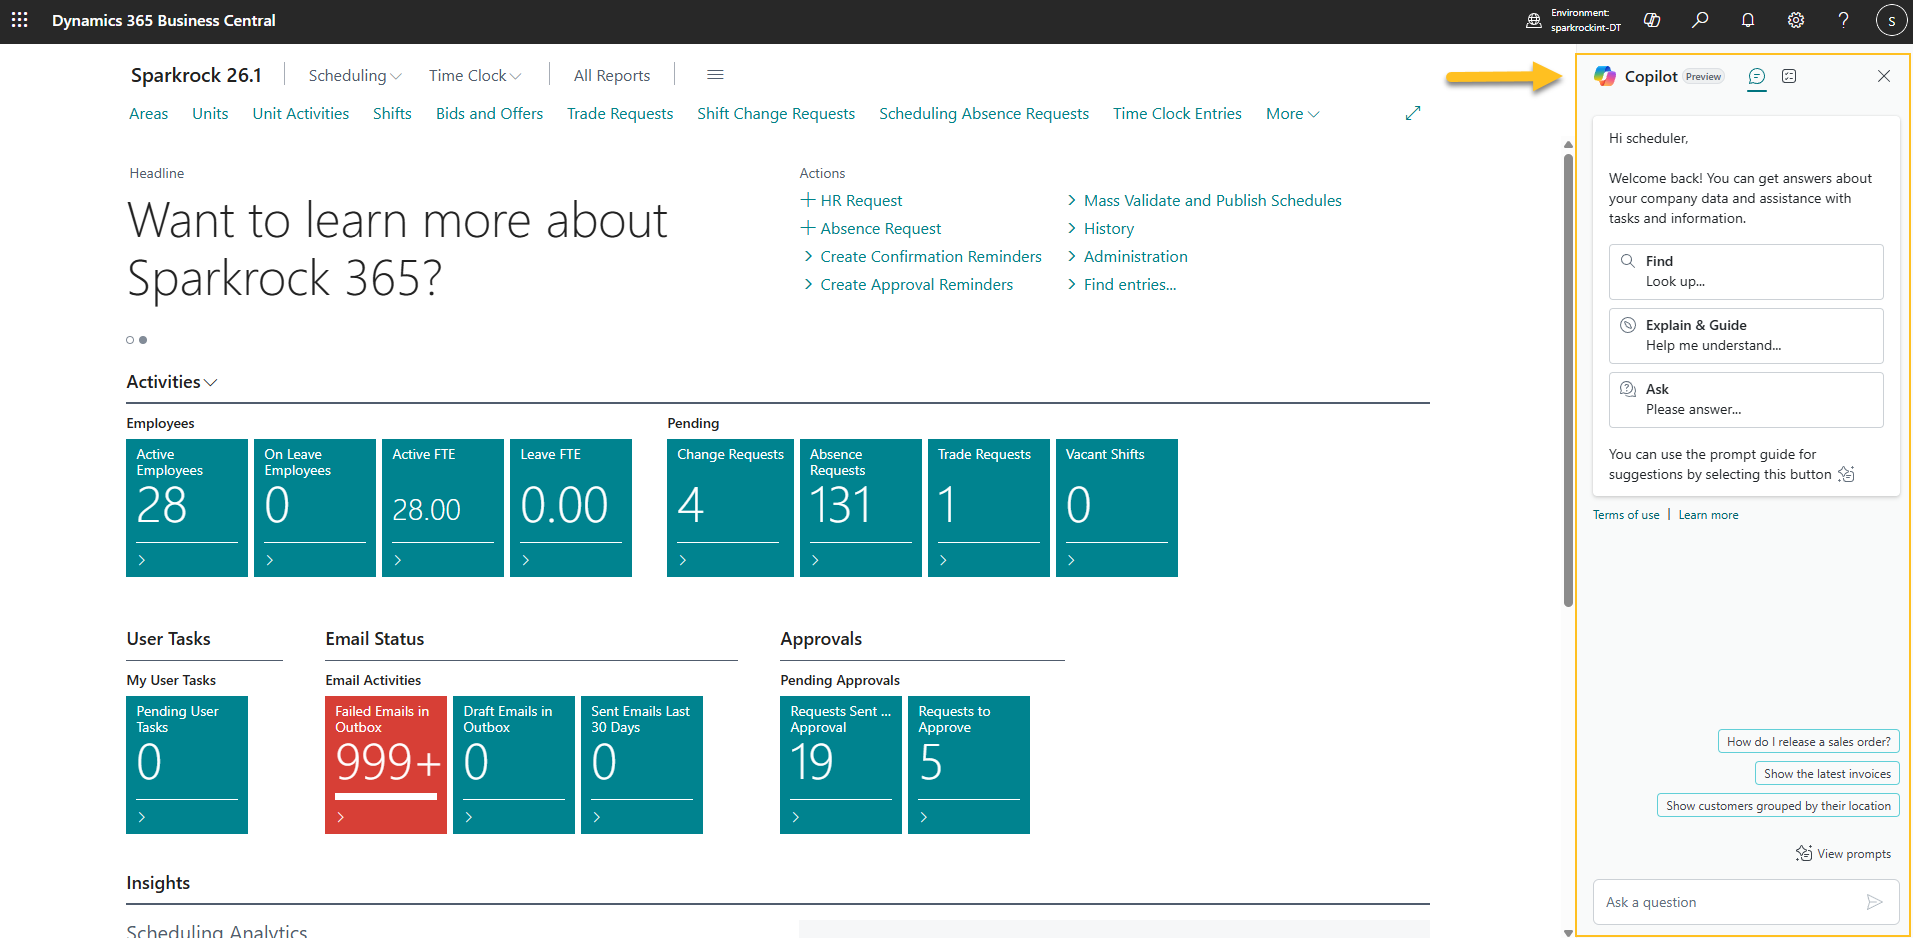
Launch Copilot
To launch Copilot, in the app bar, select the Copilot icon.

Copilot opens.
Subscription and licensing notes
While Copilot is currently included in your subscription, Microsoft may introduce separate pricing for certain AI capabilities. We monitor these developments and will communicate any changes that affect your subscription or costs.
Troubleshoot Copilot and agent capabilities
To learn how to fix common issues that you might encounter while working with Copilot and agent capabilities in Business Central, go to Troubleshoot Copilot and agent capabilities.
New platform update process
In previous releases, Sparkrock managed the update process on your behalf. Now that Sparkrock 365 runs on the Microsoft Dynamics 365 Business Central platform, you have greater control over scheduling updates. You can now choose a date that aligns with your organization’s needs, as long as the date falls within Microsoft's designated release window.
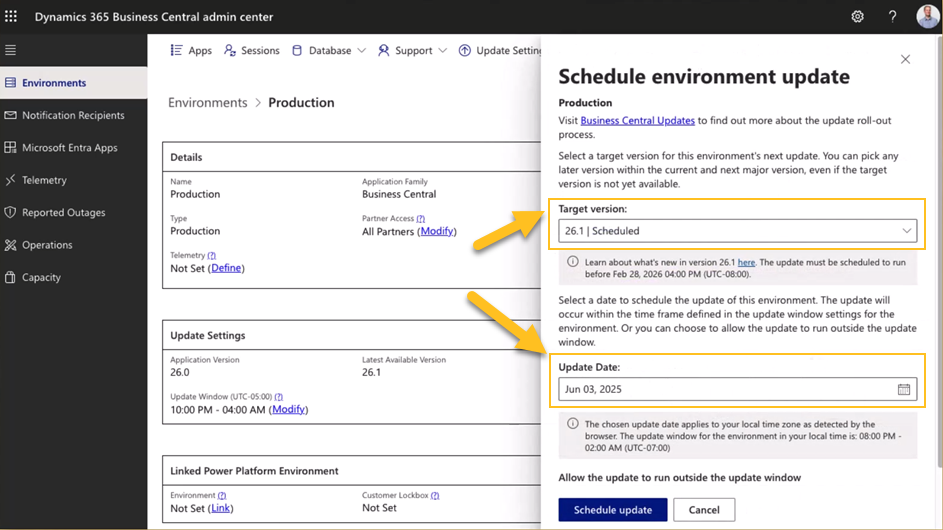
To learn more about managing updates, go to Managing updates in the Business Central admin center.
Maintenance releases
To allow Sparkrock to deploy maintenance releases to your environment, your Microsoft administrator must visit adminconsent.sparkrock.com.
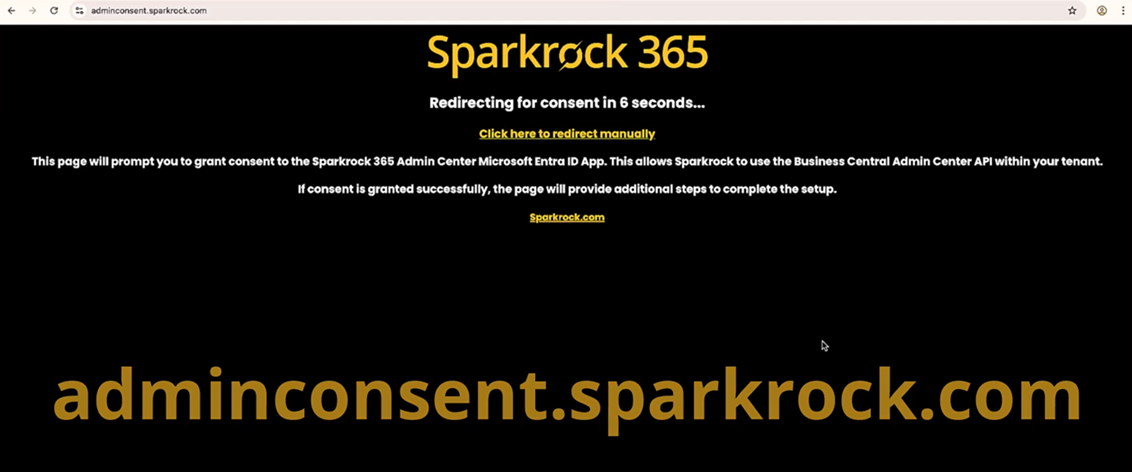
On this site, you administrator can grant consent to the Sparkrock 365 Admin Center app in Microsoft Entra ID. This consent allows Sparkrock to access the Business central Admin Center API in your tenant. After granting consent, the administrator can proceed with the remaining setup steps.
Optimize use of screen space
This release includes enhancements to default page layouts to help users work more efficiently on modern devices with large displays. These improvements optimize how pages appear in different modes to make better use of available screen space.
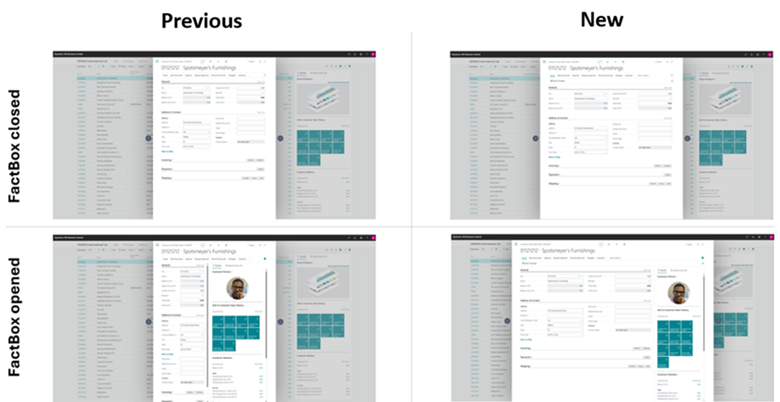
Key details of this feature:
Adjusted the default page size in narrow mode to improve page layouts.
Improved the sizing and animation of the FactBox pane in narrow mode. The pane expands outside the main content area, so opening or closing the FactBox doesn't reduce the width of the page content.
Refined proportions between field labels and values in narrow mode.
An option to Resize the FactBox pane.
Note
Note:
To use this feature, you must enable the Optimize screen estate usage on the web feature. To learn more about enabling features, go to Enabling new and upcoming features ahead of time.
Resize the FactBox pane
Starting with this release, you can resize the FactBox pane to improve visibility of the content.
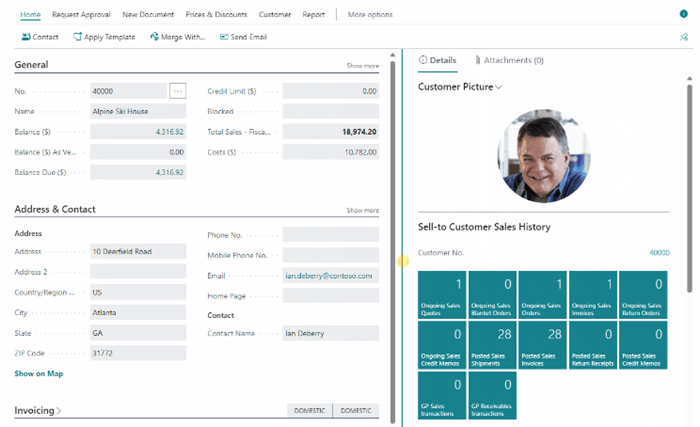
Key details of this feature:
You can resize the FactBox within specific limits to ensure the main page content remains visible.
The FactBox content reflows smoothly to fit the resized space.
Your browser remembers the FactBox size per user, per page.
A double-click of the divider resets the FactBox pane to the default size.
To learn more about resizing a FactBox, go to Resize or collapse a FactBox.
Preview PDF attachments
This release introduces the capability to view PDF attachments directly in your browser. For example, in the Documents FactBox, you can select a PDF link to open the file in preview mode.
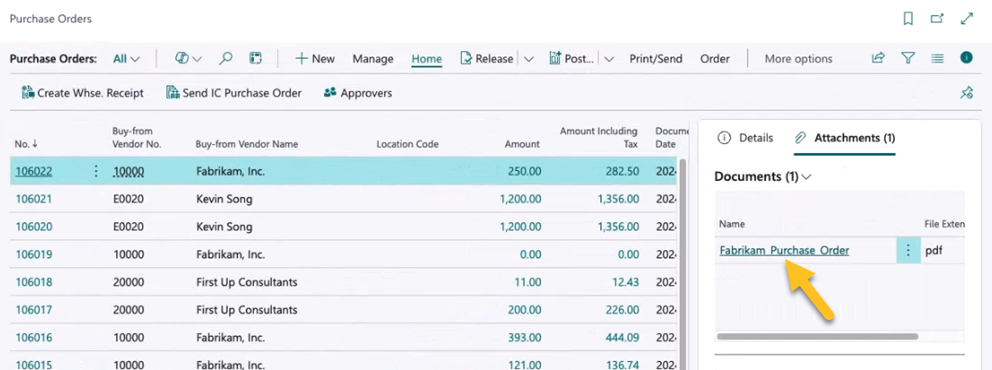
The PDF opens in a dedicated viewer, which provides a streamlined experience that is similar to the print preview feature.
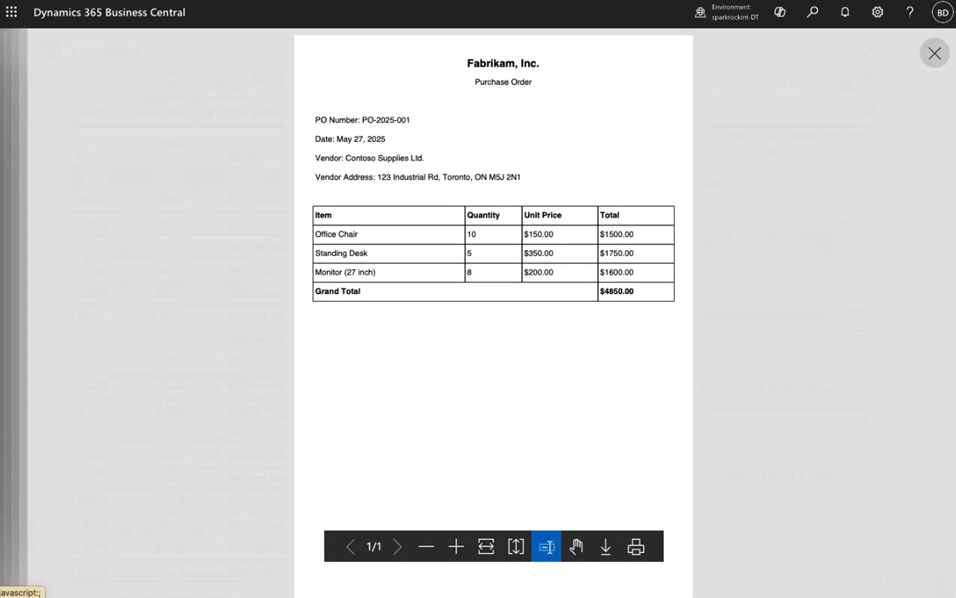
An action bar appears at the bottom of the viewer, which you can use to perform various tasks, such as zooming in, zooming out, or downloading the PDF.
Financial reports description field enhancements
On the Financial Reports page, this release updates the Description field caption to Display Title. This change helps differentiate the field from the new Internal Description field.
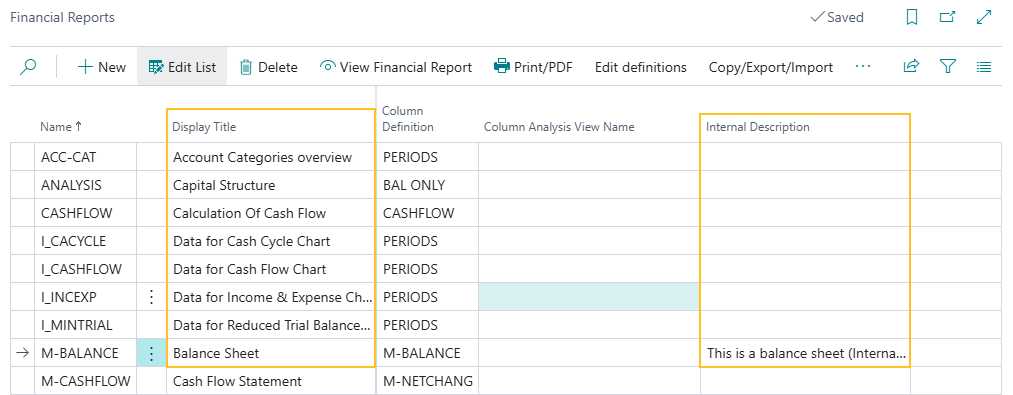
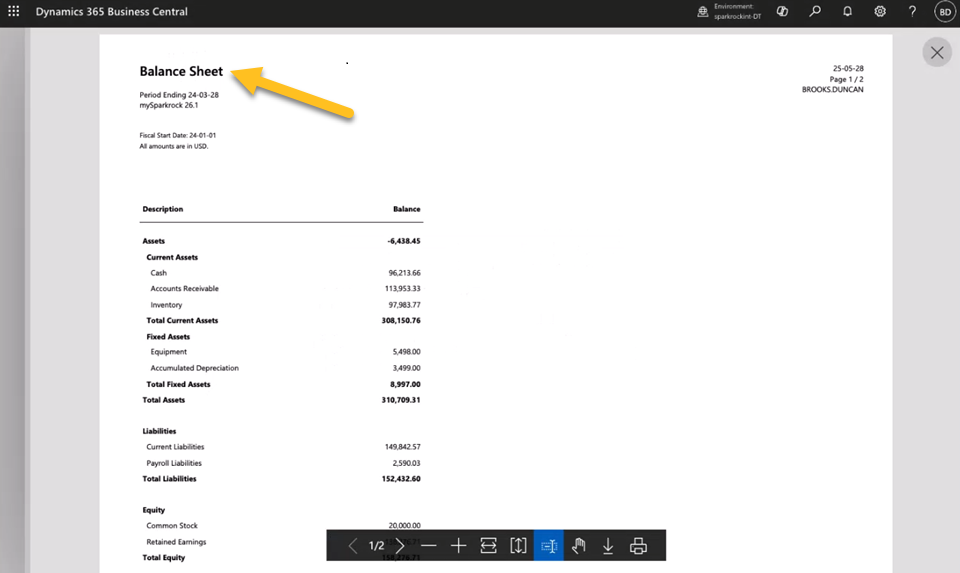
The value of the Display Title field continues to appear on reports in the same way as in previous releases.
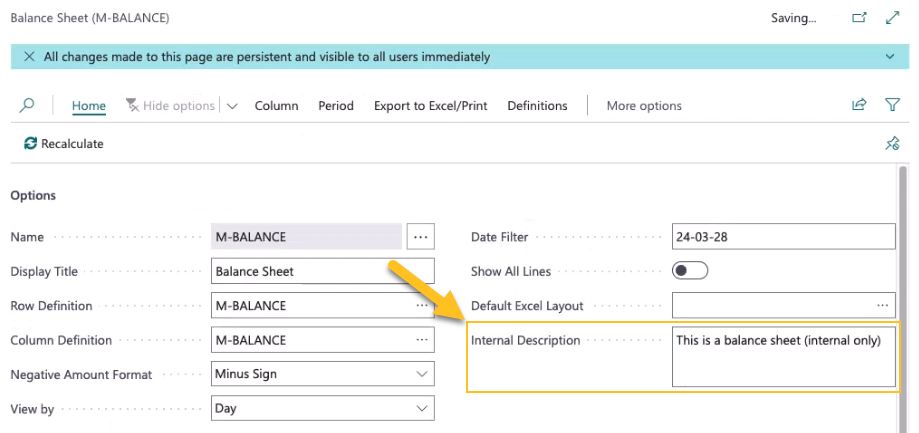
The new Internal Description field provides the capability for you to specify a description or instructions that do not appear on the report. You can edit the Internal Description field on the corresponding report definition page.
To learn more about financial reports, go to Prepare financial reporting with financial data and account categories.
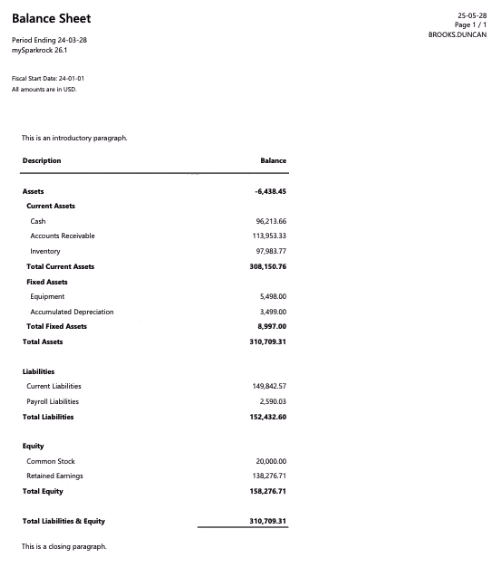
Introductory and closing paragraphs on financial reports
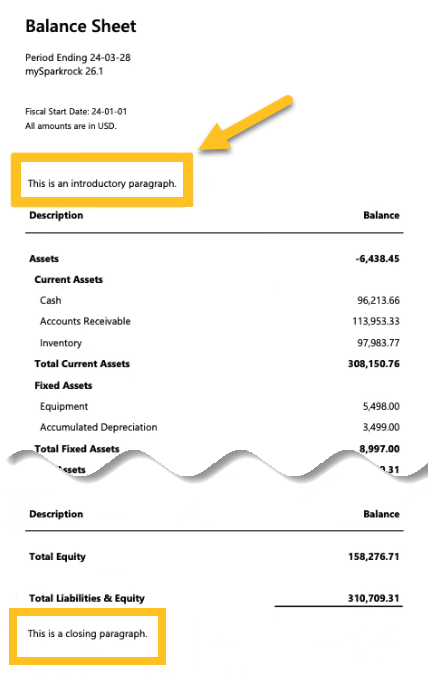
Starting with this release, you can include an introductory paragraph, a closing paragraph, or both in financial report output. To use this feature, choose the new Edit introductory/closing paragraphs action under Definitions on the corresponding report definition page.
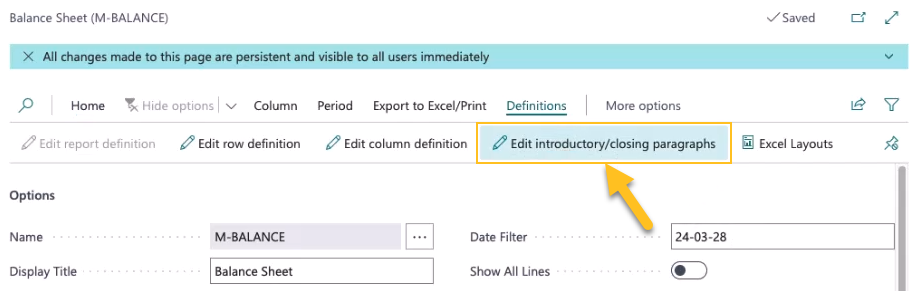
The Edit introductory/closing paragraphs action opens the Edit Financial Report Introductory/Closing Paragraph page where you can specify your desired text in the Introductory paragraph and Closing paragraph fields.
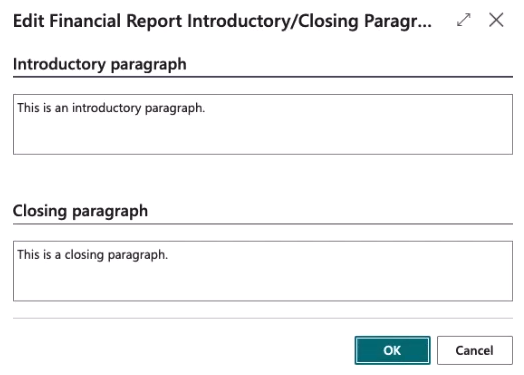
When you export the report to PDF or Excel, the paragraphs display before and after the main report body.
To learn more about financial reports, go to Prepare financial reporting with financial data and account categories.
Choose a format for negative numbers on financial reports
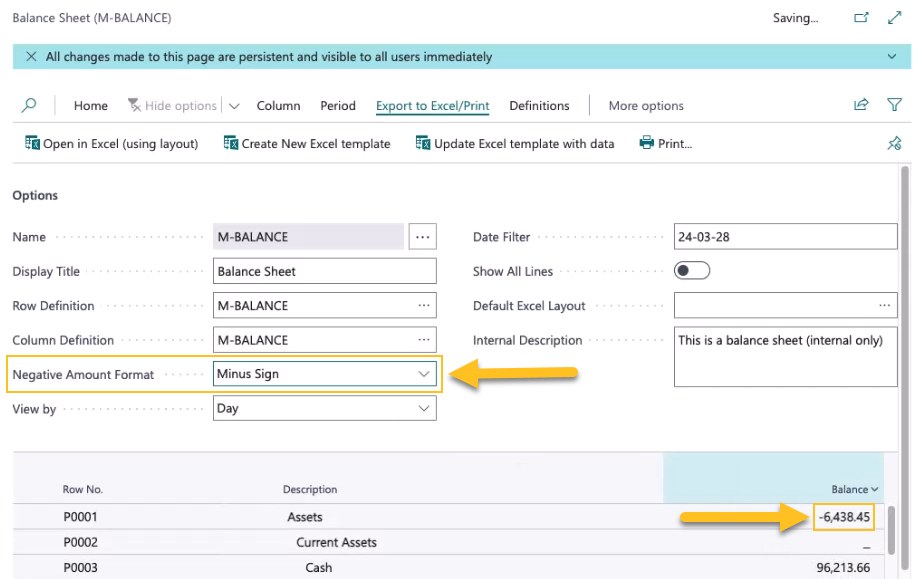
This release introduces the capability to choose how negative numbers appear in financial report output. The selected format applies to your on-screen display, PDF files, and Excel exports.
To configure the format, use the new Negative Amount Format field on the corresponding report definition page. You can choose Minus Sign or Parenthesis.
To learn more about financial reports, go to Prepare financial reporting with financial data and account categories.
Choose landscape or portrait layouts for financial reports
Starting with this release, you can choose a landscape or portrait layout when viewing a financial report.
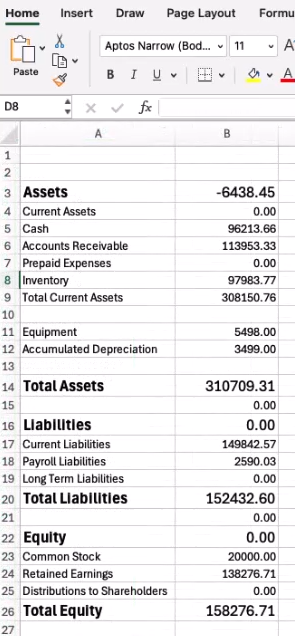
For example, when you run the Balance Sheet report, you can specify the layout format in the Report Layout field.

When you perform a lookup for the Report Layout field, the Report Layouts page opens. On this page, you can choose whether to use a landscape or portrait layout.
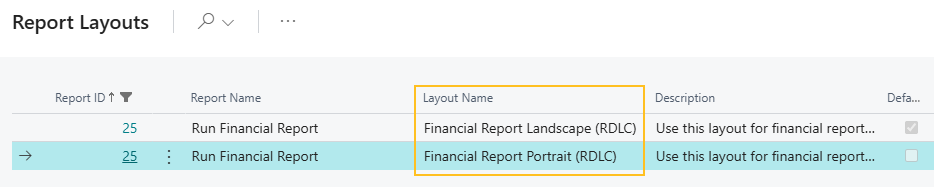
This enhancement provides the capability to select the layout that best fits the report content.
To learn more about viewing financial reports, go to View a financial report on-screen, as a PDF, or in Excel.
Run a financial report using a saved Excel template
As part of this release, instead of saving Excel templates locally, you can import them into Sparkrock 365 using the Excel layouts for Financial Reporting feature.
To save an Excel template for a financial report
On the corresponding financial report definition page, on the action bar, choose Excel Layouts under Definitions.
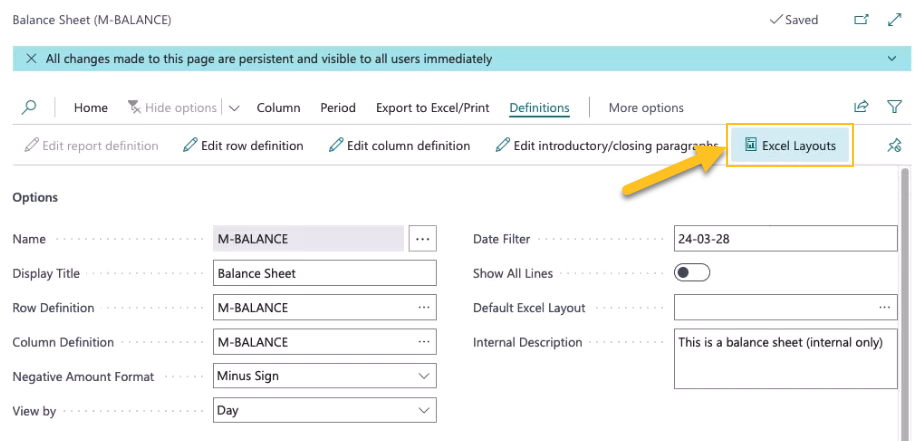
The Financial Report Excel Layouts page opens.
To create an Excel Layout, on the action bar, choose New, and then specify values for Code, Description, and File Name.

To export the financial report to Excel, on the action bar, choose Export/Run.

The financial report is exported to Excel.
Update the Excel worksheet as required, and then save the file.
The following screen capture shows the layout before and after customization.
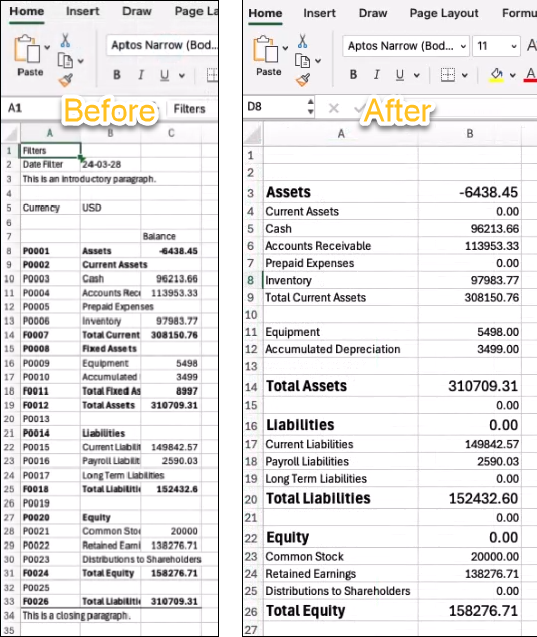
On the Financial Report Excel Layouts page, on the action bar, choose Import, and then upload the Excel file that you saved.

The layout becomes available for use with the financial report.
To set the Excel Layout that you saved as the default
On the financial report definition page, in Default Excel Layout, select the layout that you saved.
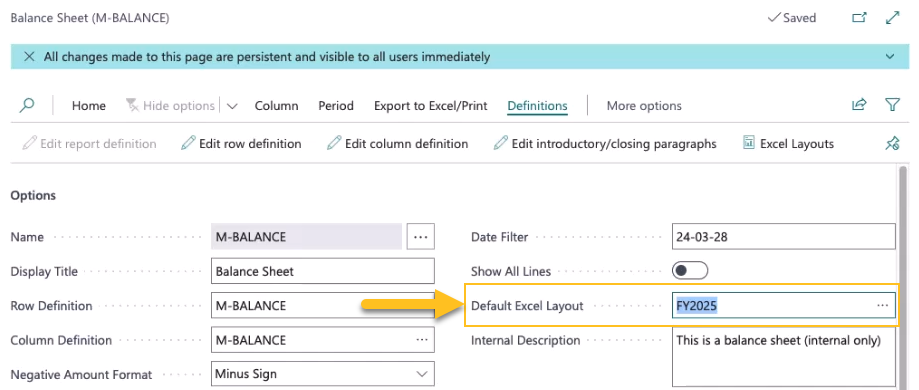
To run a financial report using the saved layout
On the financial report definition page, on the action bar, choose Export to Excel/Print > Open in Excel (using layout).

Sparkrock 365 exports the report to Excel using the layout that you selected.
To learn more about financial reports and Excel, go to View a financial report on-screen, as a PDF, or in Excel.
mySparkrock notification enhancements
To resolve an issue where, mySparkrock notification emails remained in the Email Outbox with the Status of Failed because the MYSPARKROCK user is not authorized to access the shared mailbox, this release introduces some changes to mySparkrock notification setup.
On the mySparkrock Solution Setup page, this release adds a Notification User Name field.
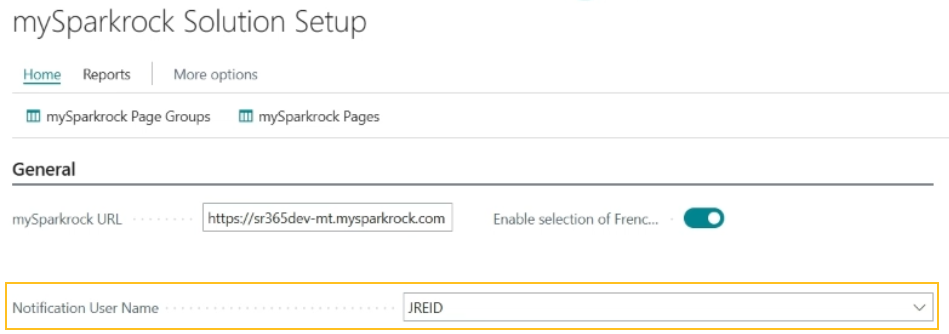
In the Notification User Name field, you must specify a user who is authorized to access the shared mailbox.
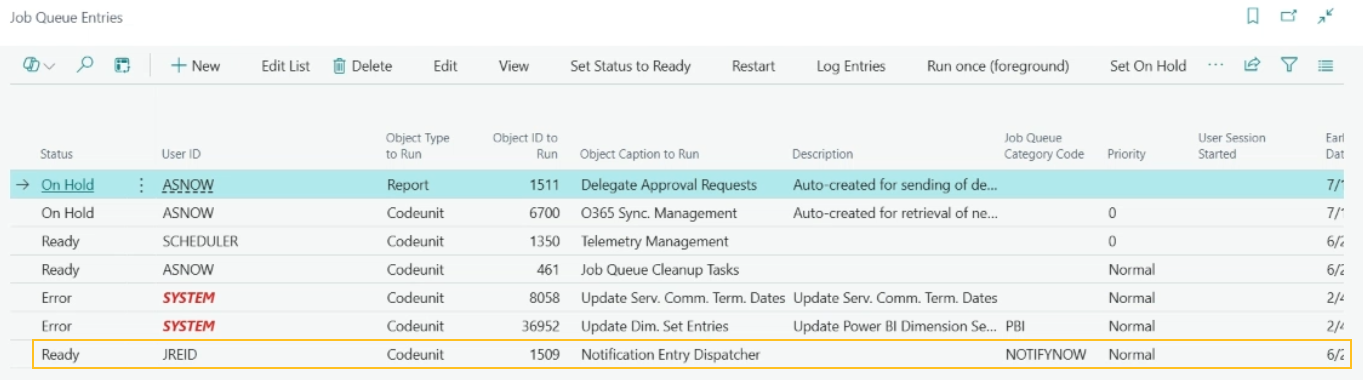
After you specify a user, Sparkrock 365 automatically creates the following recurring job on the Job Queue Entries page:
Object Type To Run: Codeunit
Object ID to Run: 1509
Object Caption to Run: Notification Entry Dispatcher
User ID: Notification User Name that is set up on the mySparkrock Solution Setup page
Note
Note:
If you update the Notification User Name field with a new name and there is an existing job, Sparkrock 365 replaces the existing job with a new job. If you clear the Notification User Name field and there is an existing job, Sparkrock 365 deletes the job.
To learn more, go to Set up mySparkrock notifications.
Activation of purchase and payment pages on mySparkrock
To support the new mySparkrock financial management functionality, this release adds the Purchase and Payments Pages field to the mySparkrock Solution Setup page.
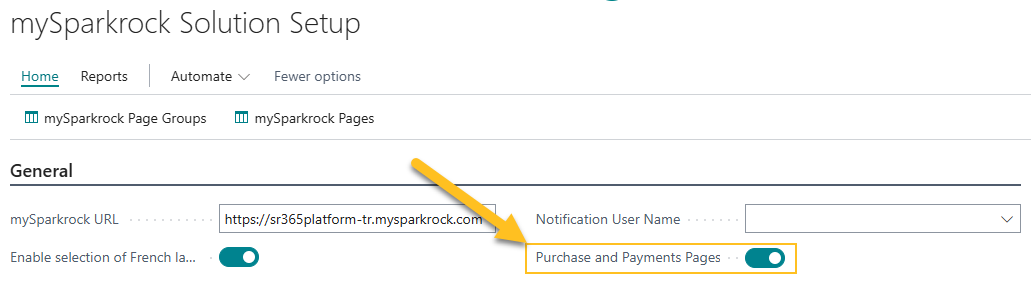
The Purchase and Payments Pages field controls whether purchase requisition, payment request, financial approval, purchase invoice, and purchase orders and receiving pages are available for configuration.
When you turn on Purchase and Payments Pages, Sparkrock Impact opens a Activation of Finance Pages on mySparkrock page where you must specify your customer tenant ID in the Activation ID field, and then choose OK.
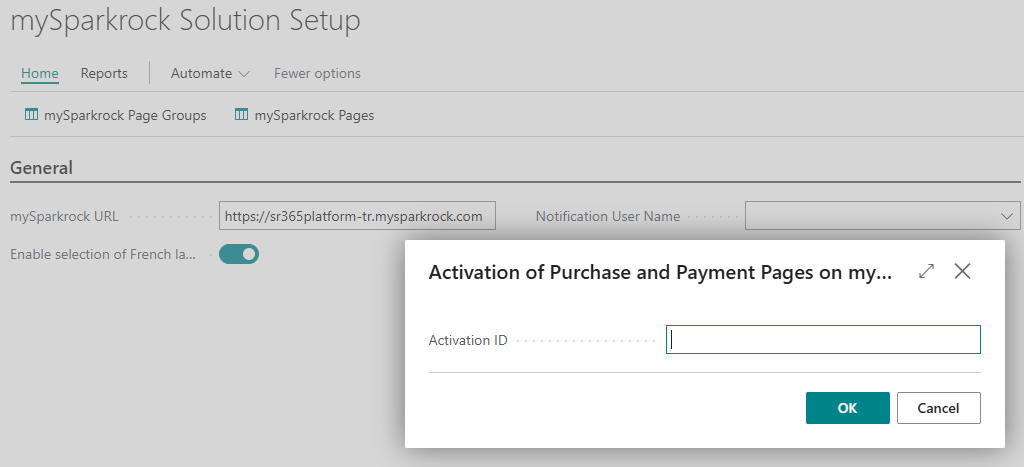
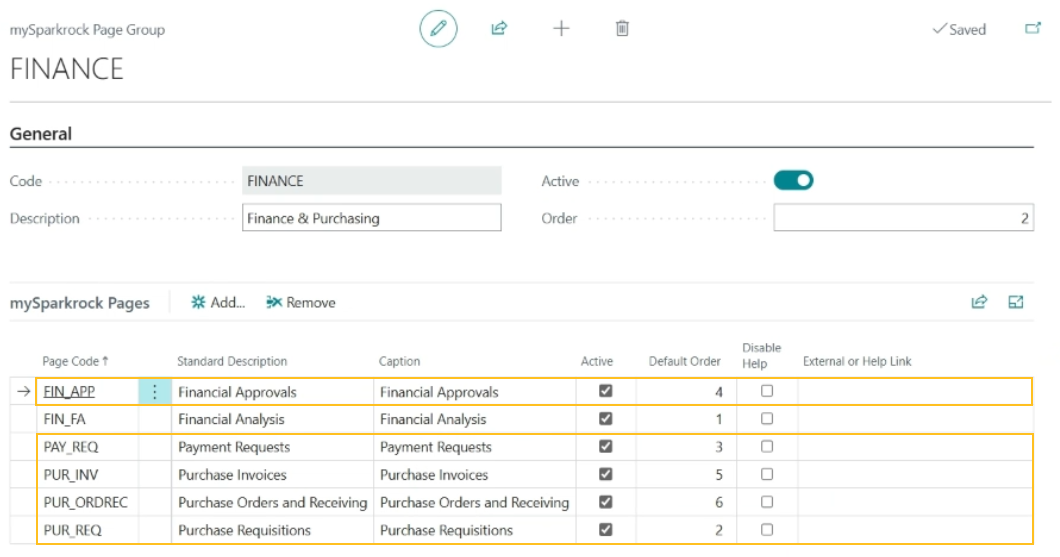
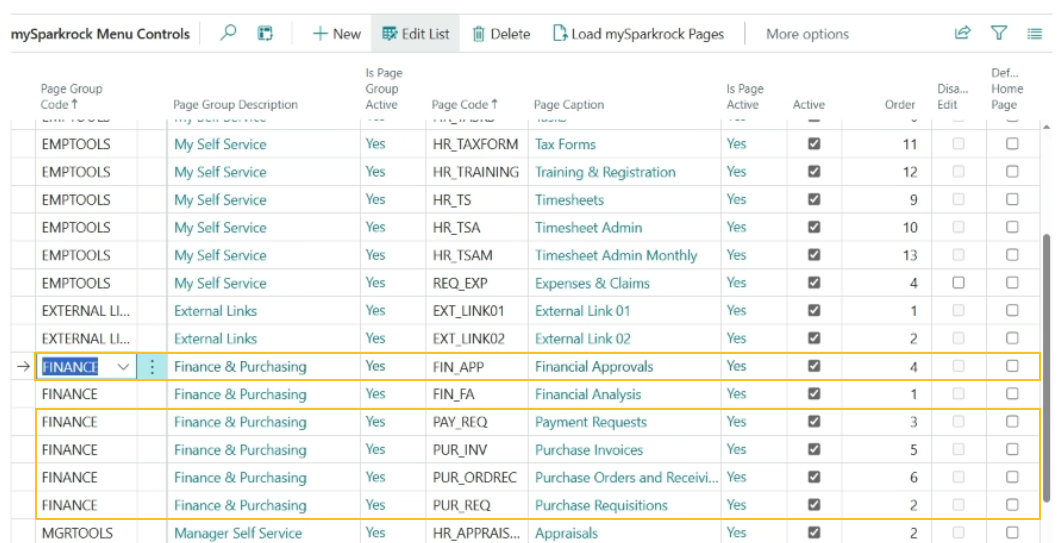
After activation, on the mySparkrock Page Group and mySparkrock Menu Controls pages, records with the Page Code of FIN_APP, PAY_REQ, PUR_INV, PUR_ORDREC, and PUR_REQ can be edited as required. The Active checkbox is selected for these records by default.
Note
Note:
The Purchase and Payments Pages field does not affect the Page Code of FIN_FA. All Financial Analysis page and subpage functionality remains unchanged from previous releases.
To learn more, go to Set up purchase and payment pages on mySparkrock.
mySparkrock approval notification link enhancements
In preparation for a future mySparkrock release, this release includes enhancements to approval notification links to support approvers who have access to mySparkrock but not Sparkrock 365.
When an approval workflow is set up for payment requests, purchase requisitions, purchase orders, or purchase invoices, Sparkrock 365 sends email notifications to approvers and requesters. Each email includes a link that opens the relevant page.
Starting with this release, Sparkrock 365 uses the following logic to determine the link destination, based on whether the recipient is a Sparkrock 365 user:
Not a Sparkrock 365 user (mySparkrock user only): The link opens the relevant page in mySparkrock.
Sparkrock 365 user: The link opens the relevant page in Sparkrock 365, regardless of whether the recipient is also a mySparkrock user.
To learn more, go to Set up approval notifications.
Automatically remove an employee's incomplete HR tasks when the employee is terminated
To improve the administration of terminated employees, this release introduces the capability to have Sparkrock 365 automatically delete an employee's incomplete HR tasks when the employee is terminated.
The following sections describe this feature in detail.
To enable the feature
To enable this feature, on the Advanced HR Setup page, on the HR Requests Setup FastTab, turn on Remove Tasks on Termination.
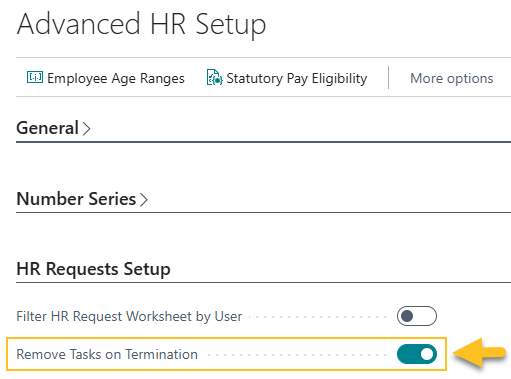
When Remove Tasks on Termination is turned on and a termination or teacher termination HR request is processed, Sparkrock 365 removes the respective employee's incomplete HR tasks. Only the terminated employee's completed tasks remain on the Employee HR Tasks page.
When Remove Tasks on Termination is turned off, Sparkrock 365 behaves the same as in previous releases.
To learn more, go to Set up Sparkrock 365 to remove an employee's HR tasks when the employee is terminated.
New HR process functions
To support this feature, the following records have been added on the HR Process Functions page for HR requests that have the Process Type of Termination.
| HR Reason Code | HR Function Code | HR Step | HR Function Description |
|---|---|---|---|
| 90-TERMINATION | 80 | 12 | Remove Tasks on Termination (80) |
| 91-TCHR TERMINATION | 80 | 12 | Remove Tasks on Termination (80) |
To learn more about HR process functions, go to HR process functions.
Reversal processing
If a termination or teacher termination HR request is reversed and Remove Tasks on Termination is turned on, Sparkrock 365 restores the incomplete employee HR tasks. Both completed and incomplete tasks appear on the Employee HR Tasks page.
Employee assignment status enhancements
To assist with search, filtering, and payroll calculations, this release enhances the Status field on the Employee Assignments page.
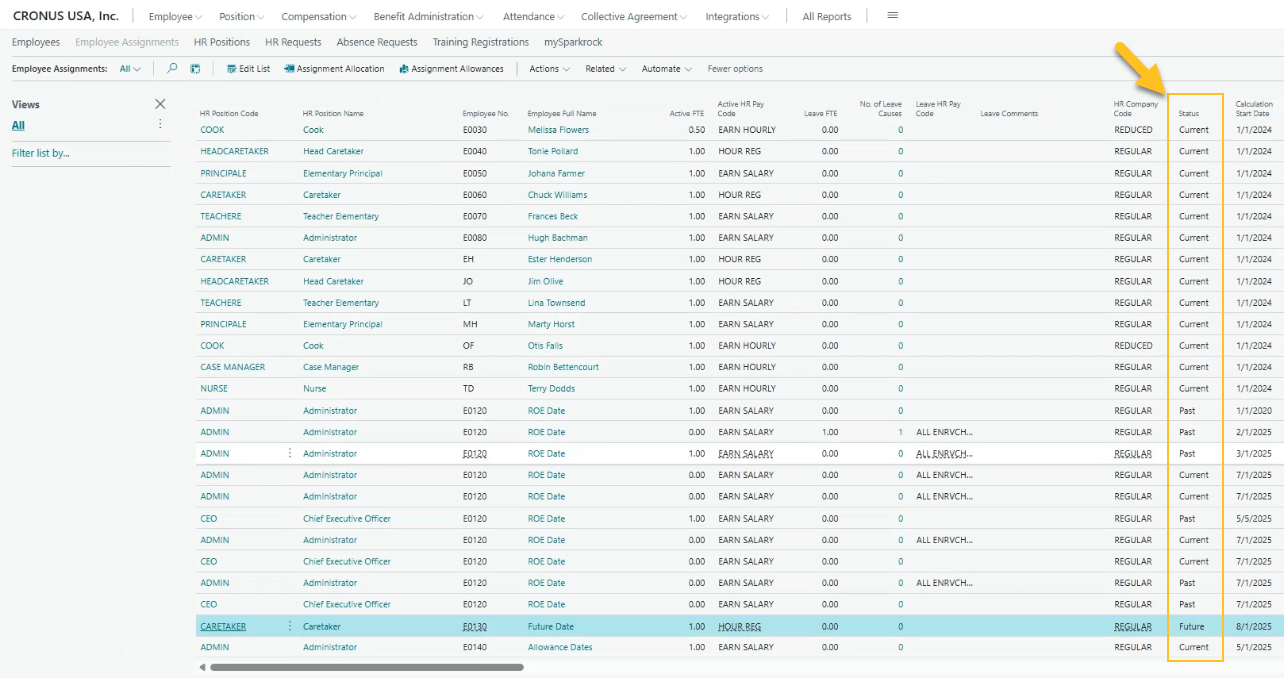
The Status field indicates the status of an assignment based on the current date. This field is read-only and cannot be edited by users.
The Status field displays one of the following values:
Current
Past
Future
To systematically set the Status field, this release introduces the following recurring job on the Job Queue Entries page:
Object Type To Run: Codeunit
Object ID to Run: 23068764
Object Caption to Run: SRW Update HR Emp. Ass. Status
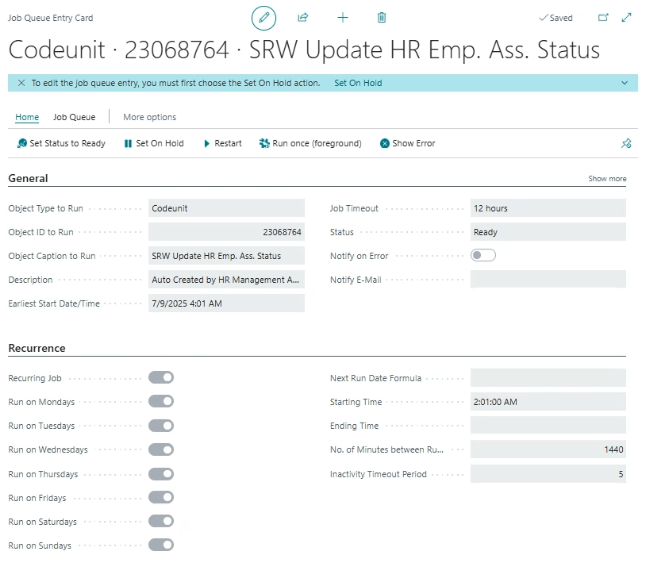
Sparkrock 365 automatically creates the job queue entry. The job is set to run daily overnight before the start of business.
The job updates the Status field for employee assignment entries where the Type is Assignment. Entries with other Type values, such as Cancelled or Budget, are not updated.
After an HR request is created, the Status field on related employee assignments is not updated immediately. The field is updated the next time the job runs.
To learn more, go to Employee assignment status.
Change a temporary assignment transfer
Sparkrock 365 now supports changing temporary employee assignment transfers. This feature resolves a previous limitation that made it difficult to change key details, such as dates or the To HR Position Code, after processing a temporary assignment transfer HR request.
With this release, a new change temporary transfer HR request can be processed, making it easier to update assignment records in response to real-world updates or corrections.
For example, Sarah, a Teacher, is given a temporary assignment as a Vice Principal from May 1 to July 31, 2025. After processing the initial temporary assignment transfer HR request, Sparkrock 365 displays the following assignments.
| Assignment | HR Position | Status | Calculation Start Date | Calculation End Date | Entry Type |
|---|---|---|---|---|---|
| A1 | Teacher | Past | January 1, 2024 | April 30, 2025 | Assignment |
| B1 | Vice Principal | Current | May 1, 2025 | July 31, 2025 | Assignment |
| C1 | Teacher | Future | August 1, 2025 | <Blank> | Assignment |
Later, the following changes to the temporary assignment are required:
- The start date is moved to May 16, instead of May 1.
- The end date is extended to August 31, instead of July 31.
After processing a change temporary assignment transfer HR request, Sparkrock 365 displays the following assignments.
| Assignment | HR Position | Status | Calculation Start Date | Calculation End Date | Entry Type |
|---|---|---|---|---|---|
| A1 | Teacher | Past | January 1, 2024 | May 15, 2025 | Assignment |
| B1 | Vice Principal | Past | May 1, 2025 | July 31, 2025 | Cancelled |
| B2 | Vice Principal | Current | May 16, 2025 | August 31, 2025 | Assignment |
| C1 | Teacher | Future | September 1, 2025 | <Blank> | Assignment |
Sparkrock 365 creates an assignment record (B2) based on the HR request and updates assignment B1 as follows for auditing and reversal purposes:
- Sets the Entry Type to Cancelled.
- Sets the Status to Past.
The following sections describe the enhancements for this feature in detail.
New Type of Transfer Request field on the HR Reason Codes page
To identify an HR reason code's type of transfer request as well as to assist with Sparkrock 365 processing, this release introduces a Type of Transfer Request field on the HR Reason Codes page.
The allowable values for the Type of Transfer Request field are as follows:
- Transfer
- Temporary Transfer
- Change Temporary Transfer
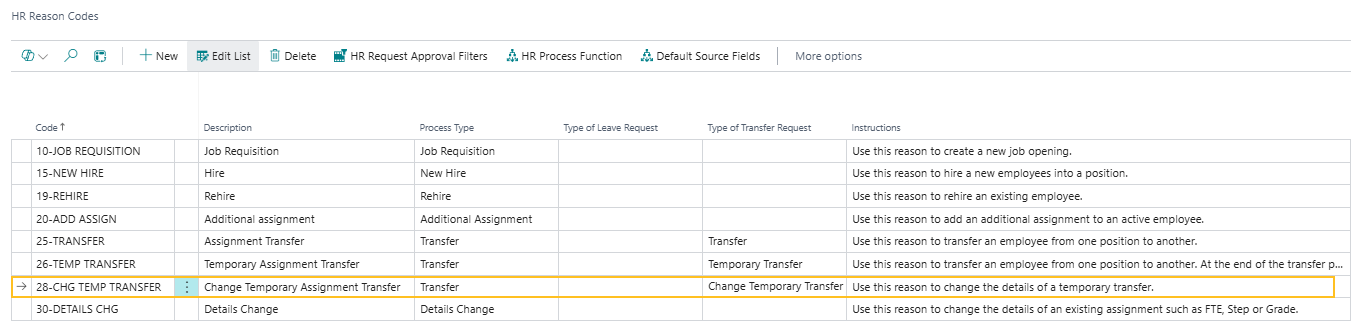
New HR reason code and HR process functions
On the HR Reason Codes page, this release introduces the following record:
- Code = 28-CHG TEMP TRANSFER.
- Description = Change Temporary Assignment Transfer
- Process Type = Transfer
- Type of Leave Request = <blank>
- Type of Transfer Request = Change Temporary Transfer
- Instructions = Use this reason to change the details of a temporary transfer.
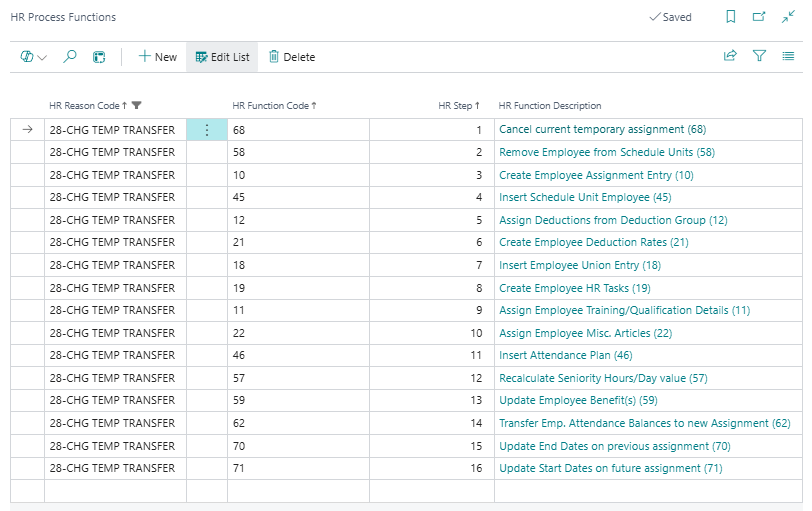
The following HR process functions are associated with the new 28-CHG TEMP TRANSFER reason code.
| HR Reason Code | HR Function Code | HR Step | HR Function Description |
|---|---|---|---|
| 28-CHG TEMP TRANSFER | 68 | 1 | Cancel current temporary assignment (68) |
| 28-CHG TEMP TRANSFER | 58 | 2 | Remove Employee from Schedule Units (58) |
| 28-CHG TEMP TRANSFER | 10 | 3 | Create Employee Assignment Entry (10) |
| 28-CHG TEMP TRANSFER | 45 | 4 | Insert Schedule Unit Employee (45) |
| 28-CHG TEMP TRANSFER | 12 | 5 | Assign Deductions from Deduction Group (12) |
| 28-CHG TEMP TRANSFER | 21 | 6 | Create Employee Deduction Rates (21) |
| 28-CHG TEMP TRANSFER | 18 | 7 | Insert Employee Union Entry (18) |
| 28-CHG TEMP TRANSFER | 19 | 8 | Create Employee HR Tasks (19) |
| 28-CHG TEMP TRANSFER | 11 | 9 | Assign Employee Training/Qualification Details (11) |
| 28-CHG TEMP TRANSFER | 22 | 10 | Assign Employee Misc. Articles (22) |
| 28-CHG TEMP TRANSFER | 46 | 11 | Insert Attendance Plan (46) |
| 28-CHG TEMP TRANSFER | 57 | 12 | Recalculate Seniority Hours/Day value (57) |
| 28-CHG TEMP TRANSFER | 59 | 13 | Update Employee Benefit(s) (59) |
| 28-CHG TEMP TRANSFER | 62 | 14 | Transfer Emp. Attendance Balances to new Assignment (62) |
| 28-CHG TEMP TRANSFER | 70 | 15 | Update End Dates on previous assignment (70) |
| 28-CHG TEMP TRANSFER | 71 | 16 | Update Start Dates on future assignment (71) |
Change temporary assignment transfer processing details
The following sections describe how Sparkrock 365 processes change temporary assignment transfer HR requests depending on whether related compensation entries exist for the temporary assignment.
Note
Note:
Sparkrock 365 prevents backdating the Calculation Start Date, Assignment Start Date, or both, of an active temporary assignment, to avoid potential payroll issues. This validation takes place only if a user tries to process a change temporary assignment HR request after the Calculation Start Date of the temporary assignment.
No related compensation entries
If no related compensation entries exist for the temporary assignment, Sparkrock 365 performs the following processing:
Creates an assignment record (B2) based on the HR request and updates the previous assignment (B1) as follows for auditing and reversal purposes:
- Sets the Entry Type to Cancelled.
- Sets the Status to Past.
If the change to a temporary assignment transfer (B2) does not include changes to the Calculation Start Date, Assignment Start Date, Calculation End Date, or Assignment End Date, Sparkrock 365 does not update the dates for previous (A1) and future (C1) assignments.
If the Calculation Start Date, Assignment Start Date, or both, of the new temporary assignment (B2) do not equal the previous temporary assignment (B1), Sparkrock 365 updates the Calculation End Date, Assignment End Date, or both, of the previous assignment (A1).
If the Calculation End Date, Assignment End Date, or both, of the new temporary assignment (B2) do not equal the previous temporary assignment (B1), Sparkrock 365 updates the Calculation Start Date, Assignment Start Date, or both, of the future assignment (C1).
Example
John is given a temporary assignment. After processing the initial temporary assignment transfer HR request, Sparkrock 365 displays the following assignments.
| Assignment | Calculation Start Date | Calculation End Date | Entry Type |
|---|---|---|---|
| Original Assignment (A1) | January 1, 2025 | April 24, 2025 | Assignment |
| Temporary Assignment (B1) | April 10, 2025 | June 30, 2025 | Assignment |
| Future Assignment (C1) | July 1, 2025 | <Blank> | Assignment |
If, on April 10, 2025, a change temporary assignment transfer HR request is processed to change the Calculation Start Date of the temporary assignment transfer to April 25, 2025 and no related compensation journal entries exist, Sparkrock 365 displays the following assignments.
| Assignment | Calculation Start Date | Calculation End Date | Entry Type |
|---|---|---|---|
| Original Assignment (A1) | January 1, 2025 | April 24, 2025 | Assignment |
| Old Temporary Assignment (B1) | April 10, 2025 | June 30, 2025 | Cancelled |
| New Temporary Assignment (B2) | April 25, 2025 | June 30, 2025 | Assignment |
| Future Assignment (C1) | July 1, 2025 | <Blank> | Assignment |
On the old temporary assignment (B1), the Entry Type is set to Cancelled.
Related compensation entries exist
If related compensation entries exist for the temporary assignment, Sparkrock 365 performs the following processing:
Splits the temporary assignment.
If the Calculation Start Date, Assignment Start Date, or both, of the new temporary assignment (B2) do not equal the previous temporary assignment (B1), Sparkrock 365 updates the Calculation End Date, Assignment End Date, or both, of the previous assignment (A1).
If the Calculation End Date, Assignment End Date, or both, of the new temporary assignment (B2) do not equal the previous temporary assignment (B1), Sparkrock 365 updates the Calculation Start Date, Assignment Start Date, or both, of the future assignment (C1).
Example
Joan is given a temporary assignment. After processing the initial temporary assignment transfer HR request, Sparkrock 365 displays the following assignments.
| Assignment | Calculation Start Date | Calculation End Date | Entry Type |
|---|---|---|---|
| Original Assignment (A1) | January 1, 2025 | April 24, 2025 | Assignment |
| Temporary Assignment (B1) | April 10, 2025 | June 30, 2025 | Assignment |
| Future Assignment (C1) | July 1, 2025 | <Blank> | Assignment |
If, on April 10, 2025, a change temporary assignment transfer HR request is processed to change the Calculation Start Date of the temporary assignment transfer to April 25, 2025 and related compensation journal entries exist, Sparkrock 365 displays the following assignments.
| Assignment | Calculation Start Date | Calculation End Date | Entry Type |
|---|---|---|---|
| Original Assignment (A1) | January 1, 2025 | April 24, 2025 | Assignment |
| Old Temporary Assignment (B1) | April 10, 2025 | April 24, 2025 | Assignment |
| New Temporary Assignment (B2) | April 25, 2025 | June 30, 2025 | Assignment |
| Future Assignment (C1) | July 1, 2025 | <Blank> | Assignment |
Status workflow for change temporary assignment transfer HR requests
The Status workflow for change temporary assignment transfer HR requests is as follows.
| Pending HR Action | Pending Payroll Action | Status Workflow |
|---|---|---|
| Yes | No | Open > Pending HR Action > Completed |
| No | Yes | Open > Pending Payroll Action > Completed |
| Yes | Yes | Open > Pending HR Action > Pending Payroll Action > Completed |
| No | No | Open > Completed |
Reversal processing details
The following sections describe how Sparkrock 365 processes a change temporary assignment transfer HR request reversal depending on whether related compensation entries exist for the temporary assignment.
Related compensation entries do not exist
If there are no related compensation entries for the temporary assignment, Sparkrock 365:
Sets the temporary assignment record (B2) Status to Cancelled.
Sets the previous temporary assignment (B1) record Status to Assignment.
Reverts the Calculation End Date, Assignment End Date, or both, of the previous assignment (A1) if the Calculation Start Date, Assignment Start Date, or both of the new temporary assignment record (B2) does not equal the previous temporary assignment record (B1).
Reverts the Calculation Start Date, Assignment Start Date or both, of the future assignment (C1) if the Calculation End Date, Assignment End Date, or both, of the new temporary assignment record (B2) does not equal the previous temporary assignment record (B1).
Related compensation entries exist
If there are related compensation entries for the temporary assignment, Sparkrock 365 prevents the change temporary transfer HR request from being reversed.
Scheduled tasks
To accommodate future dates on temporary assignment transfers, Sparkrock 365 uses scheduled tasks that run on the respective Effective Date and Calculation End Date. When a change temporary assignment transfer HR request is processed and there is a change to the Effective Date, Calculation End Date, or both, Sparkrock 365 updates the related scheduled tasks to use the new date or dates.
If the change temporary assignment transfer HR request is reversed, Sparkrock 365 reverts the changes to the scheduled tasks. The scheduled tasks will be the same as before the change temporary assignment transfer HR request was processed.
Learn more
To learn more about this feature, go to Change a temporary assignment transfer.
Transfer an employee who is on leave to a new position
This release introduces enhancements to support transferring or temporarily transferring employees who are on leave to a new position.
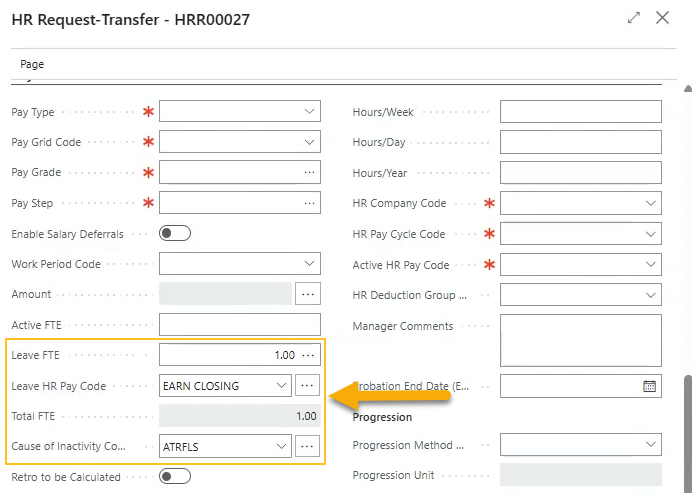
To support this feature, this release introduces the following fields on the HR Request-Transfer page:
- Leave FTE: Specifies the proportion of work hours that are allocated to the leave.
- Leave HR Pay Code: Specifies the HR pay code that is associated with the leave.
- Total FTE: Specifies the sum of the Active FTE and Leave FTE.
- Cause of Inactivity Code: Specifies the cause of inactivity code that represents the reason for the leave.
When a leave assignment is selected on a transfer or temporary transfer HR request, Sparkrock 365 automatically updates or populates related fields such as the following based on that assignment:
- Active FTE
- Leave FTE
- Hours/Day
- Hours/Week
- Hours/Year
- Grounds for Termination Code
As required, users can edit the following fields:
- Cause of Inactivity
- Leave FTE
- Leave HR Pay Code
- Leave Hours/Week
When the HR request is processed, Sparkrock 365 copies the values for these fields to the new assignment. When processing the return from a temporary assignment, Sparkrock 365 restores the assignment details to match the original leave assignment.
If the HR request is reversed, the new assignment that was created as part of the transfer or temporary transfer is cancelled. The leave related fields are retained on that assignment.
The following fields on the original assignment are retained or restored:
- Leave FTE
- Leave HR Pay Code
- Total FTE
- Cause of Inactivity Code
- Cause of Inactivity
- Leave Hours/Week
To learn more, go to Transfer employees to new assignments or Transfer an employee temporarily to a different assignment.
Control duplicate email address handling for new hire and rehire HR requests
This release introduces the capability for you to control how Sparkrock 365 handles duplicate email addresses during new hire and rehire HR request processing. You can configure Sparkrock 365 to append a trailing number to the duplicate email address or display an error message and prevent the request from being processed.
To support this configuration, a Duplicate Emails field has been added to the Email FastTab on the Advanced HR Setup page.
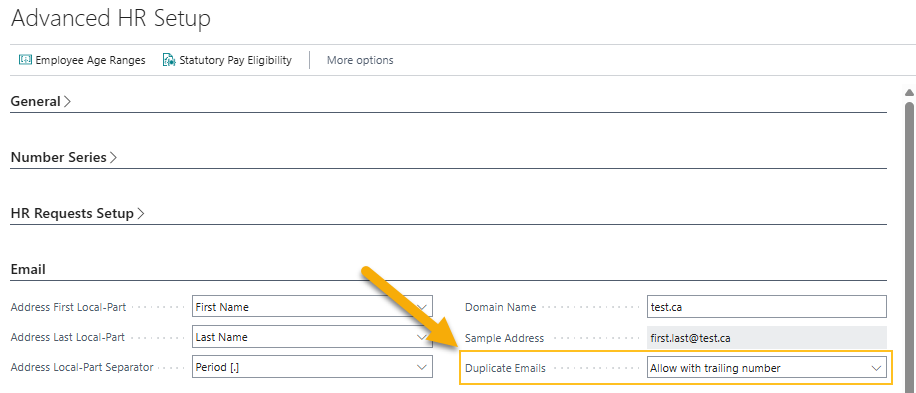
The available options are:
- Allow with trailing number : If a matching email address exists, such as jsmith@abc.com, Sparkrock 365 appends a number before the @ symbol. For example, the resulting address is jsmith1@abc.com.
- Do not allow : If a matching email address exists, Sparkrock 365 displays an error and prevents the HR request from being processed.
To learn more, go to Hire or rehire employees.
Experience FTE for substitute positions is now automatically set to 1.00 on the Employee Experience Worksheet page
To reduce manual input and ensure accurate seniority and experience calculations, this release introduces changes to the load lines process on the Employee Experience Worksheet page.
Now, when you load lines for substitute positions, Experience FTE is automatically set to 1.00.

Tip
Tip:
Substitute positions are defined on the Advanced HR Setup page, on the Employee Experience Setup FastTab, in the Substitute Positions field.
To learn more, go to Employee experience worksheet processing for substitute position assignments.
Define a maximum number of days to transfer for cause of absence code balances
This release adds a Max. Days to Transfer field to the Attendance Plans FastTab on the Advanced HR Setup page. Previously, the maximum was fixed at 10 days and could not be changed. The new field provides you with more flexibility and control. The default value remains 10.
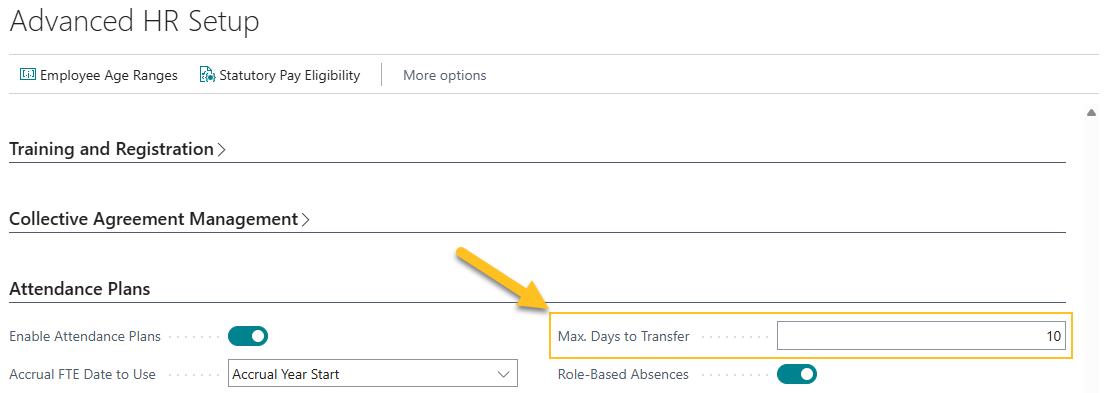
The Max. Days to Transfer field specifies the maximum number of days that can be transferred between causes of absence using the Transfer action on the Employee Attendance Plan Lines FastTab of the Employee Attendance Plan page. This setting does not affect any carry forward and sequencing rules that are configured.
To determine the hours for a day, Sparkrock 365 uses the Hours/Day value from the Timekeeping FastTab on the related HR Employee Assignment Card page.
If you try to transfer more than the maximum number of days, Sparkrock 365 does not display an error. Instead, only the specified maximum number of hours are transferred.
Example
Consider the following scenario:
- On the Employee Attendance Plan page, Cause of Absence Code SICK FULL has a balance of 100.00 and SL 100 has a balance of 0.00.
- On the Advanced HR Setup page, the Max. Days to Transfer field is set to 2.
- On the HR Employee Assignment Card page, the Hours/Day field has a value of 7.5.
- On the Absence Balance Transfer page, a transfer is processed from cause of absence code SICK to SL 100 where Hours to Transfer is set to 20.00.
For this scenario, Sparkrock 365 transfers 15.00 hours (2 x 7.5) from SICK FULL to SL 100.
To learn more, go to Employee attendance plan details and Set up attendance plan details on the Advanced HR Setup page.
T4 Employment Code enhancements
This release ensures that the T4 Employment Code field remains in sync between the HR Company Card and Payroll Company Information pages.
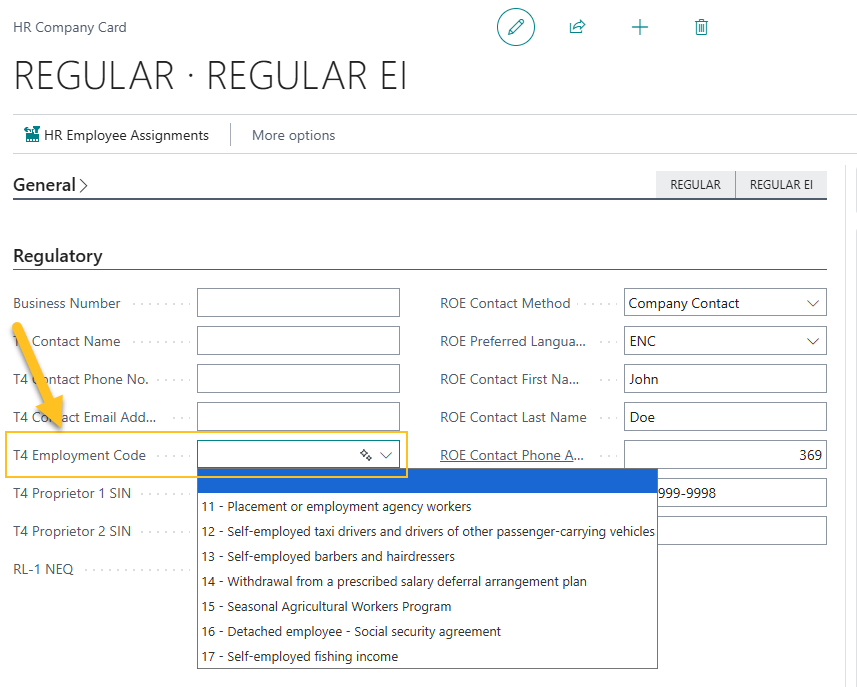
On the HR Company Card page, the T4 Employment Code field now includes the same options as the field on the Payroll Company Information page. The default option is blank.
Note
Note:
This release deletes any values that existed before the upgrade.
T4 Employment Code synchronization enhancements
This release enhances the HR Companies synchronization to keep the T4 Employment Code field in sync between the HR Company Card and Payroll Company Information pages.
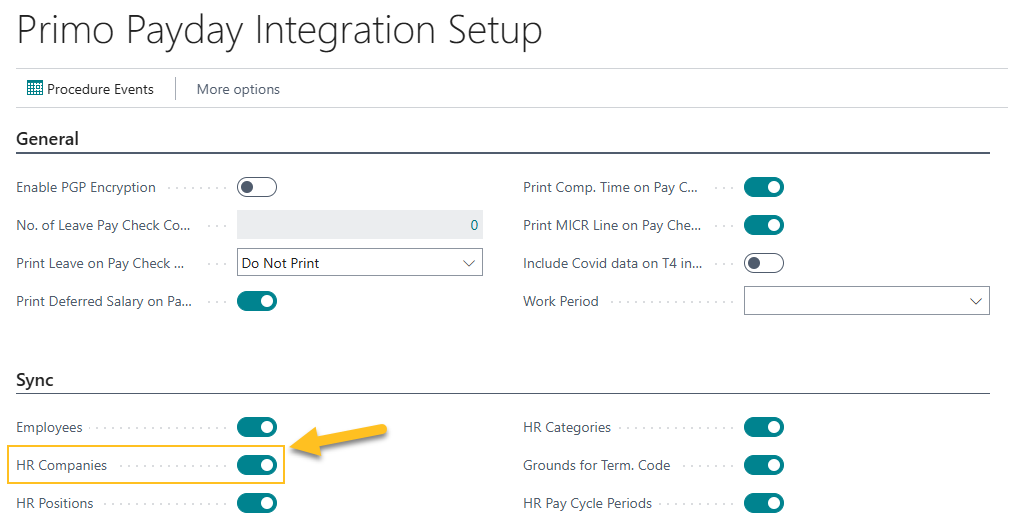
When HR Companies is turned on, changes to the T4 Employment Code field on the HR Company Card page are synchronized with the Payroll Company Information page.
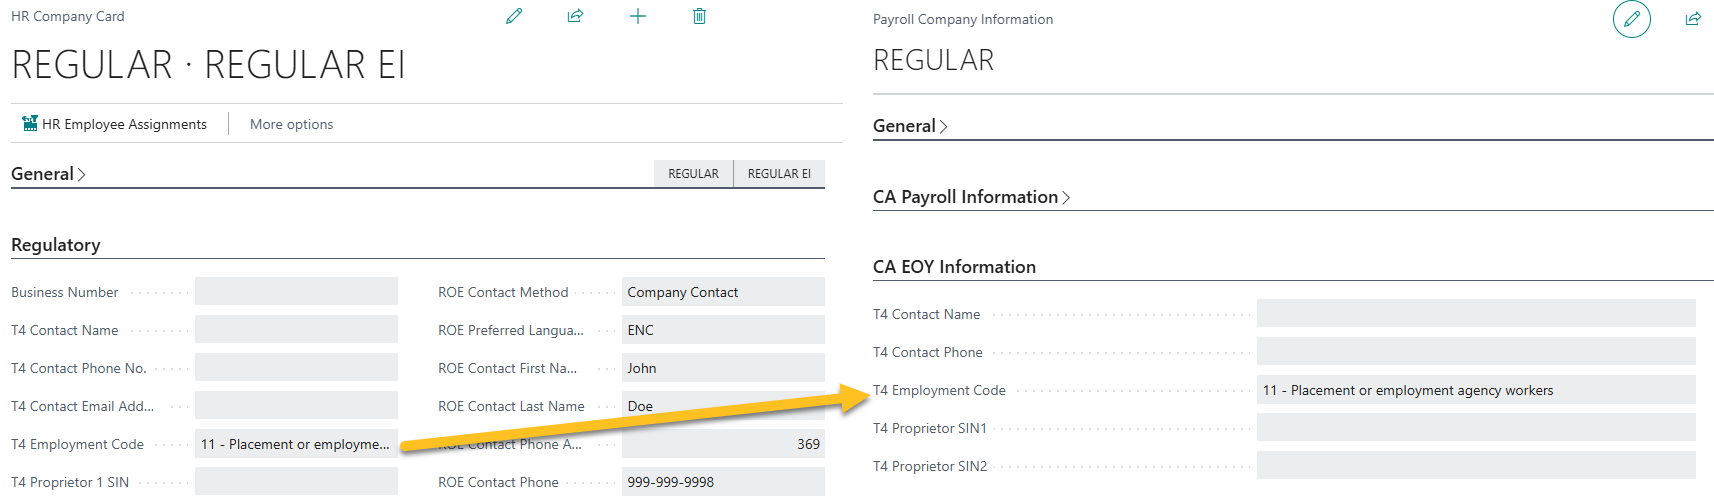
Synchronization is one-way. Updates flow from the HR Company Card page to the Payroll Company Information page. Updates made directly on the Payroll Company Information page are not reflected on the HR Company Card page.
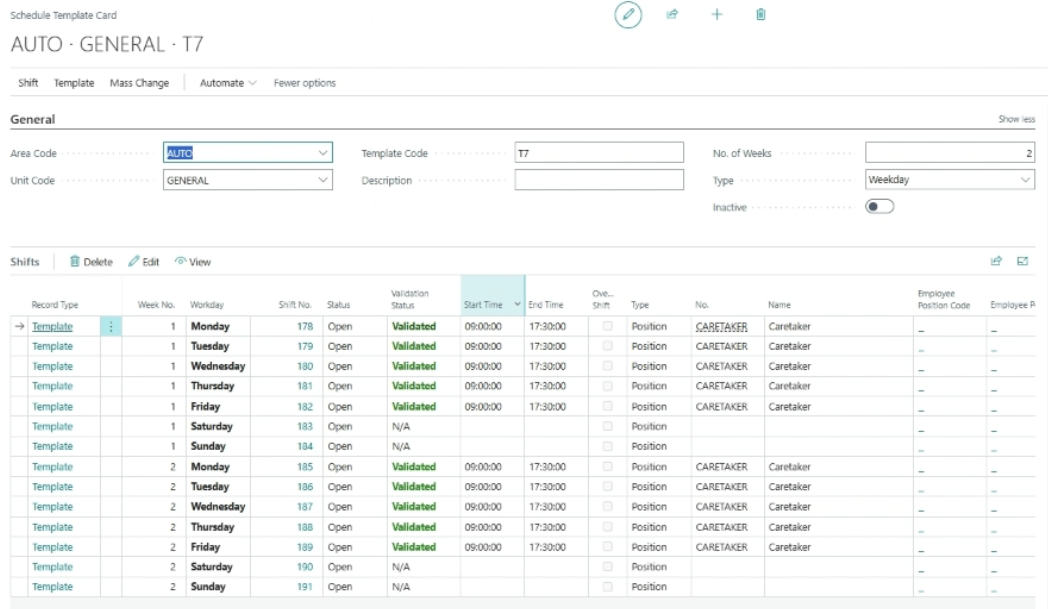
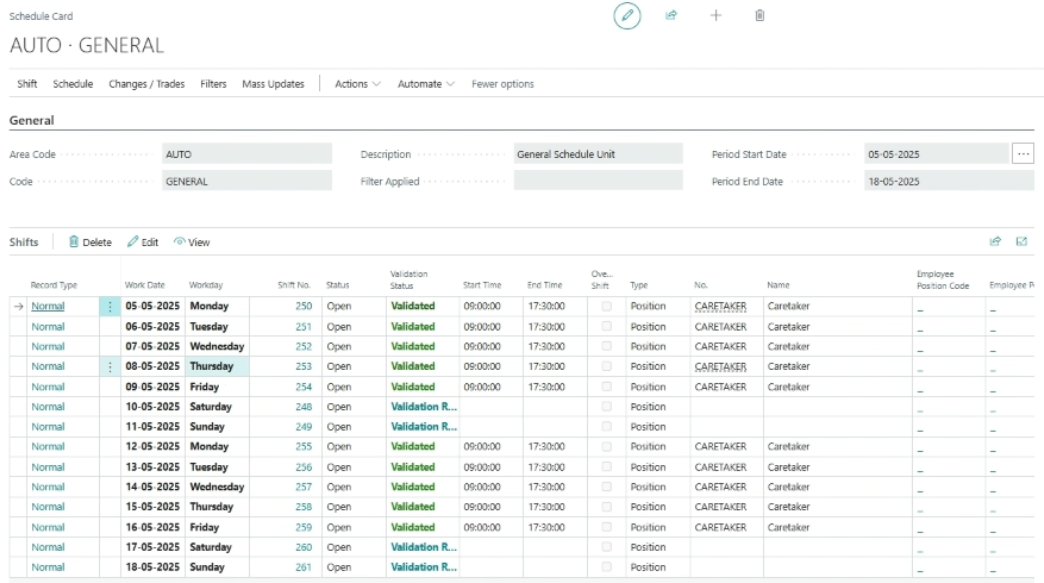
Define the week start day as Monday on schedule templates
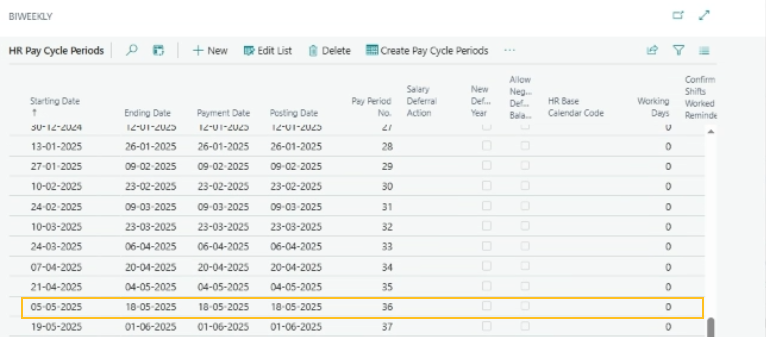
Before this release, when the Type was set to Weekday on the Schedule Template Card page, Sparkrock 365 did not create shifts properly if the HR pay cycle period did not run from Sunday to Saturday. For example, if the HR pay cycle period ran from Monday to Sunday, and Friday and Saturday were non-working days, Sparkrock 365 failed to create shifts for the first Monday to Thursday.
To resolve this issue, this release adds a Week Start Day field on the Schedule Setup page.
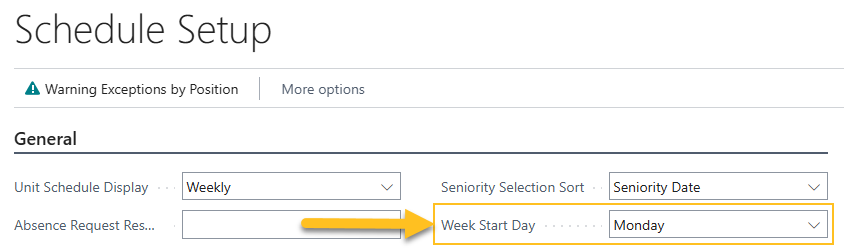
The Week Start Day field specifies the starting day of the week that is used in schedule templates to generate shifts when the Type is set to Weekday.
Now, when Week Start Day is set to Monday and the HR pay cycle period runs from Monday to Sunday, Sparkrock 365 creates shifts as expected.
Note
Note:
If the HR pay cycle period does not run from Sunday to Saturday or Monday to Sunday, set the Type to Rotation on the Schedule Template Card page to ensure shifts are created correctly.
To learn more about schedule setup and schedule templates, go to Schedule setup and Set up schedule templates.
Known problems
The following sections include information about the known problems in version 26.1 for Sparkrock 365 2025 release wave 1.
Custom Power BI reports settings change
Custom Power BI reports may be unable to connect to the Microsoft platform due to a settings configuration issue.
Workaround
To restore the connection, update your Power BI settings.
The following video shows how to apply the required settings change.
Documents Factbox does not display the Upload files option for limited access users
The Documents FactBox does not display the Upload files option for limited access users.
Workaround
To upload files when you are a limited access user, perform the following steps:
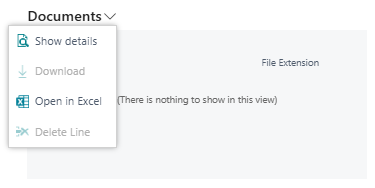
In the Documents FactBox, choose Show Details.
The Attached Documents page opens.
Depending on whether there are existing attachments, perform one of the following steps:
No existing attachments: In the Attachment column, choose Attach File(s)….
Existing attachments: To add a line, on the action bar, choose New, and then choose Attach File(s)….
An Attach a document dialog box appears.
Drop a file in the box. Alternatively, browse to the file that you want to attach, and then choose Open.
PD-6052
Error: The Sustainability Setup does not exist. Identification fields and values: Primary Keys=''
Users may encounter the following error:
The Sustainability Setup does not exist. Identification fields and values: Primary Keys=''
Workaround
To resolve this problem, perform the following actions:
Open the Sustainability Setup page. To open the page, choose
 , enter sustainability setup, and then choose the related link.
Ensure that affected users have the permission sets that are listed in the table below.
Permission Set Name Type Extension Name SUSTAINABILITY, ADMIN Sustainability - Admin System Sustainability SUSTAINABILITY, EDIT Sustainability - Edit System Sustainability SUSTAINABILITY, READ Sustainability - Read System Sustainability To learn more, go to Assign permissions to users and groups.
mySparkrock users cannot view data sets
mySparkrock users cannot view data sets because the MYSPARKROCK user is missing permission sets.
Workaround
To resolve this problem, perform the following steps:
In Sparkrock 365, choose
, enter microsoft entra applications, and then choose the related link.The Microsoft Entra Applications page opens.
Select the row that has a Description of mySparkrock, and then on the action bar, choose Manage > Edit.
The Microsoft Entra Application Card page opens.
On the User Permission Sets FastTab, add the records that appear in the following table.
Permission Set Name Type Extension Name SPKFA ANALYSIS, EDIT SR365 Create Fin. Analysis System Financial Analysis SPKFA ANALYSIS, VIEW SR365 View Financial Analysis System Financial Analysis SPKFA DATA SET, EDIT SR365 Create data sets System Financial Analysis SPKFA DATA SET, VIEW SR365 View data sets System Financial Analysis To add a record, choose Manage > New Line, and then specify values for fields as required.
Connectivity issue with APIs and other services or integrations
After updating to this release, you may experience connectivity issues with APIs and other services or integrations.
The following list includes examples of how connectivity issues may become apparent:
API errors
Power BI dashboards may no longer work correctly
Integrations may have trouble communicating with Sparkrock 365
Workaround
To resolve this problem, you must uninstall, and then install the respective extension. To uninstall, and then install the extension, perform the following steps:
In Sparkrock 365, choose
, enter extension management, and then choose the related link.The Extension Management page opens.
In Search, enter api.
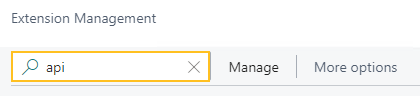
A list of the API extensions are displayed, for example, PS Finance APIs.
You may have to change your view so that you can view the version number for any extension. To view the version number for all extensions, choose
 , and then choose List.
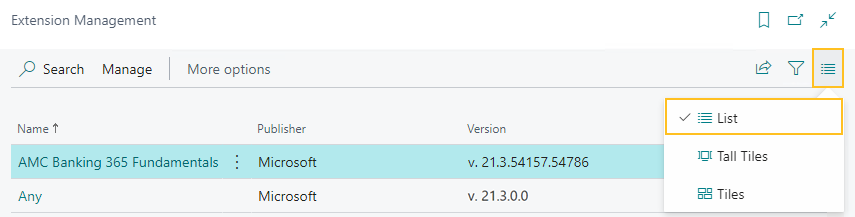
For each extension that does not have a version that starts with v.25.3 and Is Installed is selected, perform the following steps to uninstall, and then install the extension:
- Select the extension that you want to update, and then on the action bar, choose Manage > Uninstall.
The Extension Uninstallation page opens. - Choose Uninstall.
A dialog box appears and displays text that indicates the extension was successfully uninstalled. - To close the dialog box, choose OK.
- Select the extension that you want to update, and then on the action bar, choose Manage > Install.
The Extension Installation page opens. - Choose Next.
The page refreshes and you are requested to review extension information before installation. - To proceed, turn on I accept the terms and conditions.
- Choose Install.
The extension is updated to the latest version.
- Select the extension that you want to update, and then on the action bar, choose Manage > Uninstall.
Alternate workaround
It is possible that custom web services may have been deleted during or after the update.
To resolve this problem, you must copy and paste the web services lines from a sandbox environment into your production environment.
To copy and paste one or more web services lines, perform the following steps:
Open a Sparkrock 365 sandbox environment that was created before the update or create a sandbox environment from a backup.
Select Search (Alt+Q)
, enter web services, and then choose the related link.The Web Services page opens.
Copy the information for the one or more lines that you want to copy.
In your Sparkrock 365 production environment, choose
, enter web services, and then choose the related link.The Web Services page opens.
Paste the information for the one or more lines that you copied.
Re-open button is missing for a submitted expense claim in mySparkrock
The Re-open button may disappear from a submitted expense claim in mySparkrock. This issue occurs when the MYSPARKROCK user is not set up in Sparkrock 365, on the User Setup page.
Workaround
Perform the following steps:
Select Search (Alt+Q)
, enter user setup, and then choose the related link.The User Setup page opens.
On the action bar, choose New.
A new row appears.
In User ID, specify MYSPARKROCK.
Assign all permissions to this specific user.
For example, select the checkboxes for the following fields:
- A/P Batch Admin
- Allow A/P Batch Creation
- Allow A/P Batch Auditing
- Allow A/P Batch Deletion
- Allow User to Access Compensation Data
- HR Request Reversal Allowed
Electronic Funds Transfer (EFT) errors
The following setup scenarios may result in an Electronic Funds Transfer (EFT) error:
On the Countries/Regions page, ISO Code and ISO Numeric Code are blank, and on the Field Mapping page of the respective data exchange definition, on the Bank No. row, the Optional checkbox is selected.
For this scenario, Sparkrock 365 may generate an EFT file successfully, but the bank may reject the file.
On the Countries/Regions page, ISO Code and ISO Numeric Code are blank, and on the Field Mapping page of the respective data exchange definition, on the Bank No. row, the Optional checkbox is clear.
For this scenario, when you try to generate an Electronic Funds Transfer (EFT) bank import file, Sparkrock 365 may display an error, for example:
Fin. Institution Transit No. must have a value in ACH RB Detail: Data Exch. Entry No.=3, Data Exch. Line Def Code=DETAIL. It cannot be zero or empty.
Workaround
On the Countries/Regions page, ensure that you have a value specified in ISO Code and ISO Numeric Code.
For Canadian banks, specify the following:
- In ISO Code, specify CA.
- In ISO Number Code, specify 124.
For United States of America banks, specify the following:
- In ISO Code, specify US.
- In ISO Number Code, specify 840.
Transaction cannot be completed because it will cause inconsistencies in the G/L Entry table error
When you try to post a purchase invoice for a vendor that has a foreign trade Currency Code set up, for example, USD, you may receive the following error:
This transaction cannot be completed because it will cause inconsistencies in the G/L Entry table. Check where and how the CONSISTENT function is used in the transaction to find the reason for the error.
Contact your system administrator.
Tables can be marked as inconsistent during comprehensive tasks, such as posting. This prevents data from being updated incorrectly.
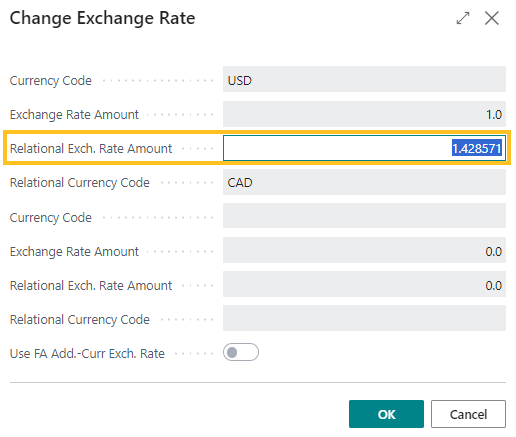
Workaround
On the Change Exchange Rate page for the specific invoice, increase the number of decimal places for the value in the Relational Exch. Rate Amount field, for example, from 1.4286 to 1.428571.
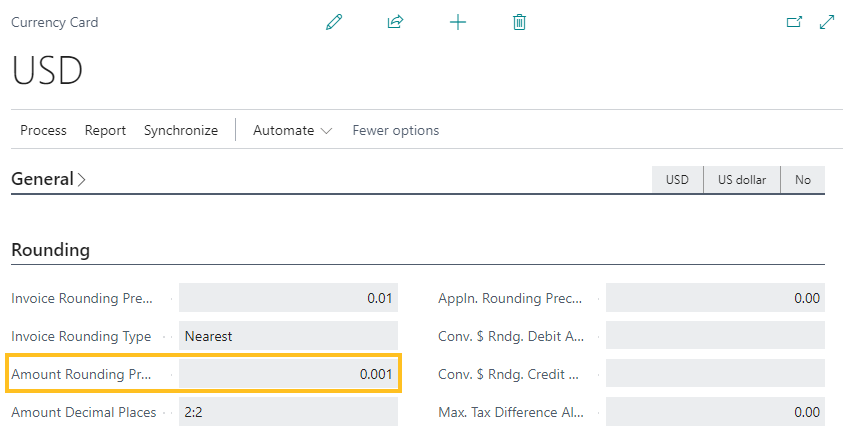
Alternate workaround
On the Currency Card page of the respective currency, increase the number of decimal places for the value in the Amount Rounding Precision field, for example, from 0.01 to 0.001.
Cannot open links in sent emails
When you open a sent email from the Sent Emails Last 30 Days page, and then select the link that appears in the body of the email, Sparkrock 365 becomes unresponsive.
Workaround
Open links in the body of sent emails from Gmail or Outlook, instead of from Sparkrock 365.
Payroll Employee or Payroll Processing pages may fail to open
When using the platform security filters on permission sets, the Payroll Employee page, Payroll Processing page, or both pages may fail to open with a something went wrong error message. This is a limitation of the payroll processing module.
Workaround
Remove the permission sets with security filters from the user who must access these pages.
Related information
New for Sparkrock Impact
Version 26.1 for mySparkrock 2025 release wave 1 release notes
Feedback
To send feedback about this page, select the following link: