Version 22.5 for Sparkrock 365 2023 release wave 1 release notes Published January 25, 2024
These release notes include supplemental information about version 22.5 for Sparkrock 365 2023 release wave 1.
Video
The following video includes information about the new features and enhancements in version 22.5 for Sparkrock 365 2023 release wave 1.
Highlights
The following sections highlight the major accomplishments in this release.
Specify a calculation end date on a full return to work HR request
Update a return assignment when you process a leave change HR request
Change the leave and return details for a processed leave and return HR request
Preferred first name is now automatically populated on a new hire HR request
Automatically update the employee's status when processing an HR request
Payroll event codes 013 has been added for more payroll flexibility
Dimension mapping enhancements for HR deduction codes with the Type of Earning
New features and changes
Version 22.5 for Sparkrock 365 2023 release wave 1 introduces exciting new features and enhancements to existing functionality.
Microsoft Dynamics 365 Business Central 22.5
The base Microsoft Dynamics 365 Business Central platform that powers Sparkrock 365, has been updated from 22.4 to 22.5.
For more information about Microsoft Dynamics 365 Business Central releases, select the following links:
What's new and planned for Dynamics 365 Business Central
Update 22.5 for Microsoft Dynamics 365 Business Central online 2023 release wave 1
Update 22.4 for Microsoft Dynamics 365 Business Central online 2023 release wave 1
Update 22.3 for Microsoft Dynamics 365 Business Central online 2023 release wave 1
Update 22.2 for Microsoft Dynamics 365 Business Central online 2023 release wave 1
Update 22.1 for Microsoft Dynamics 365 Business Central online 2023 release wave 1
To view a detailed list of cumulative platform fixes that are available from Microsoft, see Update history for Microsoft Dynamics 365 Business Central.
All users can view approval entries for documents
Before this release, only approval requesters, approvers, and approval administrators could view approval entries for documents. Starting with this release, you can set up Sparkrock 365 so that all users can view approval entries for documents.
To support this feature, on the General Ledger Setup page, this release introduces a View Approval Entries field.
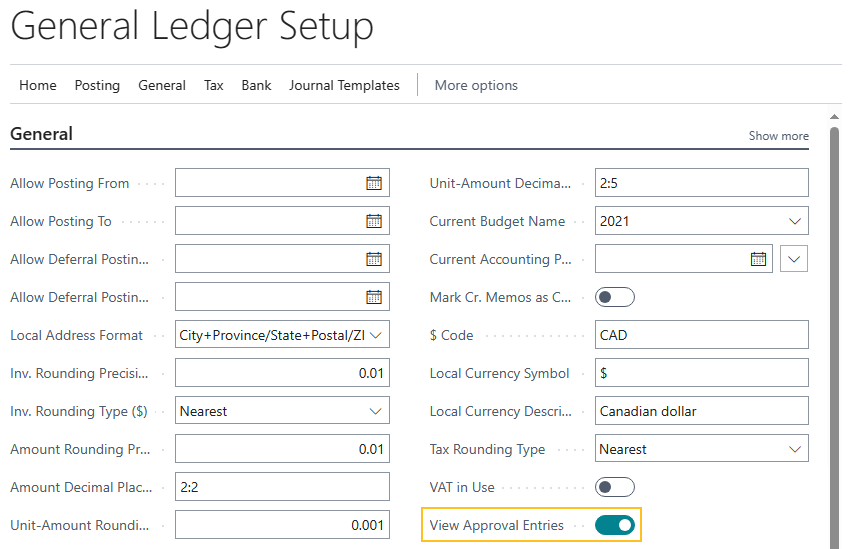
To set up Sparkrock 365 so that all users can view approval entries for documents, turn on View Approval Entries. Alternatively, to have Sparkrock 365 behave the same as previous release, ensure that View Approval Entries is turned off.
New Financial Analysis extension
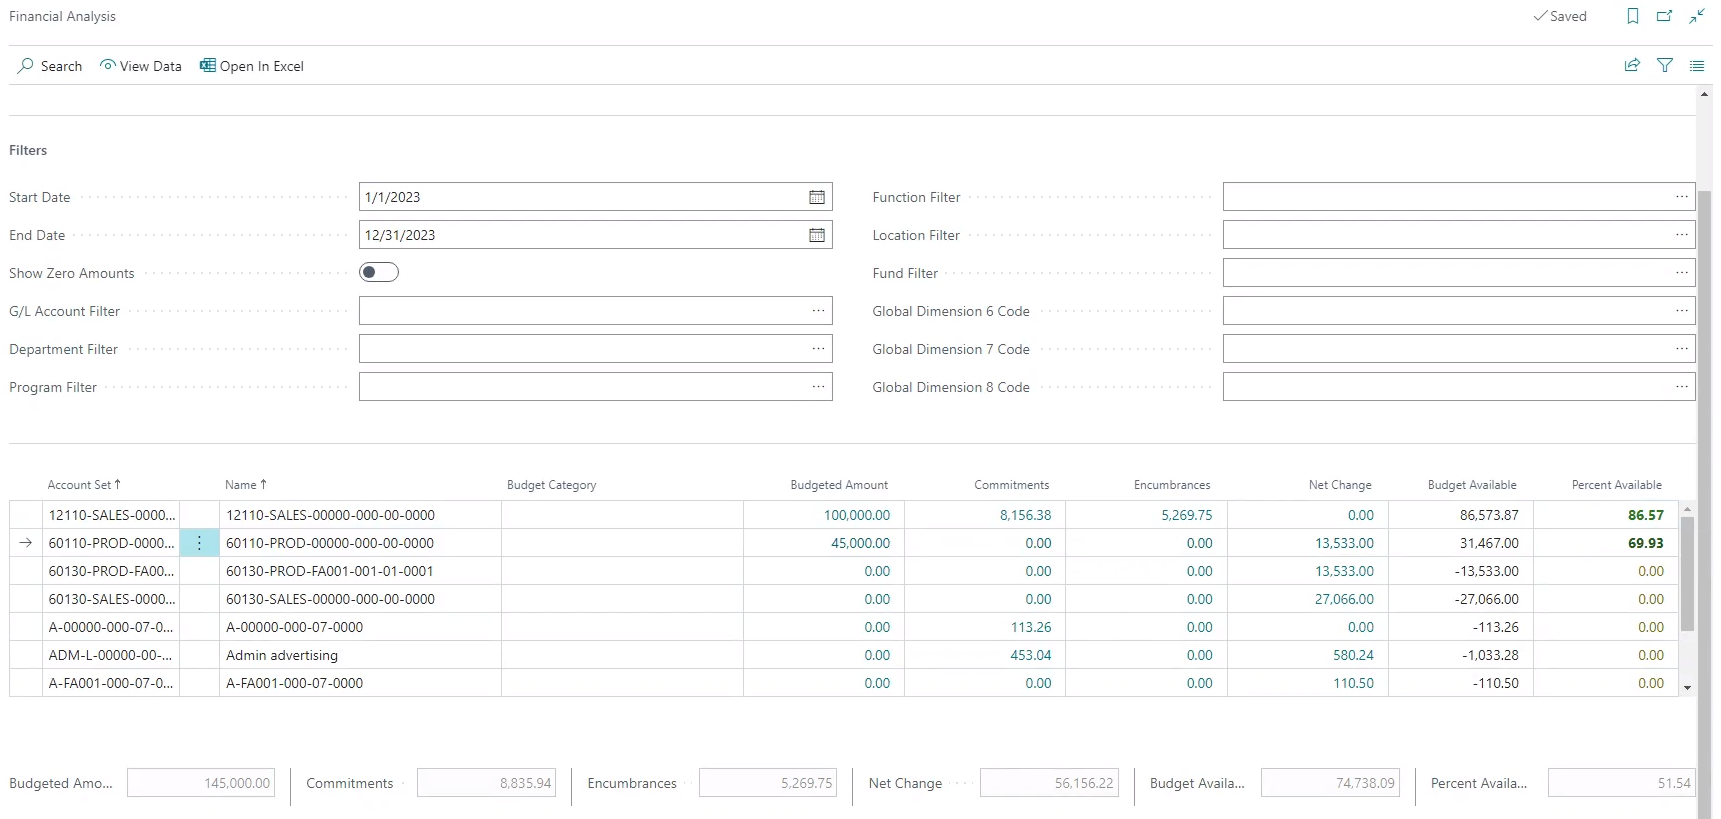
This release introduces a Financial Analysis extension that is available to all customers. This new extension replaces the professional services Financial Analysis extension that was only available for specific customers. For more information about update considerations, see Update considerations.
The new Financial Analysis extension provides the capability for you to compare in real-time budget versus actual financial information. You can view variances or differences, and then drill down to view the underlying records.
Important
Important:
To eliminate the need to support multiple financial analysis solutions, Sparkrock plans to retire the Reporting and Analytics extension in 2025. Sparkrock will communicate more details regarding timing as soon as that information becomes available. Sparkrock recommends that you start using the Financial Analysis extension before 2025.
It is recommended that the following financial analysis permission sets be assigned to users based on their responsibilities.
| Permission Set | Name | Type | Extension Name |
|---|---|---|---|
| SPKFA ANALYSIS, EDIT | SR365 Create Fin. Analysis | System | Financial Analysis |
| SPKFA ANALYSIS, VIEW | SR365 View Financial Analysis | System | Financial Analysis |
| SPKFA DATA SET, EDIT | SR365 Create data sets | System | Financial Analysis |
| SPKFA DATA SET, VIEW | SR365 View data sets | System | Financial Analysis |
For more information about the Financial Analysis extension, see Financial Analysis.
Add an attachment after an approver has approved a purchase requisition or payment request
Some customers require the capability to add an attachment to a purchase requisition or payment request after an approver has approved the document. To support these customers, this release introduces on the Purchases & Payables Setup page, an Always Allow Attachments field.
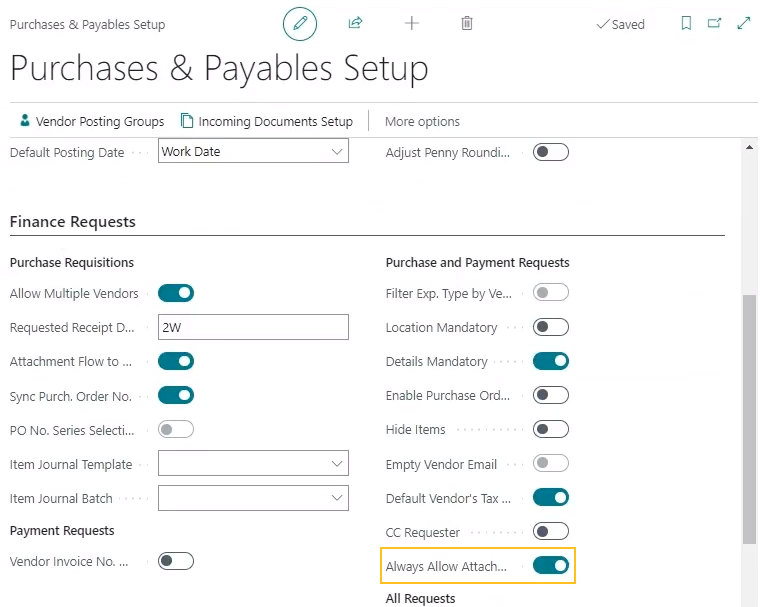
When the Always Allow Attachments field is turned on, attachments can be added to a purchase requisition or payment request regardless of the status. Alternatively, when Always Allow Attachments field is turned off and a purchase requisition or payment request has a Status of Approved, Sparkrock 365 behaves the same as previous releases and prevents a user from adding an attachment.
T4A liable information on posted purchase invoices
For Canadian customers, to let you know whether a posted purchase invoice is T4A liable, this release adds a T4A Liable field on the Lines and Invoice Details FastTabs of the Posted Purchase Invoice page.
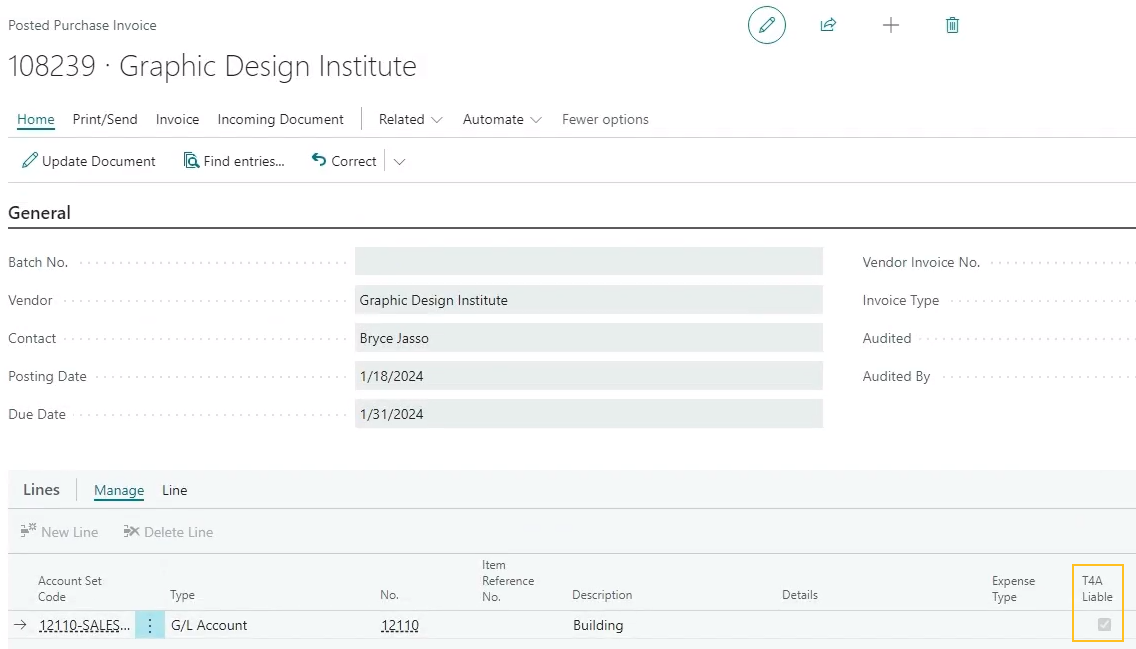
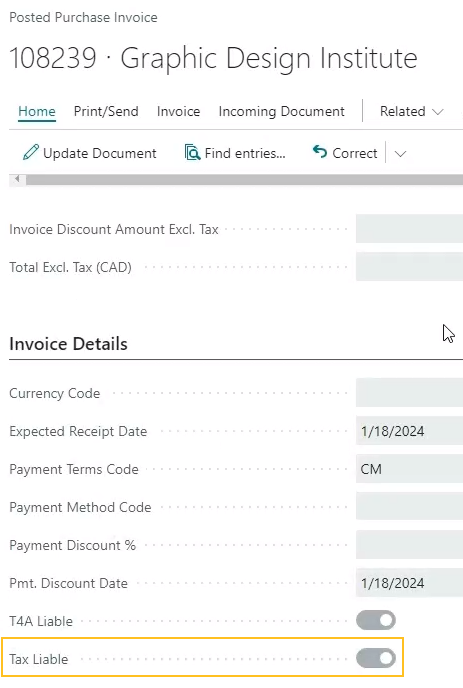
When T4A Liable is turned on, the posted purchase invoice is T4A liable. Alternatively, when T4A Liable is turned off, the posted purchase invoice is not T4A liable.
Absence request payouts for salaried employees
Some organizations choose to report on pay stubs absence hours or earnings that salaried employees take separately from regular earnings. To accommodate instances where a salaried employee exceeds their allocated entitlements for the year and takes an absence that is paid at a reduced rate or is unpaid, this release introduces a new Salary Hourly Rate field and changes to the compensation journal.
New Salary Hourly Rate field
To help with payouts of absences or banked balances for salaried employees, on the HR Employee Assignment Card page, this release introduces a Salary Hourly Rate field.
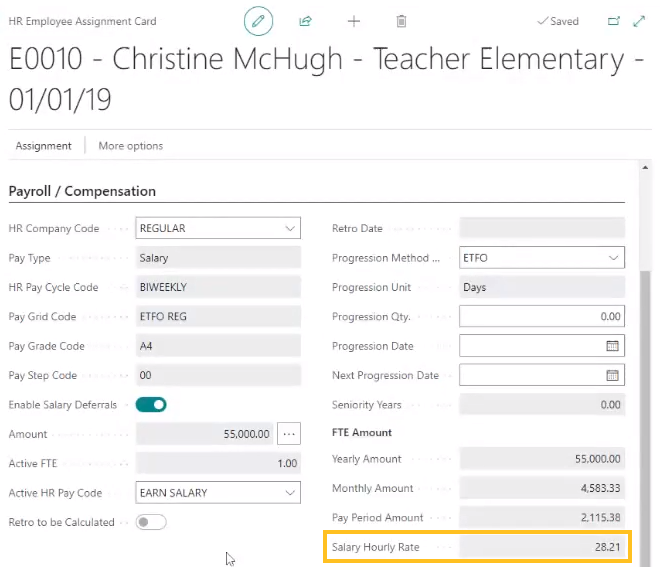
Sparkrock 365 automatically calculates the value of the Salary Hourly Rate field.
To determine the value of the Salary Hourly Rate field, Sparkrock 365 uses the following calculation:
Salary Hourly Rate = (Annual Salary on Amount field x Active FTE x Pay Grid Pay Period Adj. Factor x Pay Period Frequency) / Hours per Year
Example
Consider the following scenario:
- A part-time employee records an absence of 7.5 hours.
- The employee has a FTE of 1.0.
- The employee has a salary of $55,000.
- The number of pay periods is 26.
- The pay period adjustment factor is 1 / 26 = 0.0384615385.
- The number of hours per week are 37.5.
- The hours per year are 1950.
To determine the payout for the absence, Sparkrock 365 performs the following calculations:
Salary Hourly Rate:
($55,000 x 1.0 x 0.0384615385 x 26) / 1950 = $28.205128233
Absence payout:
$28.205128233 x 7.5 = $211.54
Compensation journal changes for absence request payouts for salaried employees
Starting with this release, absence requests for salaried employees now appear in the compensation journal.
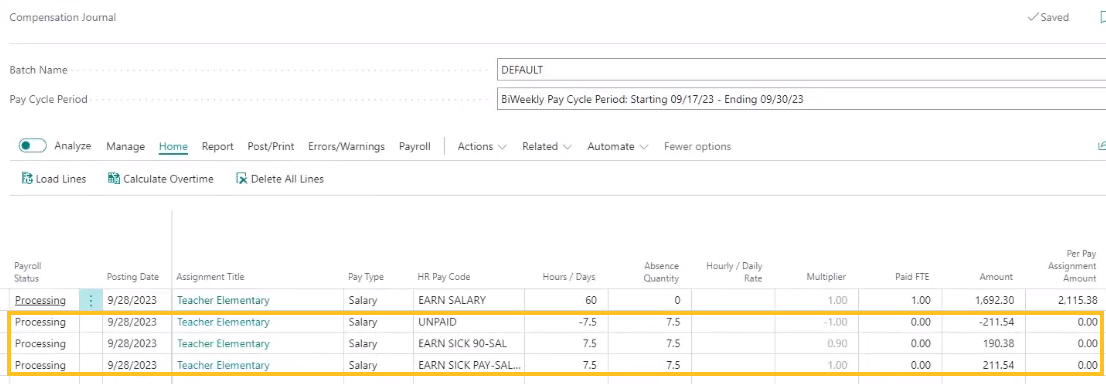
The values for Amount and Days Worked in Pay Period are adjusted accordingly for the absence requests.
Example
Consider the following scenario:
- An employee earns a salary Amount of $55,000.
- The Active FTE for the employee is 1.00.
- The employee has an HR Pay Cycle Code of BIWEEKLY.
- The Pay Period Amount is $2,115.38.
- The Salary Hourly Rate is $28.205128233.
- The employee works 7.5 hours a day and 37.5 hours per week.
- The following HR pay codes are setup:
Code Description HR Pay Code Multiplier EARN SALARY Earn Salary 1.00 UNPAID Unpaid Sick Leave -1.00 EARN SICK 90-SAL Sick Leave Paid at 90% of Salary 0.90 EARN SICK PAY-SAL Sick Leave Paid at 100% of Salary 1.00
If this employee had 3 absences in the pay period, one for each of the HR pay codes, the lines in the compensation journal would appear as described in the following table.
| HR Pay Code | Hours / Days | Absence Quantity | Multiplier | Paid FTE | Amount | Per Pay Assignment Amount | HR Pay Cycle | No. of Days in Pay Period | Days Worked in Pay Period |
|---|---|---|---|---|---|---|---|---|---|
| EARN SALARY | 60 | 0 | 1.00 | 1.00 | 1,692.30 | 2,115.38 | BIWEEKLY | 10 | 7 |
| UNPAID | -7.5 | 7.5 | -1.00 | 0.00 | -211.54 | 0.00 | BIWEEKLY | 0 | 0 |
| EARN SICK 90-SAL | 7.5 | 7.5 | 0.90 | 0.00 | 190.38 | 0.00 | BIWEEKLY | 0 | 0 |
| EARN SICK PAY-SAL | 7.5 | 7.5 | 1.00 | 0.00 | 211.54 | 0.00 | BIWEEKLY | 0 | 0 |
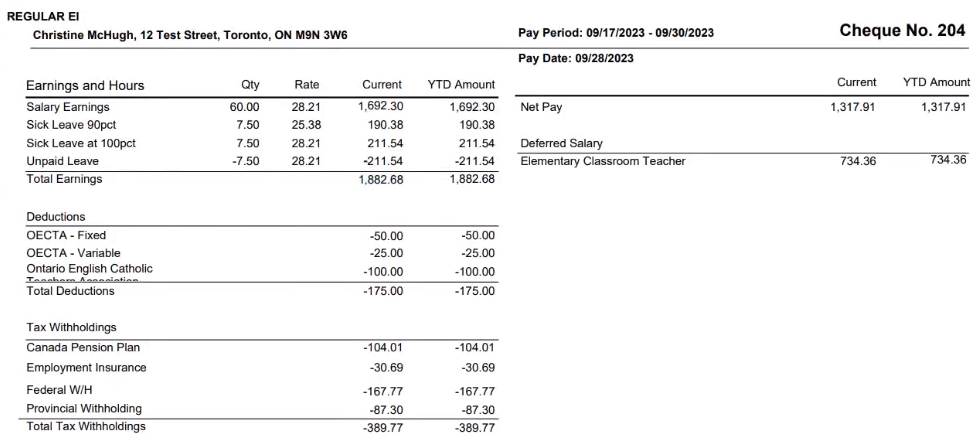
The following screen capture displays a sample pay stub.
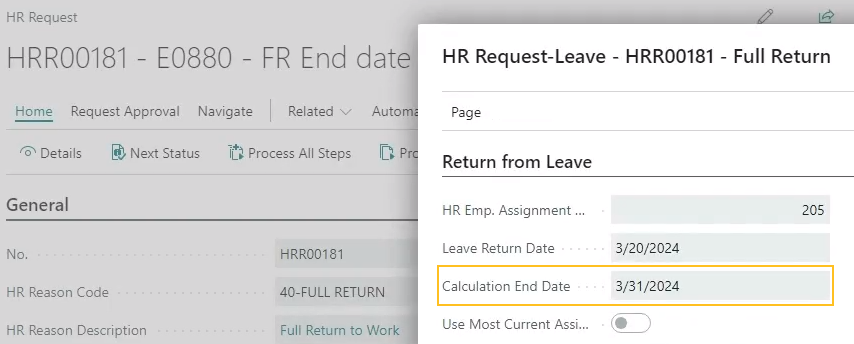
Specify a calculation end date on a full return to work HR request
Starting with this release, you can specify a calculation end date on a full return to work HR request. When the HR request is processed, Sparkrock 365 adds the specified calculation end date from the HR request to the Calculation End Date field on the employee's return to work assignment.
To support this feature, this release adds on the HR Request-Leave - Full Return page, a Calculation End Date field.
For more information, see Return employees to work.
Update a return assignment when you process a leave change HR request
This release introduces the capability for you when processing a leave change HR request to have Sparkrock 365 automatically update the return assignment. For example, while an employee is on leave, you may want to update their payroll information on their leave assignment and automatically have Sparkrock 365 apply those changes to their return assignment.
To support this feature, this release introduces the following changes to Sparkrock 365:
On the HR Request-Leave page, this release adds the Update Return Assignment and Return Assignment Entry No. fields.
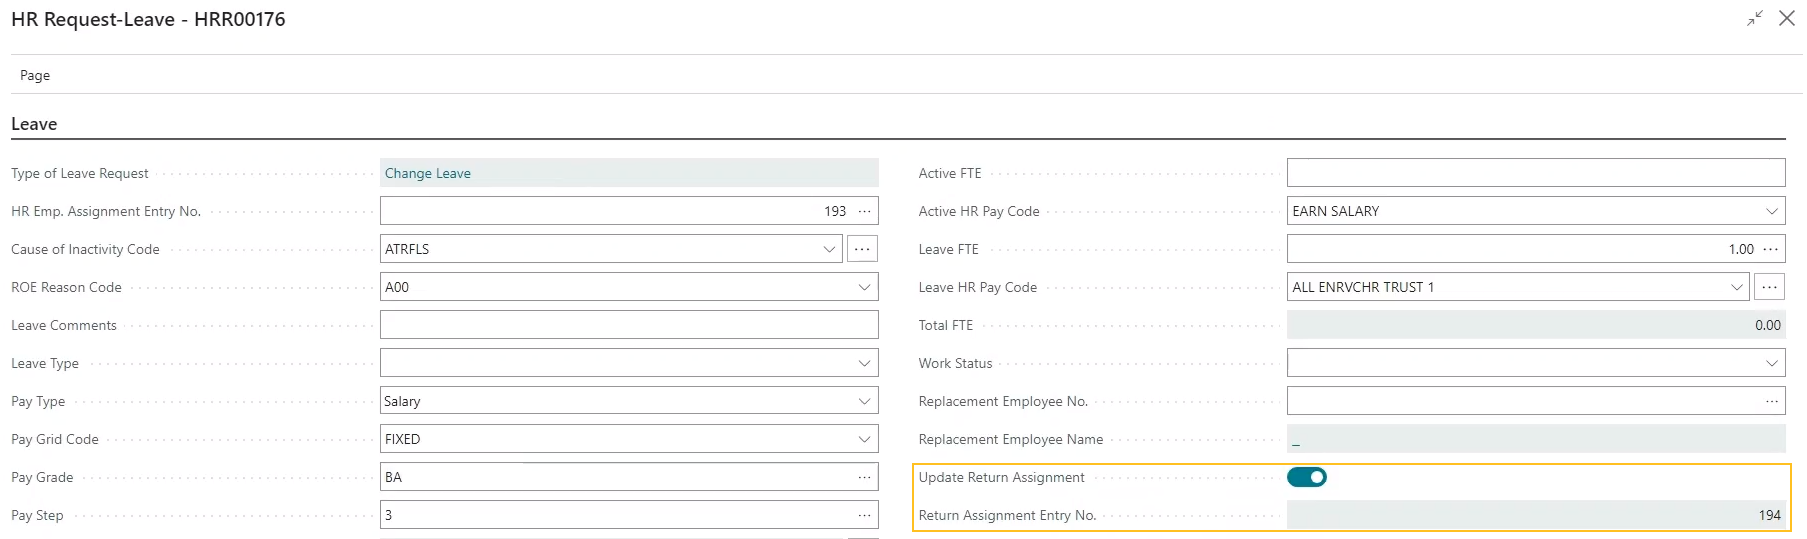
The Update Return Assignment field specifies whether the return assignment is to be updated when a leave change HR request is processed. When the Update Return Assignment field is turned off, Sparkrock 365 behaves the same as previous releases.
The Return Assignment Entry No. field specifies the assignment entry number that is associated with the return to work assignment. Sparkrock 365 automatically populates this field when the Update Return Assignment field is turned on.
On the HR Process Functions page, this release adds the following record.
HR Reason Code HR Function Code HR Step HR Function Description 37-LEAVE CHANGE 63 11 Update future return HR Employee assignment (63) The purpose of this function is to update the active assignment that was created from a previously processed full return or leave and return HR request. When a leave change HR request is processed and the Update Return Assignment field is turned on, Sparkrock 365 cancels the active assignment, and then automatically creates and processes a details change HR request that creates a return assignment with updated data based on the HR request details.
Alternatively, when a leave change HR request is processed and the Update Return Assignment field is turned off, Sparkrock 365 does not perform any additional steps.
In the event that a leave change HR request is reversed where the Update Return Assignment field is turned on, Sparkrock 365 reverses the changes that were processed in the original HR request, including the changes to the return assignment.
For more information, see Change leave details.
View company email information on the Employees page
To provide the capability for you to view the company email information for multiple employees on one page, this release introduces on the Employees page, a Company Email field.

The Company Email field specifies the employee's email address at the company. By default, the Company Emailfield is hidden. To add the field to the Employees page, you can use the personalization feature. For more information about adding a field, see Personalize your workspace.
Sparkrock 365 populates the Company Email field on the Employees page based on the value that is specified in the Company Email field on the respective Employee Card page.
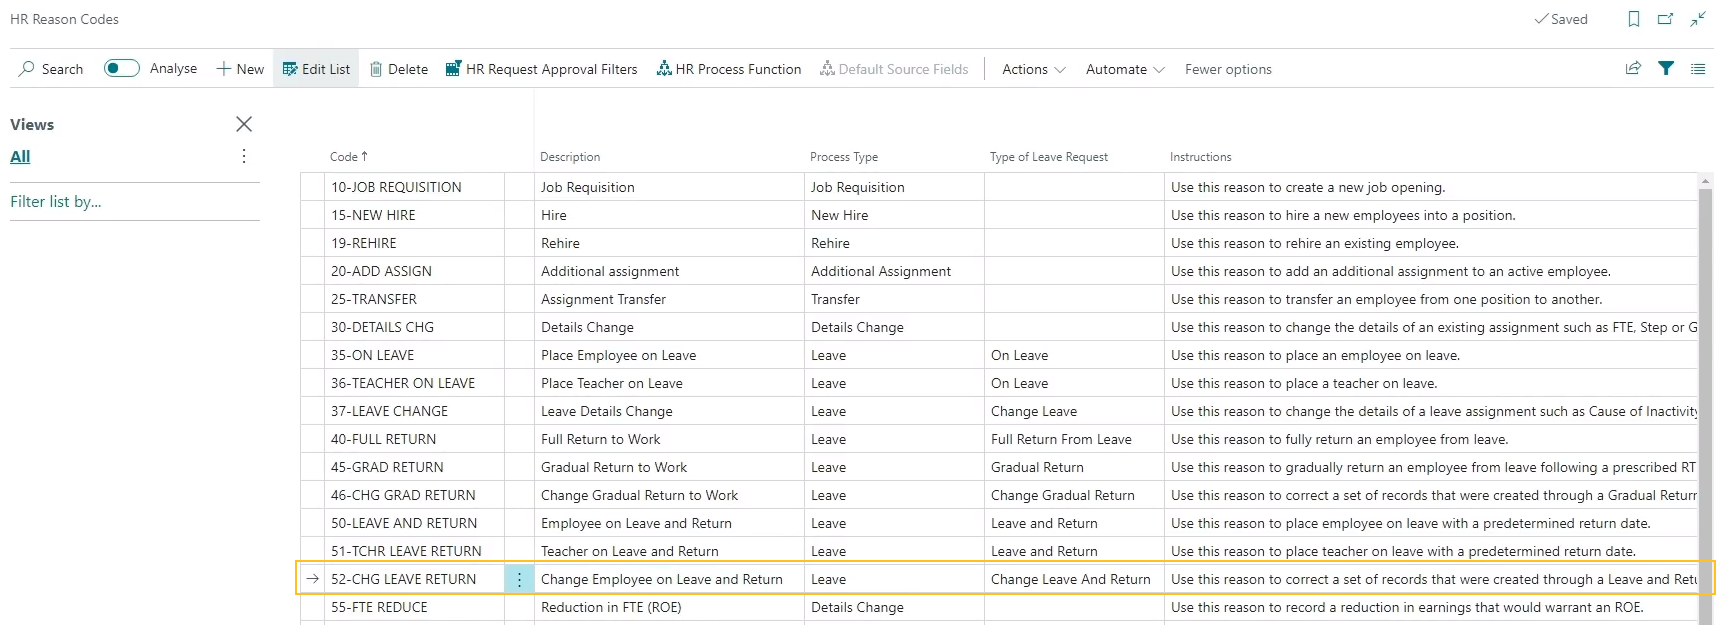
Change the leave and return details for a processed leave and return HR request
Starting with this release, if required, you can change the leave and return details that were created during the processing of a leave and return HR request. To change the details, you can create, and then process a change leave and return HR request.
For example, consider a scenario where you processed an HR request for an employee who is taking a maternity or parental leave. Due to the baby arriving early, you now must adjust the dates on the leave and return assignments. To adjust the dates, you can process a change leave and return HR request.
When you process a change leave and return HR request, Sparkrock 365 cancels the original HR leave and return employee assignments, and then creates leave and return employee assignments with the updated details that you specified in the HR request.
In the event that the change leave and return HR request is reversed, Sparkrock 365 cancels the new leave and return employee assignments, and restores the original HR leave and employee assignments.
To support this feature, this release introduces the following changes to Sparkrock 365:
On the HR Reason Codes page, this release adds the Code of 52-CHG LEAVE RETURN.
On the HR Process Functions page, this release adds the following records for HR requests that have the Process Type of Change Leave And Return.
HR Reason Code HR Function Code HR Step HR Function Description 52-CHG LEAVE RETURN 64 1 Insert Details Change Employee Assignment Entries for Leave and Return (64) 52-CHG LEAVE RETURN 65 2 Set Status to Cancel on Assignment Entries created through Leave and Return (65) 52-CHG LEAVE RETURN 52 3 Update Assignment No. on Schedule Templates (52) 52-CHG LEAVE RETURN 57 4 Recalculate Seniority Hours/Day Value (57) 52-CHG LEAVE RETURN 59 5 Update Employee Benefit(s) (59) 52-CHG LEAVE RETURN 61 7 Update Assignment No. on Time Line Details (61) 52-CHG LEAVE RETURN 46 8 Insert Attendance Plan (46) 52-CHG LEAVE RETURN 62 9 Transfer Emp. Attendance Balances to new Assignment (62) Changes to the HR request processing functionality to support the processing and reversing of change leave and return HR requests.
For more information, see Change leave and return details.
Preferred first name is now automatically populated on a new hire HR request
To save you time when you are filling out the details for a new hire HR request, Sparkrock 365 now automatically populates the Preferred First Name field. To populate the field, Sparkrock 365 uses the value that you specified in the First Name (Legal) field.
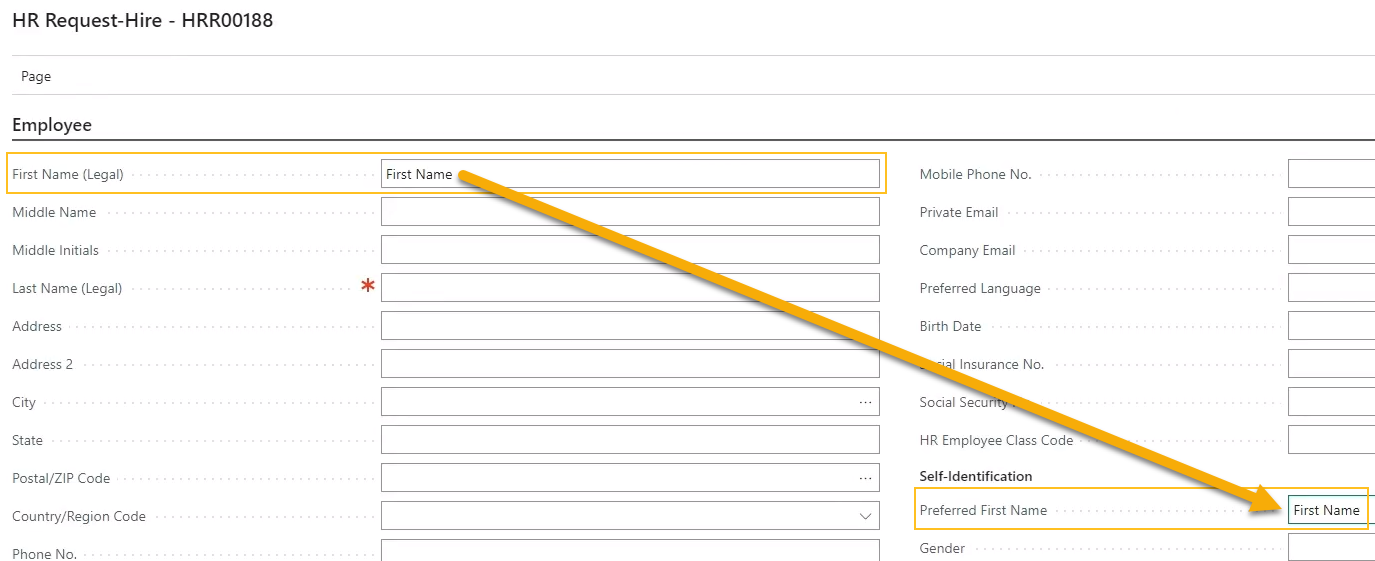
If required, you can change the value of the Preferred First Name field.
If the Preferred First Name field is populated when you make a change to the First Name (Legal) field, Sparkrock 365 does not automatically update the Preferred First Name field.
For more information, see Hire or rehire employees.
Set preferred first name when performing user setup
Starting with this release, you can set Sparkrock 365 to use a user's preferred name when performing the user's setup during processing of a new hire HR request.
To support this feature, this release adds on the Advanced HR Setup page, in the Address First Local-Part field, the new Preferred First Name option.
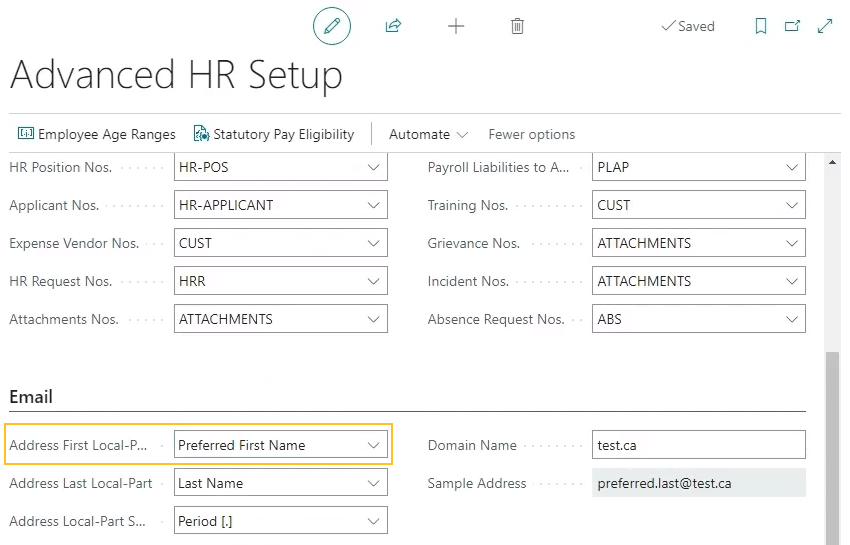
When Address First Local-Part is set to Preferred First Name, Sparkrock 365 uses the value in Preferred First Name on the HR Request-Hire page to automatically populate the following fields during processing of a new hire HR request:
On the Employee Card page, the Company Email field.
On the mySparkrock User Setup Card page, the User Name and E-Mail fields.
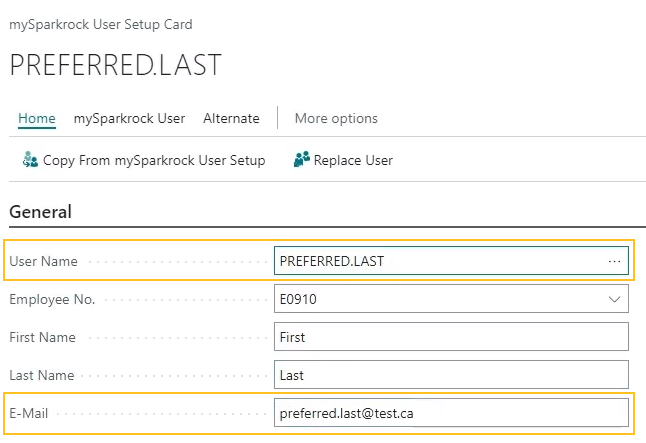
For example, in the following screen capture, you can see that Preferred was specified in the Preferred First Name field.
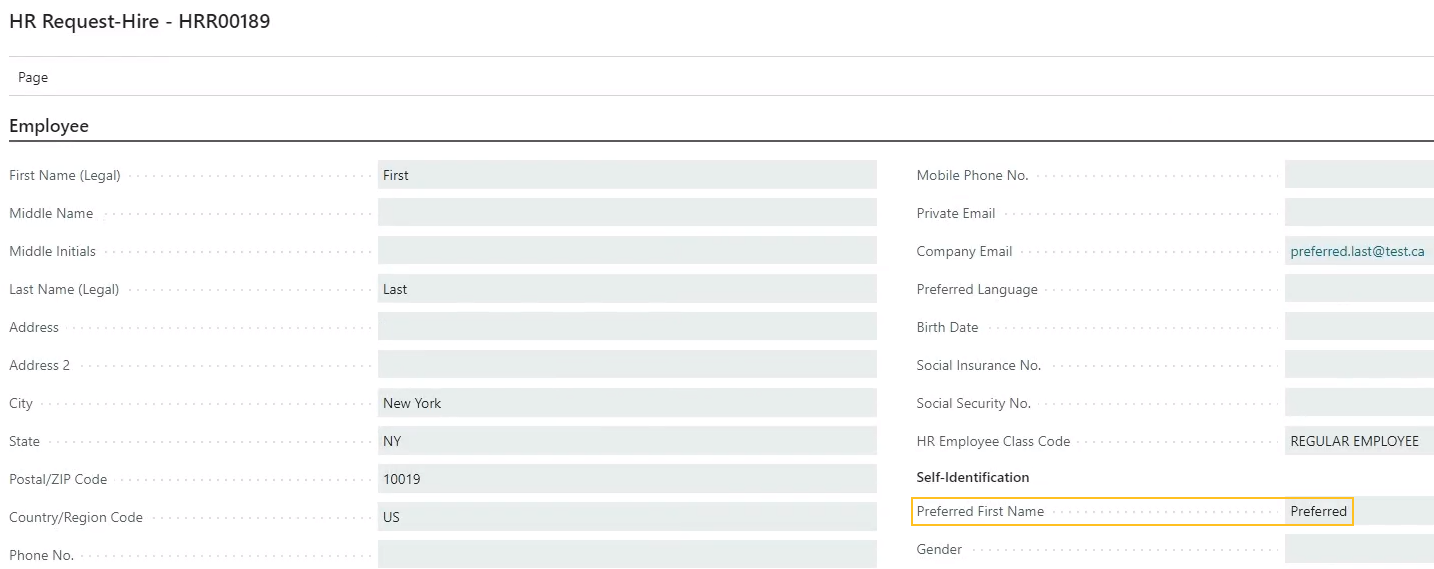
When the new hire HR request was processed, Sparkrock 365 automatically populated the value of the Company Email and E-Mail fields to be preferred.last@test.ca as well as automatically populated the User Name field to be PREFERRED.LAST as shown in the following screen captures.

For more information, see Set up the Advanced HR Setup page.
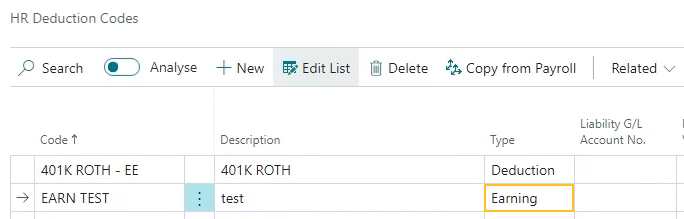
Set the Type to Earning on an HR Deduction Code
To support payroll administration, on the HR Deduction Codes page, this release introduces the capability for you to set the Type field to have a value of Earning.
The capability to set the Type field to Earning for an HR deduction code is necessary because of the following reasons:
Certain earnings must be calculated and displayed for payroll processing. For example, the EI REBATE code is a common HR deduction code that is not calculated or loaded on the compensation journal, but is calculated during payroll processing.
These types of earnings ofter require dimension mapping.
When you set the Type to Earning for an HR deduction code, and then choose ![]() for Employee External ID or Employer External ID, Sparkrock 365 automatically filters the resulting list of payroll codes to display only records that have the Type of Earnings.
for Employee External ID or Employer External ID, Sparkrock 365 automatically filters the resulting list of payroll codes to display only records that have the Type of Earnings.
For information about dimension mapping changes that relate to this feature, see Dimension mapping enhancements for HR deduction codes with the Type of Earning.
Automatically update the employee's status when processing an HR request
Starting with this release, when an HR request is processed, Sparkrock 365 reviews the total Active FTE, and then updates the Status on the Employee Card page to Active or Inactive. When the total Active FTE is greater than zero, Sparkrock 365 sets the Status to Active. Alternatively, when the total Active FTE is zero, Sparkrock 365 sets the Status to Inactive.
The following table describes how Sparkrock 365 determines the value of the Status field for different leave HR request scenarios.
| Number of assignments | Active FTE Before Leave | Leave FTE Before Leave | Active FTE After Leave HR Request is Processed | Leave FTE After Leave HR Request is Processed | Status on the Employee Card page |
|---|---|---|---|---|---|
| 1 | 1.0 | 0.0 | 0.0 | 1.0 | Inactive |
| 1 | 1.0 | 0.0 | 0.5 | 0.5 | Active |
| 2 | 0.6 and 0.4 | 0.0 and 0.0 | 0.0 and 0.4 | 6.0 and 0.0 | Active |
| 2 | 0.6 and 0.4 | 0.0 and 0.0 | 0.0 and 0.0 | 0.6 and 0.4 | Inactive |
The following table describes how Sparkrock 365 determines the value of the Status field for different return HR request scenarios.
| Number of assignments | Active FTE Before Return | Leave FTE Before Return | Active FTE After Return HR Request is Processed | Leave FTE After Return HR Request is Processed | Status on the Employee Card page |
|---|---|---|---|---|---|
| 1 | 0.0 | 1.0 | 1.0 | 0.0 | Active |
| 1 | 0.0 | 1.0 | 0.5 | 0.5 | Active |
| 2 | 0.4 and 0.6 | 0.6 and 0.4 | 0.6 and 0.0 | 0.0 and 4.0 | Active |
The timing of the update to the Status field depends on the Effective Date, Calculation End Date, or Leave Return Date of the respective HR request. When the Effective Date, Calculation End Date, or Leave Return Date is less than or equal to the work date, Sparkrock 365 updates the field instantly. Alternatively, when the Effective Date, Calculation End Date, or Leave Return Date is in the future, Sparkrock 365 creates one or two scheduled tasks that will update the Status when the Effective Date, Calculation End Date, or Leave Return Date is reached. Sparkrock 365 determines whether to create one or two scheduled tasks based on the type of HR request. If the HR request is only a leave or only a return, Sparkrock 365 creates one scheduled task. If the HR request is a leave and return, Sparkrock 365 creates two scheduled tasks, one task for the leave and one task for the return.
To enable the updating of the Status field on the Employee Card page when an HR request is processed, this release introduces a Set Employee Status to Active or Inactive based on Total FTE function.
The following table shows the list of HR reason codes to which this new function was added.
| HR Reason Code | HR Function Code | HR Step | HR Function Description |
|---|---|---|---|
| 20-ADD ASSIGN | 66 | 13 | Set Employee Status to Active or Inactive based on Total FTE (66) |
| 35-ON LEAVE | 66 | 10 | Set Employee Status to Active or Inactive based on Total FTE (66) |
| 36-TEACHER ON LEAVE | 66 | 10 | Set Employee Status to Active or Inactive based on Total FTE (66) |
| 37-LEAVE CHANGE | 66 | 12 | Set Employee Status to Active or Inactive based on Total FTE (66) |
| 40-FULL RETURN | 66 | 10 | Set Employee Status to Active or Inactive based on Total FTE (66) |
| 45-GRAD RETURN | 66 | 10 | Set Employee Status to Active or Inactive based on Total FTE (66) |
| 46-CHG GRAD RETURN | 66 | 10 | Set Employee Status to Active or Inactive based on Total FTE (66) |
| 50-LEAVE AND RETURN | 66 | 12 | Set Employee Status to Active or Inactive based on Total FTE (66) |
| 51-TCHR LEAVE RETURN | 66 | 12 | Set Employee Status to Active or Inactive based on Total FTE (66) |
| 52-CHG LEAVE RETURN | 66 | 10 | Set Employee Status to Active or Inactive based on Total FTE (66) |
| 80-ASSIGN END | 66 | 3 | Set Employee Status to Active or Inactive based on Total FTE (66) |
| 85-ASSIGN END ROE | 66 | 4 | Set Employee Status to Active or Inactive based on Total FTE (66) |
| 86-TCHR ASGN END ROE | 66 | 4 | Set Employee Status to Active or Inactive based on Total FTE (66) |
You can view the records in the table above on the HR Process Functions page.
In the event that a HR request is reversed and the Effective Date, Calculation End Date, or Leave Return Date of the respective HR request is in the past, Sparkrock 365 returns the value of the Status field to the same value that existed before the HR request was processed. Alternatively, when an HR request is reversed and the Effective Date, Calculation End Date, or Leave Return Date of the respective HR request is in the future, Sparkrock 365 cancels the one or more pending scheduled tasks.
Statutory pay in the compensation journal is now supported when the Pay Type is Salary on an HR employee assignment
This release introduces support for statutory pay in the compensation journal when on the respective HR Employee Assignment Card page, the Pay Type field has a value of Salary.
To support this feature, this release introduces on the Advanced HR Setup page, the Calc. Stat. Pay for Salaried Employees field.

When Calc. Stat. Pay for Salaried Employees is turned on, Sparkrock 365 calculates statutory pay for HR employee assignments where the Pay Type field has a value of Salary. Alternatively, when Calc. Stat. Pay for Salaried Employees is turned off, Sparkrock 365 behaves the same as in previous releases and only calculates statutory pay for HR employee assignments where the Pay Type field has a value of Hourly.
For more information, see Set up payroll for statutory holiday pay.
Payroll has been updated to version 23.37.0.0
To stay current with the latest payroll updates and fixes, payroll has been updated to 23.37.0.0.
For more information, see Payroll release notes version 23.37.0.0 through 24.39.0.1.
Reverse compensation ledger entries
Before this release, when payroll was processed incorrectly, users had to manually enter reversing entries in the compensation ledger, and then find and reverse the respective payroll ledger entries. To improve the process, this release introduces the capability for you to reverse compensation ledger entries and payroll ledger entries simultaneously. Also, Sparkrock 365 now automatically updates records that are associated with reversed compensation ledger entries.
The following list describes the highlights of this feature:
When errors occur, this feature is useful for reversing the original incorrect compensation ledger entries before you create the corrected entries.
The reversed entries are the same as the original entries, except that fields, such as Amount, Hours / Days, Assignment Amount, and so on have a minus sign (-).
Sparkrock 365 links the original and reversed entries based on the values of the following new fields:
Reversed By Entry No.: Specifies the number of the correcting entry. If this field has a value other than 0, the entry cannot be reversed again.
Reversed Entry No.: Specifies the number of the original entry that was reversed.
Reversed compensation ledger entries have the same values for Employee No., Document No., and Posting Date as the original entry.
Users are prevented from reversing already reversed compensation ledger entries.
When reversing compensation ledger entries, you can choose to automatically reverse the respective payroll ledger entries that have the same Document No., Employee No., and Payment Date. If required, you also have the option to manually reverse the respective payroll ledger entries.
You can reverse a complete compensation register or individual compensation ledger entries.
When you reverse compensation ledger entries, Sparkrock 365 automatically updates any associated absence incidents, absence registrations, posted time sheet entries, shifts, and shift activities.
Sparkrock 365 updates the associated entries as described in the following list:
Absence incidents:
- The value of Sub. Status is updated from Posted to Open.
Absence registration entries:
- The Payroll Processing and Transferred To Payroll checkboxes and cleared.
Posted time sheet entries:
The Status of the one or more time lines are updated from Posted to Approved.
The values of the Document No. and Posting Date fields are deleted.
Shifts: and shift activities:
- The Status is updated from All Posted to Approved.
Shift activities:
The value of Payroll Posted is updated to No.
The values of the Posted By and Posted Date/Time fields are deleted.
The following sections include information about the changes that were completed in Sparkrock 365 to support this feature.
Compensation Registers page changes
On the Compensation Registers page, this release adds the following field and action:
Reversed field: Specifies whether the register has been reversed.

Note
Note:
The Reversed checkbox is only selected when all compensation ledger entries for a register are reversed. If only some of the compensation ledger entries for a register are reversed, the Reversed checkbox is clear.Reverse Register action: View the compensation ledger entries for the selected register.

For more information, see Reverse a compensation register.
New Reverse Compensation Entries page
This release introduces the Reverse Compensation Entries page.

On the Reverse Compensation Entries page, you can choose Reverse to reverse all the compensation entries and post the correcting entries.
Note
Note:
If any entries have the Reversed checkbox selected, those entries cannot be reversed from this page.
New Reverse action on the Compensation Ledger Entries page
On the Compensation Ledger Entries page, this release introduces a Reverse action.

You can use the Reverse action to reverse posted compensation ledger entries.
When you choose the Reverse action, the Reverse Compensation Ledger Entries page opens.
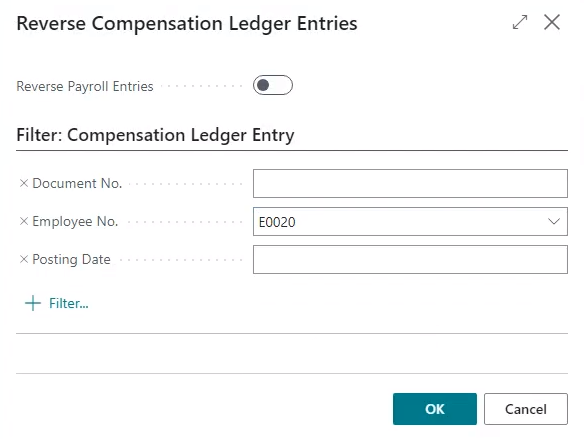
On the Reverse Compensation Ledger Entries, you can choose whether to reverse payroll entries. Also, you can filter the list of compensation ledger entries that you want to reverse.
For more information, see Reverse compensation ledger entries.
Payroll event code 013 has been added for more payroll flexibility
Starting with this release, when creating payroll process procedures, you can use the new 013 event code.
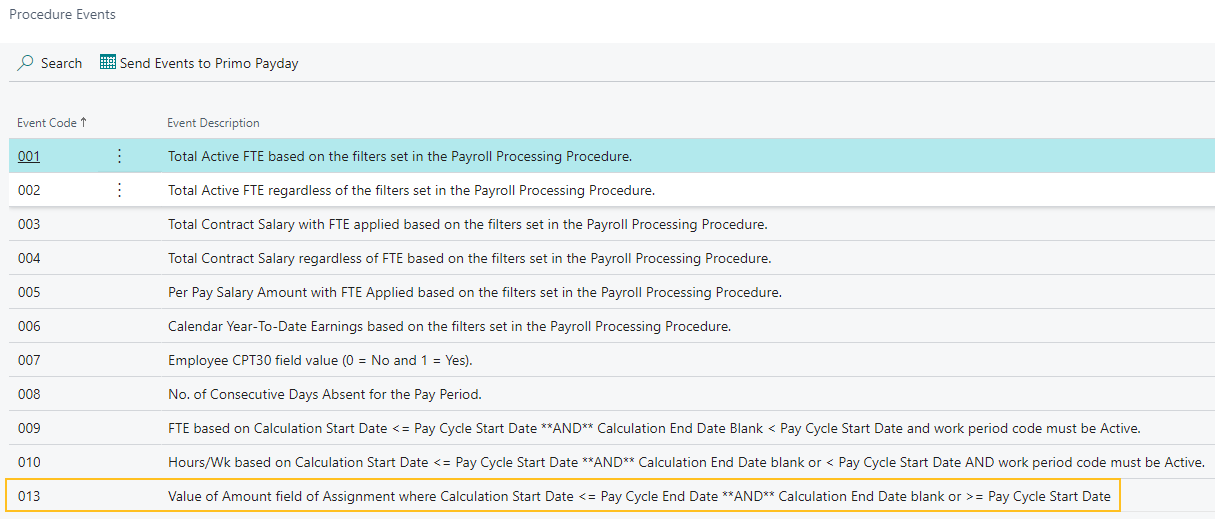
Event code 013 returns the value of the Amount field where the Calculation Start Date is less than or equal to the Pay Cycle End Date and the Calculation End Date is blank or is greater than or equal to the Pay Cycle Start Date.
For more information about payroll procedure events, see View payroll procedure events.
Dimension mapping enhancements for HR deduction codes with the Type of Earning
To support HR deduction codes that have the new Type of Earning, this release also updates the dimension mapping functionality. After you complete the necessary setup, Sparkrock 365 performs dimension mapping during payroll processing. For more information, see Set Up Dimension Mapping for HR Deduction Codes with the Type of Earning.
For more information about the new Type of Earning, see Set the Type to Earning on an HR Deduction Code.
Set up time entry for terminated employees for a specific HR employee assignment
In some locations, employees who are terminated can perform time entry for a specific duration after their termination date.
Before this release, Sparkrock 365 only provided the capability for you to turn on time entry for terminated employees for all HR employee assignments.
This release introduces the capability for you to specify the one or more specific HR employee assignments for which an employee can perform time entry after termination.
To turn on time entry for terminated employees for specific HR employee assignments, this release introduces on the HR Employee Assignment Card page, an Hours Entry End Date Enabled on Assignment field.
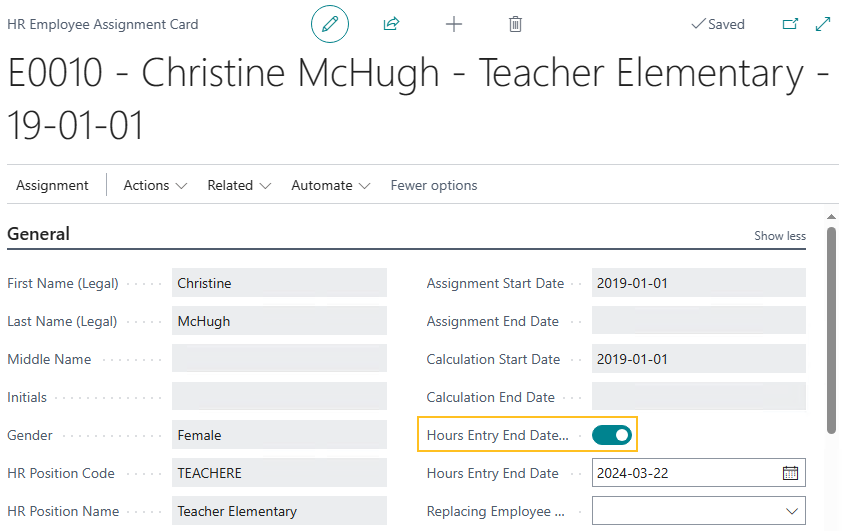
When the Hours Entry End Date Enabled on Assignment field is turned on for a specific assignment, an Hours Entry End Date field appears on the respective HR Employee Assignment Card page.
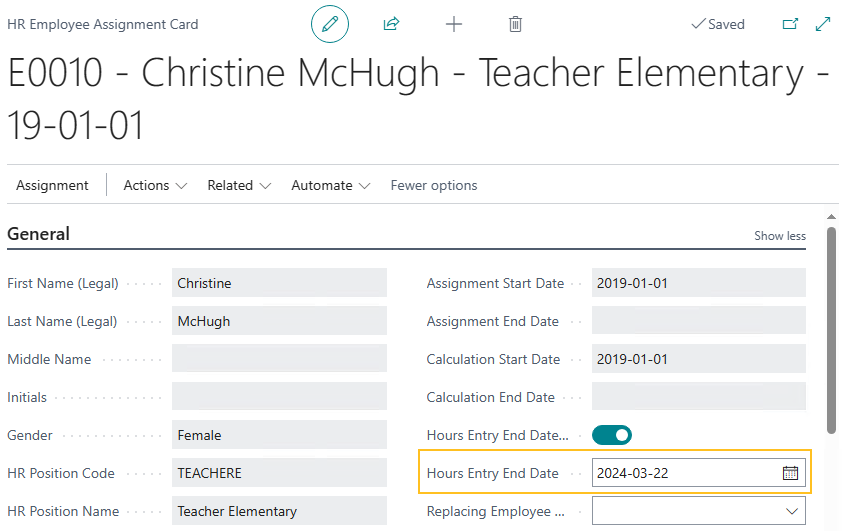
The Hours Entry End Date field specifies the date after which a user cannot perform time entry.
Alternatively, when the Hours Entry End Date Enabled on Assignment field is turned off, Sparkrock 365 does not display the Hours Entry End Date field.
For more information, see Set up time entry for terminated employees.
Update considerations
Consider the following information before updating to version 22.5 for Sparkrock 365 2023 release wave 1.
New Financial Analysis extension
The new Financial Analysis extension is installed automatically. All existing data sets are available for use with the new extension.
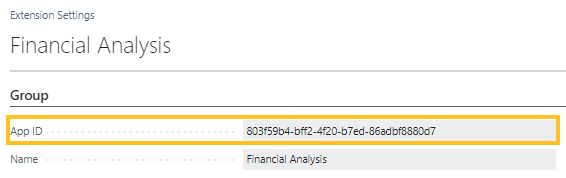
When you update to this version, Sparkrock recommends that you uninstall the professional services Financial Analysis extension because the extension is now redundant. The professional services Financial Analysis extension has an App ID of 803f59b4-bff2-4f20-b7ed-86adbf8880d7.
For more information about how to uninstall an extension, see Install and uninstall extensions (apps) in Business Central.
To view the App ID of an extension
Select Search (Alt+Q)
 , enter extension management, and then choose the related link.
The Extension Management page opens.
Select the row of the extension for which you want to view the App ID, and then on the action bar, choose Manage > View.
The Extension Settings page opens and you can view the App ID.
Pending approvals
Before updating to this version from Sparkrock 2016, it is recommended that you update the approval status of any documents that are in a pending approval or in progress state to an approved or open state.
Missing permissions
When you update to this version, users may encounter permission related errors. The following table describes the Sparkrock 365 pages where these errors may appear, the error, and the permission setup that is necessary to prevent the error.
| Page | Error | Permission Setup To Prevent Error | |||||
|---|---|---|---|---|---|---|---|
| Object ID | Object Name | Read Permission | Insert Permission | Modify Permission | Delete Permission | ||
| Purchase Invoice | Sorry, the current permissions prevented the action. (TableData VAT Setup Tax Setup Read: Base Application). | 189 | VAT Setup | Yes | |||
| Purchase Credit Memo | Sorry, the current permissions prevented the action. (TableData Purch. Cr. Memo Entity Buffer Insert: Base Application). | 5508 | Purch. Cr. Memo Entity Buffer | Yes | Yes | Yes | Yes |
Note
Note:
Sparkrock recommends that you add these permissions to a permission set to which the user is already assigned.
For information about how to assign permissions to users and groups, see Assign permissions to users and groups.
Known problems
The following sections include information about the known problems in version 22.5 for Sparkrock 365 2023 release wave 1.
Connectivity issue with APIs and other services or integrations
After updating to this release, you may experience connectivity issues with APIs and other services or integrations.
The following list includes examples of how connectivity issues may become apparent:
API errors
Power BI dashboards may no longer work correctly
Integrations may have trouble communicating with Sparkrock 365
Workaround
To resolve this problem, you must uninstall, and then install the respective extension. To uninstall, and then install the extension, perform the following steps:
In Sparkrock 365, choose
, enter extension management, and then choose the related link.The Extension Management page opens.
In Search, enter api.
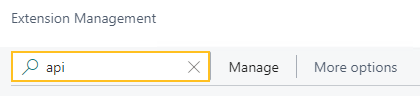
A list of the API extensions are displayed, for example, PS Finance APIs.
You may have to change your view so that you can view the version number for any extension. To view the version number for all extensions, choose
 , and then choose List.
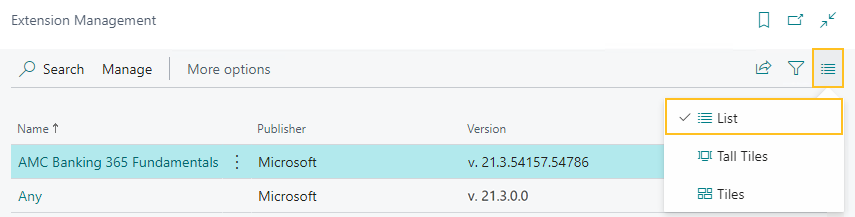
For each extension that does not have a version that starts with v.22.5 and Is Installed is selected, perform the following steps to uninstall, and then install the extension:
- Select the extension that you want to update, and then on the action bar, choose Manage > Uninstall.
The Extension Uninstallation page opens. - Choose Uninstall.
A dialog box appears and displays text that indicates the extension was successfully uninstalled. - To close the dialog box, choose OK.
- Select the extension that you want to update, and then on the action bar, choose Manage > Install.
The Extension Installation page opens. - Choose Next.
The page refreshes and you are requested to review extension information before installation. - To proceed, turn on I accept the terms and conditions.
- Choose Install.
The extension is updated to the latest version.
- Select the extension that you want to update, and then on the action bar, choose Manage > Uninstall.
Alternate workaround
It is possible that custom web services may have been deleted during or after the update.
To resolve this problem, you must copy and paste the web services lines from a sandbox environment into your production environment.
To copy and paste one or more web services lines, perform the following steps:
Open a Sparkrock 365 sandbox environment that was created before the update or create a sandbox environment from a backup.
Select Search (Alt+Q)
, enter web services, and then choose the related link.The Web Services page opens.
Copy the information for the one or more lines that you want to copy.
In your Sparkrock 365 production environment, choose
, enter web services, and then choose the related link.The Web Services page opens.
Paste the information for the one or more lines that you copied.
Re-open button is missing for a submitted expense claim in mySparkrock
The Re-open button may disappear from a submitted expense claim in mySparkrock. This issue occurs when a mySparkrock user is not set up in Sparkrock 365, on the User Setup page.
Workaround
Perform the following steps:
Select Search (Alt+Q)
, enter user setup, and then choose the related link.The User Setup page opens.
On the action bar, choose New.
A new row appears.
In User ID, specify MYSPARKROCK.
Assign all permissions to the user.
For example, select the checkboxes for the following fields:
- A/P Batch Admin
- Allow A/P Batch Creation
- Allow A/P Batch Auditing
- Allow A/P Batch Deletion
- Allow User to Access Compensation Data
- HR Request Reversal Allowed
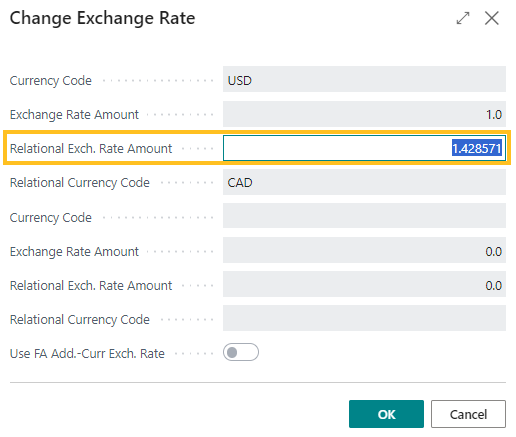
Transaction cannot be completed because it will cause inconsistencies in the G/L Entry table error
When you try to post a purchase invoice for a vendor that has a foreign trade Currency Code set up, for example, USD, you may receive the following error:
This transaction cannot be completed because it will cause inconsistencies in the G/L Entry table. Check where and how the CONSISTENT function is used in the transaction to find the reason for the error.
Contact your system administrator.
Tables can be marked as inconsistent during comprehensive tasks, such as posting. This prevents data from being updated incorrectly.
Workaround
On the Change Exchange Rate page for the specific invoice, increase the number of decimal places for the value in the Relational Exch. Rate Amount field, for example, from 1.4286 to 1.428571.
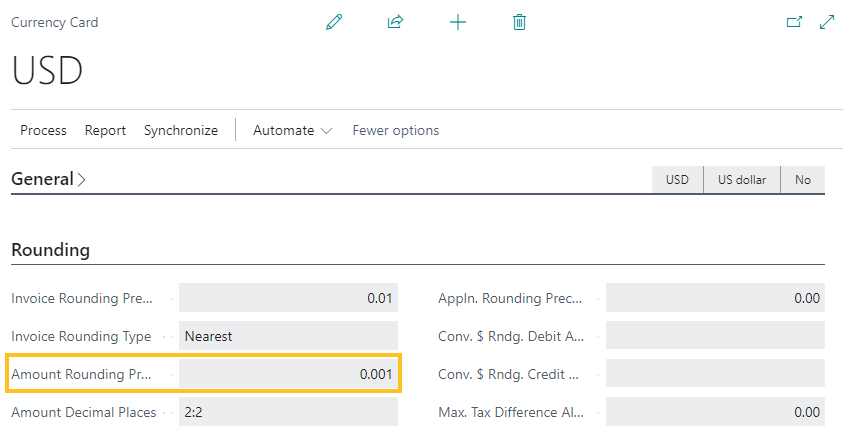
Alternate workaround
On the Currency Card page of the respective currency, increase the number of decimal places for the value in the Amount Rounding Precision field, for example, from 0.01 to 0.001
Cannot open links in sent emails
When you open a sent email from the Sent Emails Last 30 Days page, and then select the link that appears in the body of the email, Sparkrock 365 becomes unresponsive.
Workaround
Open links in the body of sent emails from Gmail or Outlook, instead of from Sparkrock 365.
Payroll Employee or Payroll Processing pages may fail to open
When using the platform security filters on permission sets, the Payroll Employee page, Payroll Processing page, or both pages may fail to open with a something went wrong error message. This is a limitation of the payroll processing module.
Workaround
Remove the permission sets with security filters from the user who must access these pages.
Related information
New for Sparkrock Impact
Payroll releases
Feedback
To send feedback about this page, select the following link: