Version 27.0 for Sparkrock Finance 2025 release wave 2 release notes Published October 7, 2025
These release notes include supplemental information about version 27.0 for Sparkrock Finance 2025 release wave 2.
Video
The following video includes information about the new features and enhancements in version 27.0 for Sparkrock Finance 2025 release wave 2.
Highlights
The following sections highlight the major accomplishments in this release.
Update 27.0 for Microsoft Dynamics 365 Business Central 2025 release wave 2
User experience
Finance and reporting
Copilot AI
New features and changes
Version 27.0 for Sparkrock Finance 2025 release wave 2 introduces exciting new features and enhancements to existing functionality.
Update 27.0 for Microsoft Dynamics 365 Business Central 2025 release wave 2
The base Microsoft Dynamics 365 Business Central platform that powers Sparkrock Finance, has been updated from 26.5 to 27.0.
To learn more about update 27.0 for Microsoft Dynamics 365 Business Central online 2025 release wave 2, go to Update 27.0 for Microsoft Dynamics 365 Business Central online 2025 release wave 2 (27.0).
To view a detailed list of cumulative platform fixes that are available from Microsoft, see Update history for Microsoft Dynamics 365 Business Central.
Important
Important:
Microsoft automatically schedules this update. The exact update date will vary.
Sparkrock recommends that you reschedule the update in the Business Central admin center to occur on or after October 24, 2025. Rescheduling the update gives you the opportunity to test the release in a sandbox environment with your organization's specific extensions and customizations before updating your production environment. This approach ensures that update issues are identified in your sandbox environment rather than in production.
If Microsoft detects issues with your extensions or customizations, you'll receive a notification directly from Microsoft. For example:
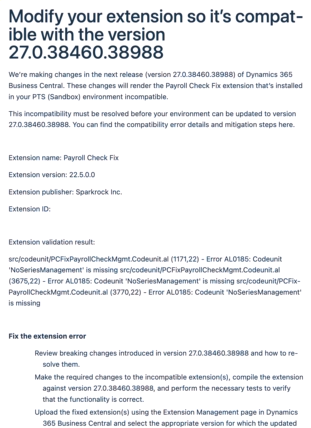
Sparkrock does not receive these notifications. If you receive one, contact Sparkrock Support for assistance.
Admins can schedule update 27.0 to any date within the 5-month update period, which ends on February 28, 2026.
To learn more about platform updates or sandbox creation, visit the following resources:
Advanced Tell Me
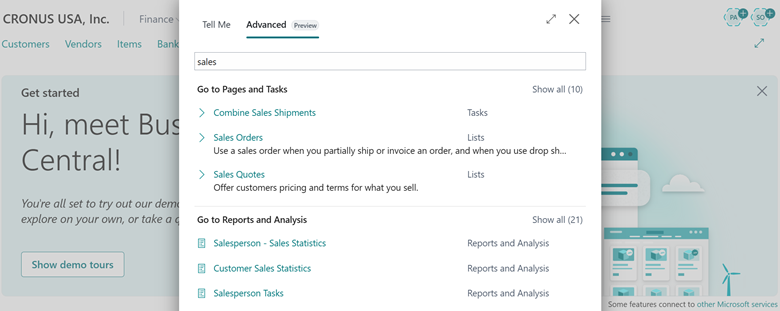
This release introduces an advanced AI-powered search feature that helps you find any page or report, even when you don't remember the exact name. The feature returns results based on semantic meaning, not just exact text matches. The search process evaluates page properties and related terms to produce an ordered list of relevant results.
The new feature is available in the role or report explorer and from Tell Me (Alt+Q)  .
.
From the role or report explorer, go to the Find box, enter a search term, and then select Try Advanced.
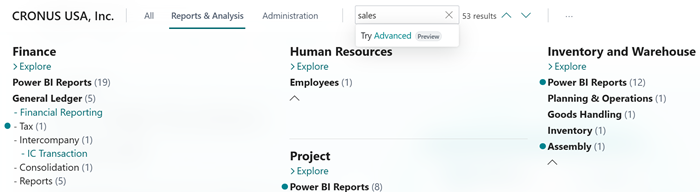
The Advanced tab in Tell Me opens automatically. The search terms that you entered in the Find box appear in Tell Me, where the search results are displayed. From there, you can enter new search terms to refine the results.
To use this feature, enable the Preview semantic similarity search on application metadata feature on the Feature Management page. To learn more, go to Enabling Upcoming Features Ahead of Time.
Resize panes
To work optimally with Business Central, you may need extra room for information in side panes, such as for Copilot, and Help. You can now drag the divider between the main content area and these panes to view more details whenever necessary.
Key capabilities of this feature include:
- Panes resize to specific proportions so that the main content area remains visible.
- Content in panes adjusts smoothly to fill the available space.
- The browser remembers the adjustments that you make the next time you open the pane, similar to other display changes, such as modifying the width of FactBoxes.
- To reset the pane to its default width, double-click the divider.
Show week numbers
Starting with this release, you can choose whether to display week numbers in calendars.
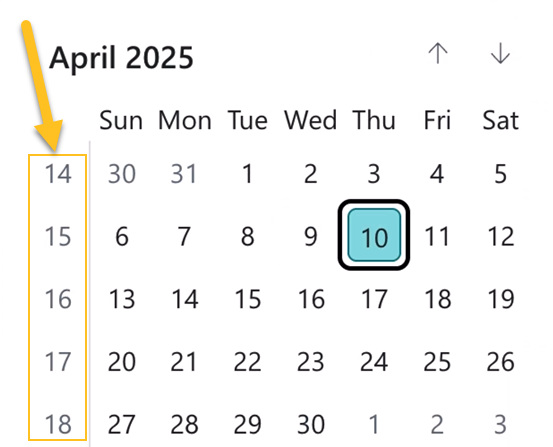
To display week numbers in calendars, use one of the following keyboard shortcuts, depending on your device:
- Windows: Shift+Home
- Mac: Shift+Fn+Left Arrow
Preview password-protected PDFs
You can now preview PDF files that are password-protected.
After you select the PDF file that you want to view, the Enter a password dialog box appears.

To view the PDF, specify the password, and then choose Open document.
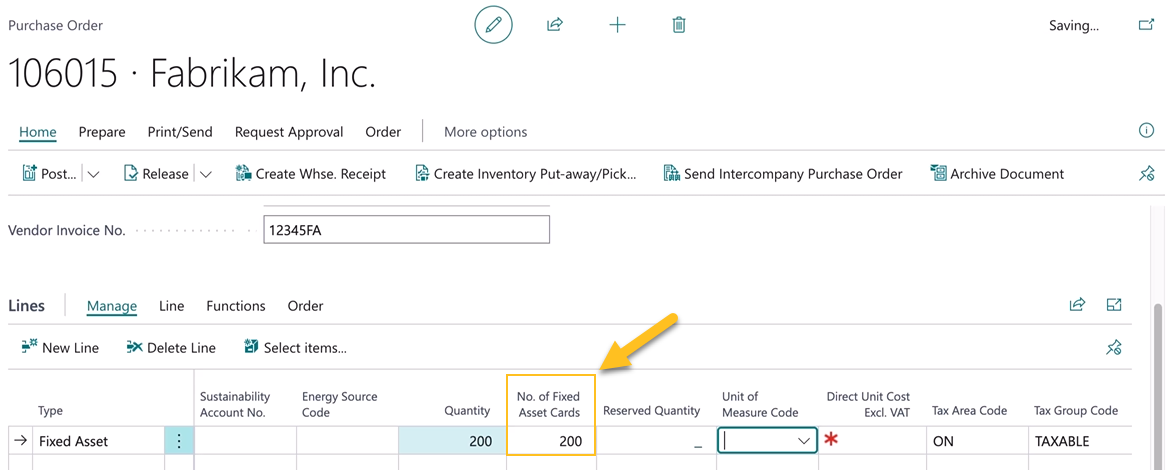
Create multiple fixed asset cards automatically
To increase accuracy, and improve operational efficiency, multiple fixed asset cards are now created automatically when you post a purchase invoice. This features provides the opportunity to process bulk purchases and ensure that each asset is recorded and tracked without manual entry.
For example, if your company purchases 200 computers from the same vendor, fixed asset cards are now automatically generated for each computer. You no longer have to create the cards manually.
To have fixed asset cards created automatically, specify a value in the No. of Fixed Asset Cards field when you create a purchase order.
Tip
Tip:
To have the No. of Fixed Asset Cards field appear, you may have to use the personalization feature to add the field. To learn more, go to Add a field so it's visible on the page.
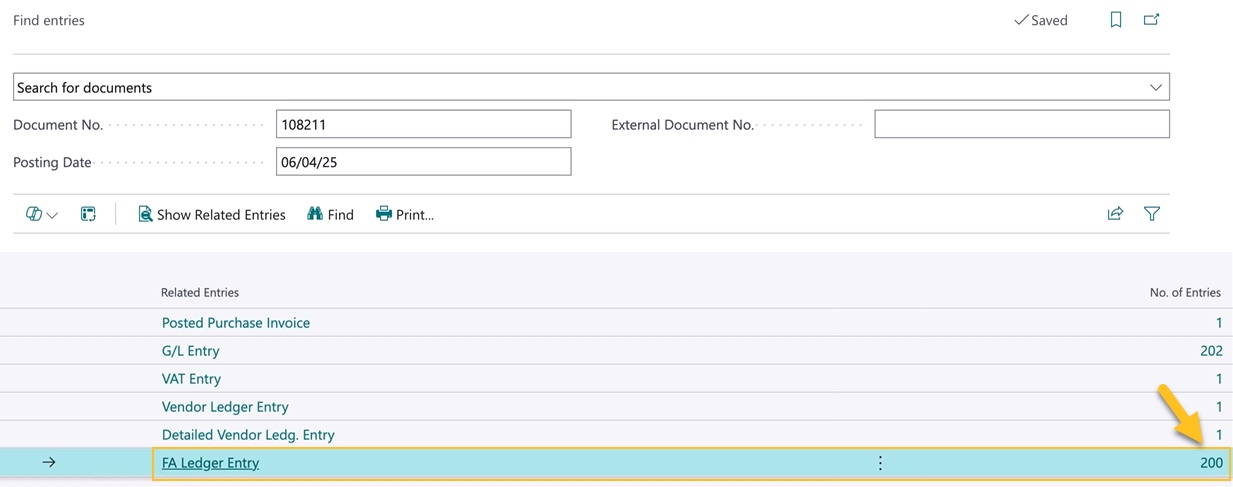
After you post the purchase invoice, the fixed assets that are created appear in the FA Ledger Entry.
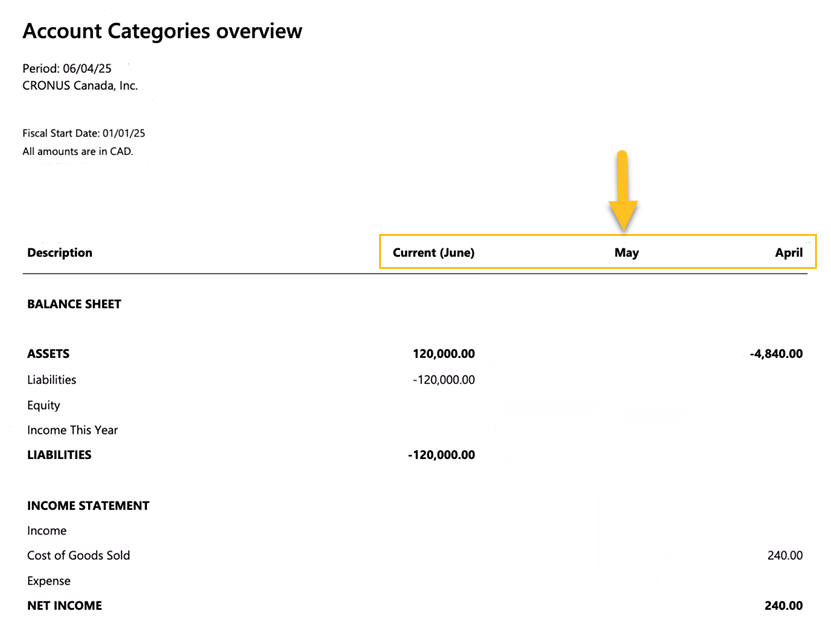
Define column headers on reports that display periods
On reports that display periods, you can now define more meaningful labels instead of the default headings, such as CURRENT PERIOD, CURRENT PERIOD - 1, and CURRENT PERIOD - 2.
The following options are available:
- Weekday
- Week
- Month
- Month and Year
- Quarter
- Quarter and Year
- Year
- Full Date
For example, you may want the Account Categories overview report to display more meaningful labels, such as the month.

To have the report display the month, when defining column definitions, perform the following steps:
In the Column Header column, set the first row to Column.
In the Include Date in Column Header column, specify Month.

When you print the report, the month label appears in the column header.
To learn more about column definitions, go to Column definitions in Financial Reporting.
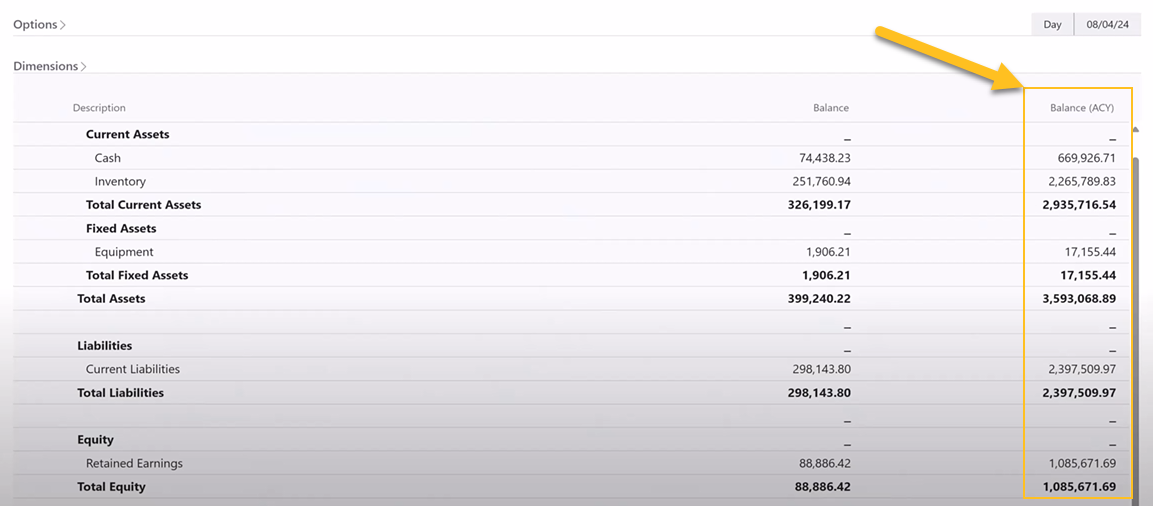
Create reports that include both local currency and additional currency
If your environment uses an additional reporting currency (ACY), you can now include columns in reports in the local currency (LCY), which is the default, the ACY, or both. When you define column definitions, the Show in ACY field determines whether an ACY column appears in the report.

After you define a column and select the Show in ACY checkbox, the report includes an additional column that displays values in the ACY.
To learn more about how to set up ACY, go to fSet up an additional reporting currency.
Autofill row definition fields
When working with financial reports, the Row No. and Description fields are now automatically populated. For example, when defining a row, if you specify Posting Account for Totaling Type, and then specify a general ledger account in Totaling, the Row No. and Description fields are automatically filled based on the general ledger account details.

If necessary, you can change the values for Row No. and Description afterwards.
Summarize with Copilot
This release introduces summarize with Copilot enhancements that help generate concise record summaries. These enhancements reduce the effort required to gain insights from your data and plan your next steps.

Copilot now provides faster and more comprehensive summaries through the following improvements:
- Summary generation is 50% faster.
- Deeper insights on popular pages, such as the Customer Card.
- Clear and consistent use of currency codes for currency amounts.
- Highlights of activity from autonomous agents that create or modify the record.
- Expanded language and list filter support.
- Richer insights with more related statistics when you drill down into a record from a list.
- Option to copy the summary and share the content with contacts in Teams or Outlook. In Teams, the content is formatted into a card.
- Option to select Show more for additional insights and use Copilot chat to ask questions.
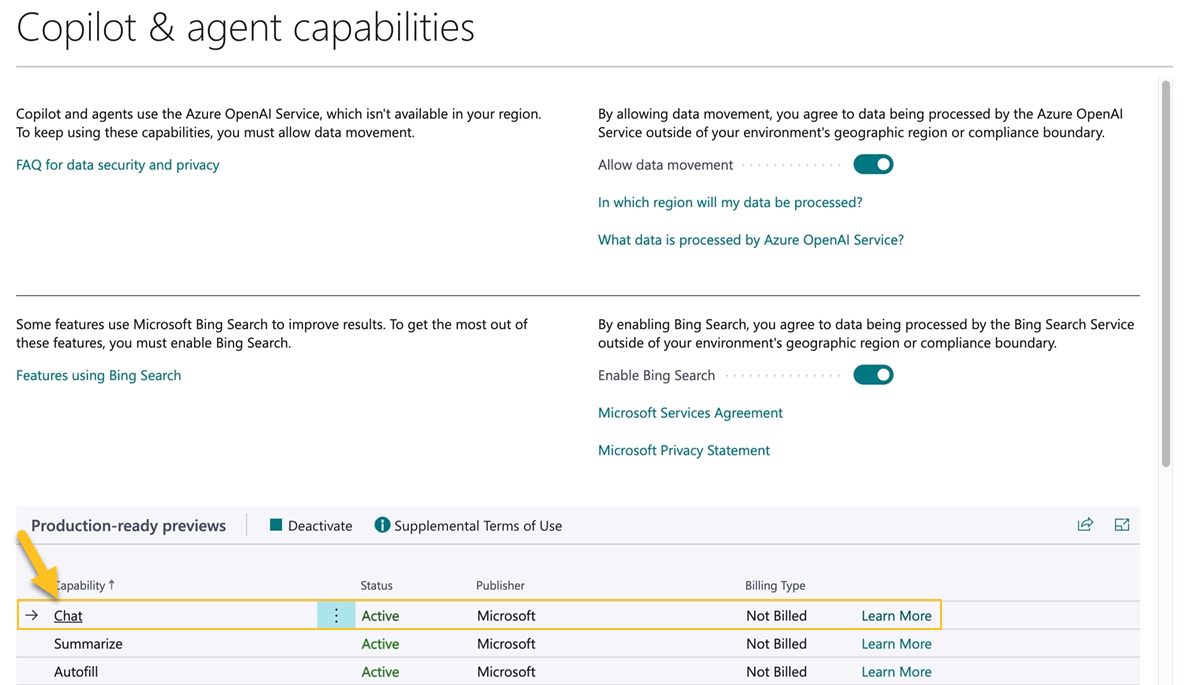
Activating the Summarize with Copilot capability automatically enables these enhancements.

Note
Note:
- You can use this feature as a production-ready preview in production and sandbox environments for any country localization. Production-ready previews have supplemental terms of use. For more information, see Supplemental terms of use for Dynamics 365 preview.
- Microsoft supports this feature in English and select languages only. While the feature can run in other languages, results might vary. Language quality depends on interaction and system settings, which can affect accuracy and the user experience.
- AI-generated content might be incorrect.
To learn more, go to Summarize records with Copilot (preview).
Enhanced chat with Copilot
This release introduces enhancements to Copilot chat that improve usability and performance.
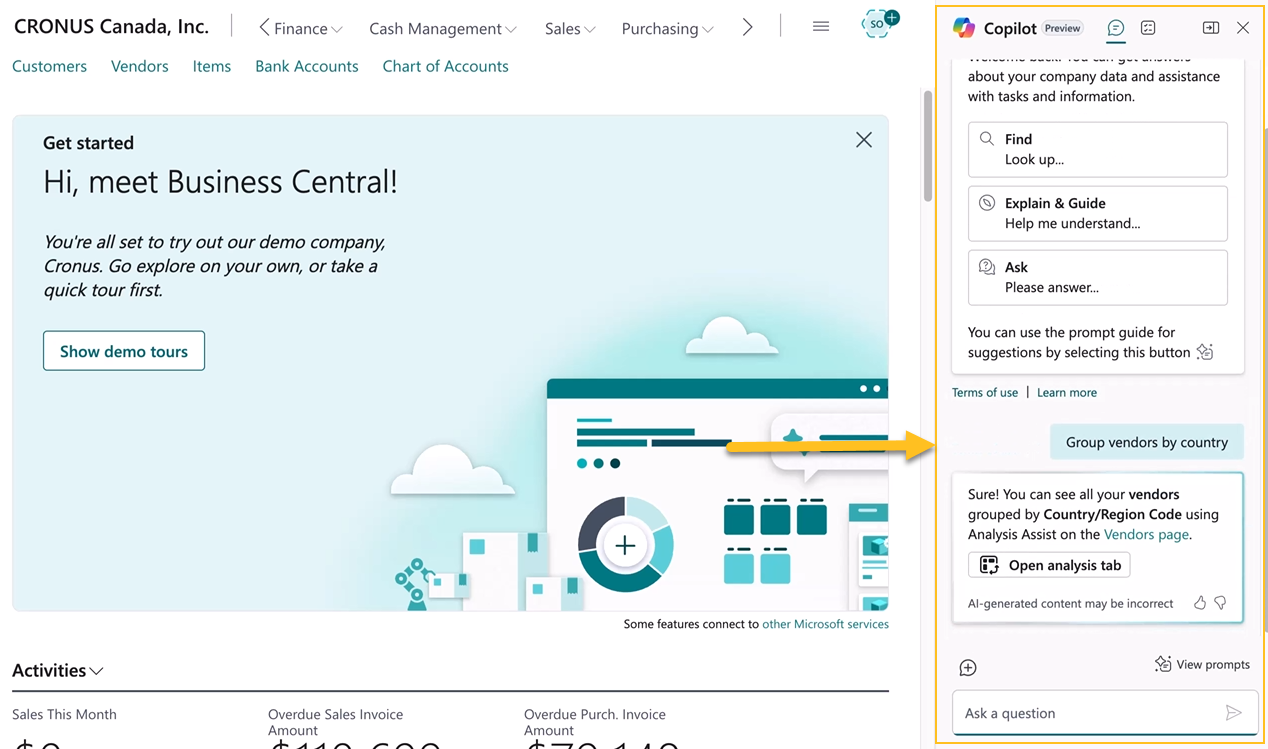
Copilot chat now offers the following improvements:
- Option to resize the Copilot pane.
- Faster performance and greater reliability.
- Expanded language support.
Activating the Chat with Copilot capability automatically enables these enhancements.
Note
Note:
- You can use this feature as a production-ready preview in production and sandbox environments for any country localization. Production-ready previews have supplemental terms of use. For more information, see Supplemental terms of use for Dynamics 365 preview.
- Microsoft supports this feature in English and select languages only. While the feature can run in other languages, results might vary. Language quality depends on interaction and system settings, which can affect accuracy and the user experience.
- AI-generated content might be incorrect.
To learn more, go to Chat with Copilot (preview).
Analyze data in lists with Copilot enhancements
The analyze data in lists with Copilot feature now includes improvements that enhance performance and expand analytical capabilities.
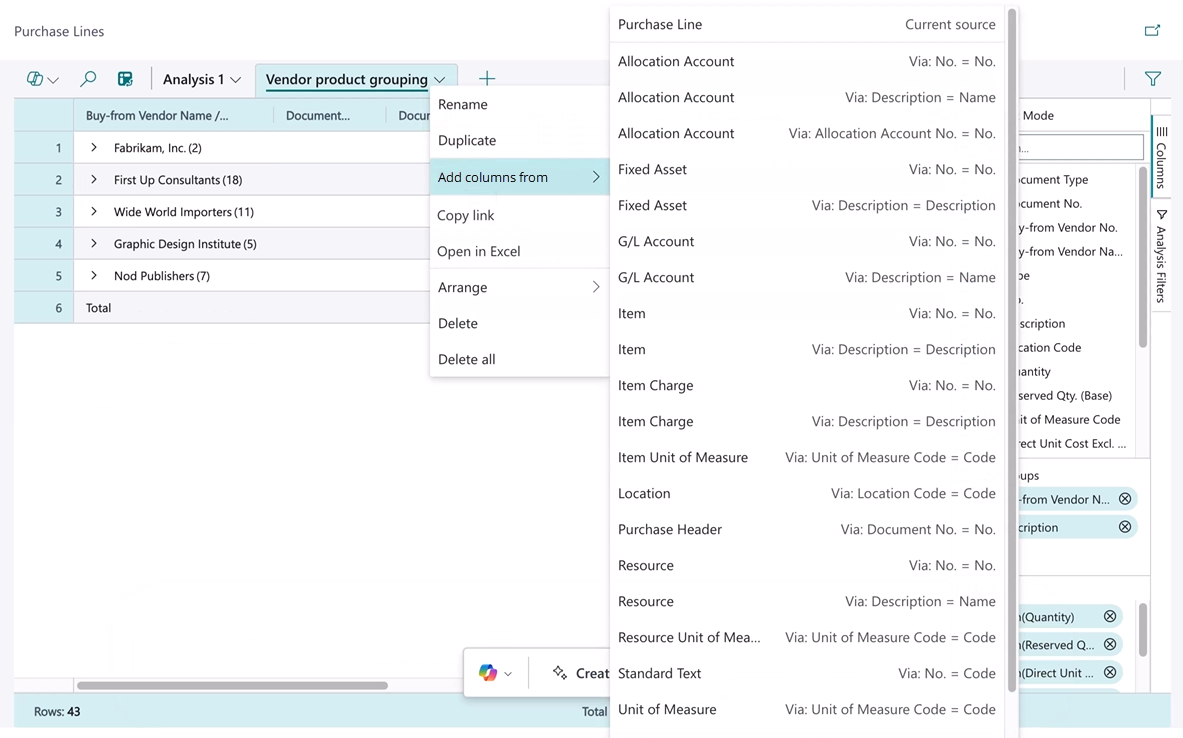
The analysis assist feature includes the following key enhancements:
- A new system permission in the Copilot system features permission set that grants or denies access to the feature.
- The capability to ask Copilot to include fields from related tables. You are no longer limited to data that appears only on the page that you are viewing.
- Immediate feedback when you make analysis design choices that might affect performance.
Activating the Analyze list with Copilot capability automatically enables these enhancements.

To learn more, go to Analyze data in lists with Copilot.
Custom fields for expense claims
This release introduces a new expense attributes framework that enables organizations to define and manage custom fields for expense claims.
An expense attribute is a configurable data field that is used to capture additional details about an expense claim line. Expense attributes extend the standard expense claim functionality and help organizations capture data specific to their reporting or operational needs.
Administrators configure expense attributes directly in the application and assign them to specific expense types. Each expense attribute includes a defined Type, such as Option, Text, Integer, Decimal, or Date. A display order and mandatory or optional status can also be defined.
Expense attributes can be configured for each expense type to capture specific details. For example, mileage claims might include a Start Date and End Date, while travel claims might include Location and Purpose of Trip.
When users create or edit an expense claim, the configured expense attributes appear as custom fields on the claim lines or in FactBoxes. The entered values are stored and validated with the claim to ensure consistent and complete expense data.
Key capabilities of this feature include:
A new Allow Setup of Expense Attributes field on the User Setup page.
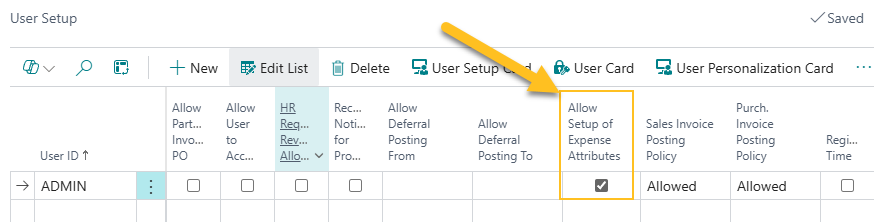
The Allow Setup of Expense Attributes field specifies whether a user can configure expense attributes for expense claims.
If the Allow Setup of Expense Attributes checkbox is clear, all expense claim functionality continues to work the same as in previous releases.
To learn more, go to Turn on or turn off the expense attributes setup.
Creation of custom expense attribute fields with the following types on the Attributes - SRF Expense Type page:
- Option
- Text
- Integer
- Decimal
- Date
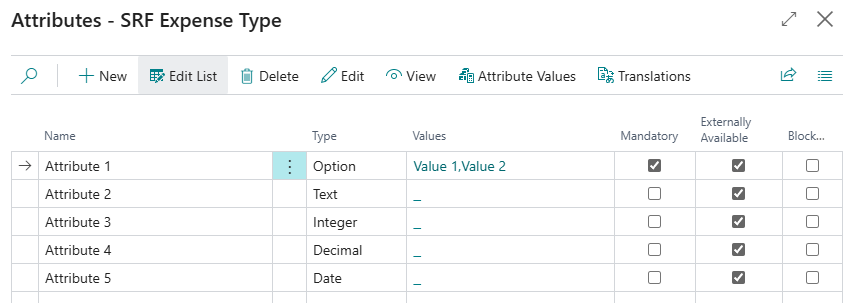
You can specify whether the fields are Mandatory and Externally Available. The Externally Available field determines whether the fields appear in mySparkrock.
Note
Note:
mySparkrock expense attribute functionality will be available in a future release.To learn more, go to Set up expense attribute fields.
Expense attribute fields can be assigned to expense types on the Attribute Values - Expense Type page.

To learn more, go to Assign expense attribute fields to expense types.
Expense attributes appear in the Item Attributes FactBox on the Expense Types or Expense Type Card pages.

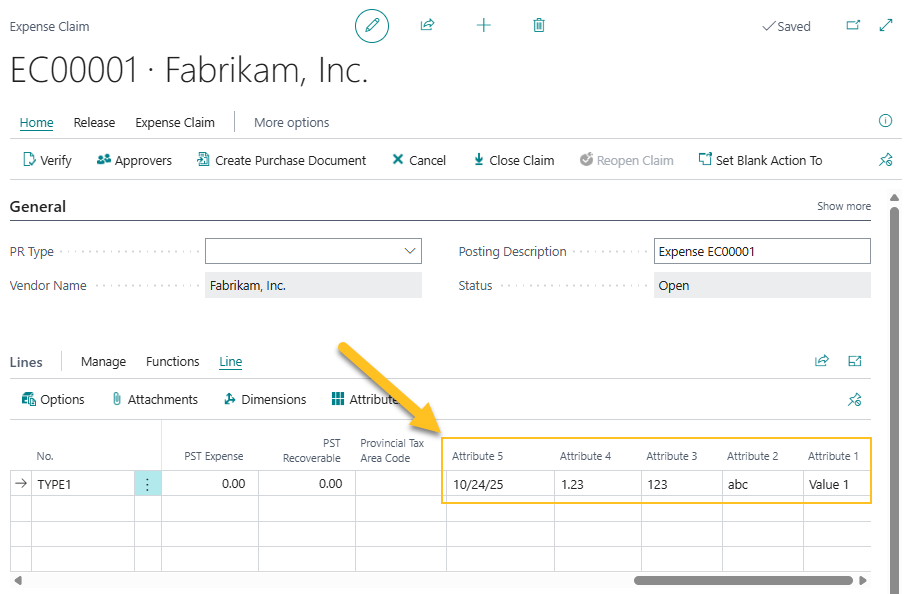
On the Purchases & Payables Setup page, you can configure the display order of expense attribute fields on unassigned expenses and expense claim lines.

Note
Note:
If expense attribute fields are not configured on the Purchases & Payables Setup page, the fields do not appear on unassigned expenses and expense claim lines.To learn more, go to Set up the display order of expense attribute fields.
Expense attribute fields appear on the following pages:
Unassigned expenses
Expense claim lines
mySparkrock pages
Note
Note:
mySparkrock expense attribute functionality will be available in a future release.
On the Expense Claim page, on the Lines FastTab, you can use the Attributes action to open the Purchase Request line - Edit Attribute Set Entries page.
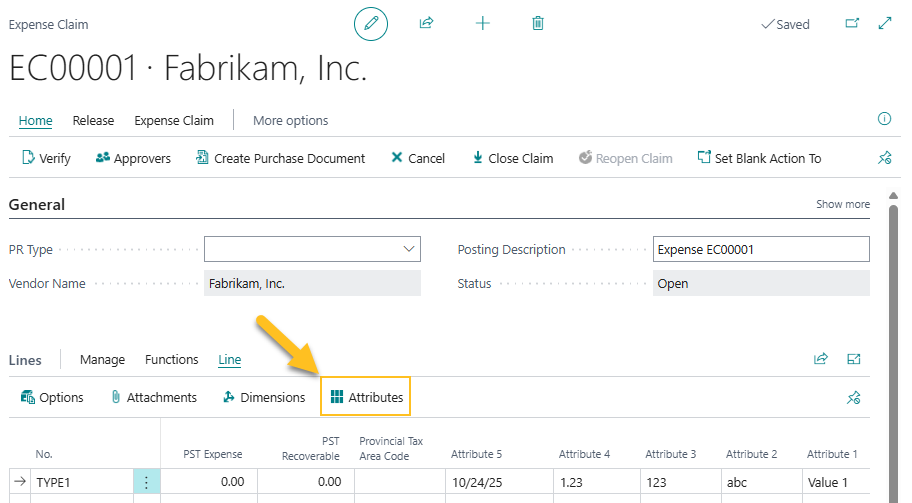
On the Purchase Request line - Edit Attribute Set Entries page, you can view, edit, and delete the expense attribute entries for the selected line.

To learn more about viewing, editing, and deleting expense attribute entries, go to:
On the Expense Claim page, you can view the expense attributes for the selected line in the Line Attributes FactBox.
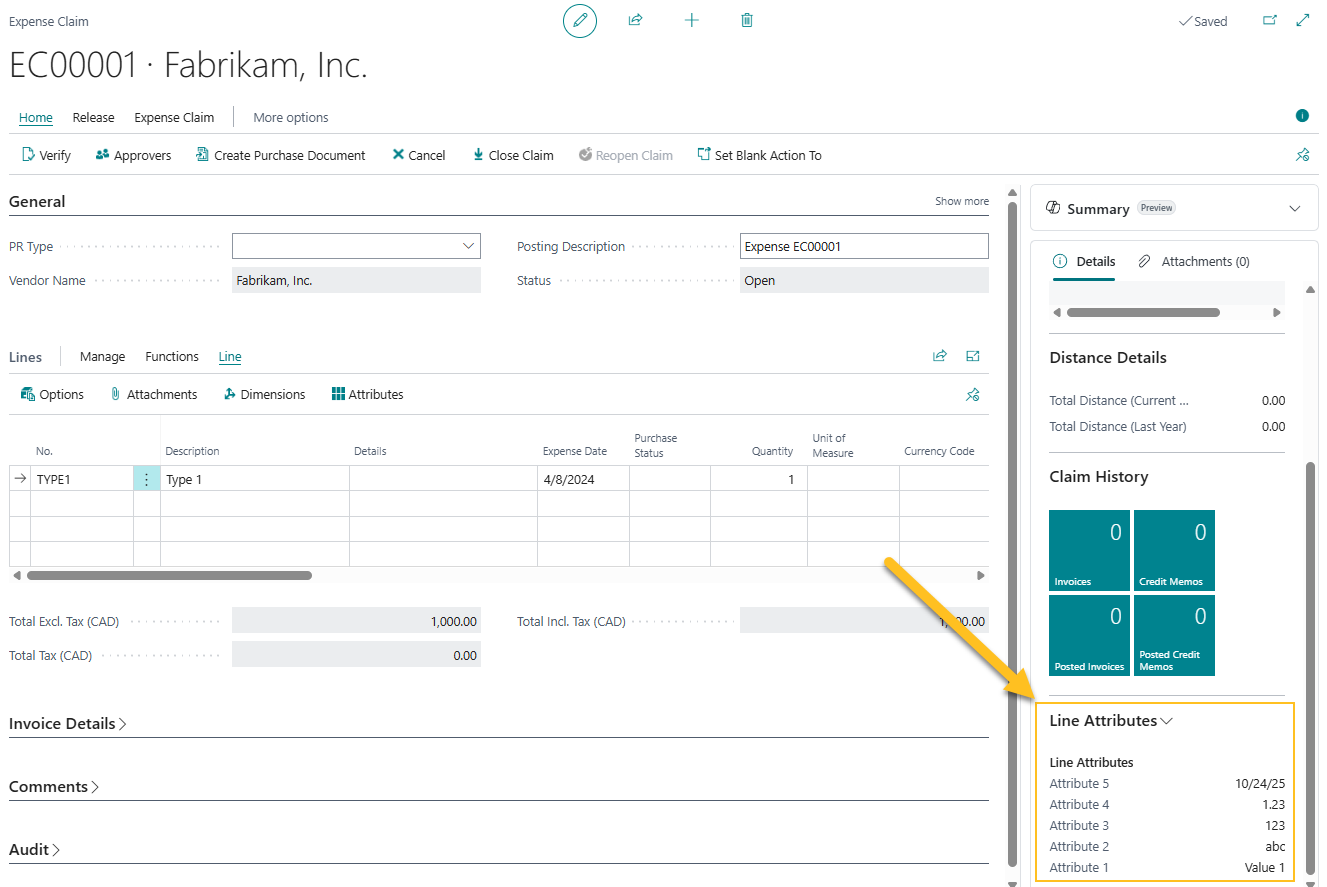
Updated save and post actions ensure that expense attribute data is recorded consistently across the application.
PD-6351, PD-7381, PD-7380, PD-7374, PD-7276, PD-7144, PD-7141, PD-7128, PD-7127, PD-7126, PD-7124, PD-7122, PD-7120, PD-7119, PD-7118, PD-7114, PD-7113, PD-7112, PD-7111, PD-7110, PD-7109, PD-7108, PD-7107, PD-6542
Known problems
The following sections include information about the known problems in version 27.0 for Sparkrock Finance 2025 release wave 2.
Custom Power BI reports settings change
Custom Power BI reports may be unable to connect to the Microsoft platform due to a settings configuration issue.
Workaround
To restore the connection, update your Power BI settings.
The following video shows how to apply the required settings change.
Documents Factbox does not display the Upload files option for limited access users
The Documents FactBox does not display the Upload files option for limited access users.

Workaround
To upload files when you are a limited access user, perform the following steps:
In the Documents FactBox, choose Show Details.
The Attached Documents page opens.
Depending on whether there are existing attachments, perform one of the following steps:
No existing attachments: In the Attachment column, choose Attach File(s)….
Existing attachments: To add a line, on the action bar, choose New, and then choose Attach File(s)….
An Attach a document dialog box appears.
Drop a file in the box. Alternatively, browse to the file that you want to attach, and then choose Open.
PD-6052
Error: The Sustainability Setup does not exist. Identification fields and values: Primary Keys=''
Users may encounter the following error:
The Sustainability Setup does not exist. Identification fields and values: Primary Keys=''
Workaround
To resolve this problem, perform the following actions:
Open the Sustainability Setup page. To open the page, choose
, enter sustainability setup, and then choose the related link.Ensure that affected users have the permission sets that are listed in the table below.
Permission Set Name Type Extension Name SUSTAINABILITY, ADMIN Sustainability - Admin System Sustainability SUSTAINABILITY, EDIT Sustainability - Edit System Sustainability SUSTAINABILITY, READ Sustainability - Read System Sustainability To learn more, go to Assign permissions to users and groups.
mySparkrock users cannot view data sets
mySparkrock users cannot view data sets because the MYSPARKROCK user is missing permission sets.
Workaround
To resolve this problem, perform the following steps:
In Sparkrock Finance, choose
, enter microsoft entra applications, and then choose the related link.The Microsoft Entra Applications page opens.
Select the row that has a Description of mySparkrock, and then on the action bar, choose Manage > Edit.
The Microsoft Entra Application Card page opens.
On the User Permission Sets FastTab, add the records that appear in the following table.
Permission Set Name Type Extension Name SPKFA ANALYSIS, EDIT SR365 Create Fin. Analysis System Financial Analysis SPKFA ANALYSIS, VIEW SR365 View Financial Analysis System Financial Analysis SPKFA DATA SET, EDIT SR365 Create data sets System Financial Analysis SPKFA DATA SET, VIEW SR365 View data sets System Financial Analysis To add a record, choose Manage > New Line, and then specify values for fields as required.
Connectivity issue with APIs and other services or integrations
After updating to this release, you may experience connectivity issues with APIs and other services or integrations.
The following list includes examples of how connectivity issues may become apparent:
API errors
Power BI dashboards may no longer work correctly
Integrations may have trouble communicating with Sparkrock Finance
Workaround
To resolve this problem, you must uninstall, and then install the respective extension. To uninstall, and then install the extension, perform the following steps:
In Sparkrock Finance, choose
, enter extension management, and then choose the related link.The Extension Management page opens.
In Search, enter api.
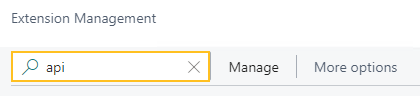
A list of the API extensions are displayed, for example, PS Finance APIs.
You may have to change your view so that you can view the version number for any extension. To view the version number for all extensions, choose
 , and then choose List.
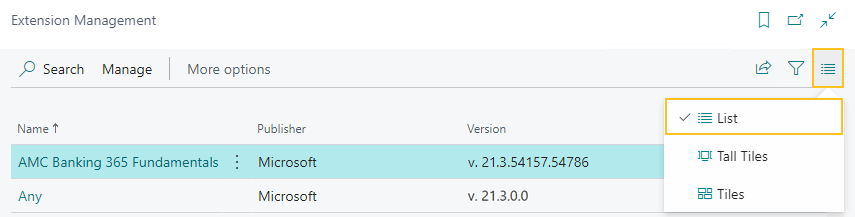
For each extension that does not have a version that starts with v.25.3 and Is Installed is selected, perform the following steps to uninstall, and then install the extension:
- Select the extension that you want to update, and then on the action bar, choose Manage > Uninstall.
The Extension Uninstallation page opens. - Choose Uninstall.
A dialog box appears and displays text that indicates the extension was successfully uninstalled. - To close the dialog box, choose OK.
- Select the extension that you want to update, and then on the action bar, choose Manage > Install.
The Extension Installation page opens. - Choose Next.
The page refreshes and you are requested to review extension information before installation. - To proceed, turn on I accept the terms and conditions.
- Choose Install.
The extension is updated to the latest version.
- Select the extension that you want to update, and then on the action bar, choose Manage > Uninstall.
Alternate workaround
It is possible that custom web services may have been deleted during or after the update.
To resolve this problem, you must copy and paste the web services lines from a sandbox environment into your production environment.
To copy and paste one or more web services lines, perform the following steps:
Open a Sparkrock Finance sandbox environment that was created before the update or create a sandbox environment from a backup.
Select Search (Alt+Q)
, enter web services, and then choose the related link.The Web Services page opens.
Copy the information for the one or more lines that you want to copy.
In your Sparkrock Finance production environment, choose
, enter web services, and then choose the related link.The Web Services page opens.
Paste the information for the one or more lines that you copied.
Re-open button is missing for a submitted expense claim in mySparkrock
The Re-open button may disappear from a submitted expense claim in mySparkrock. This issue occurs when the MYSPARKROCK user is not set up in Sparkrock Finance, on the User Setup page.
Workaround
Perform the following steps:
Select Search (Alt+Q)
, enter user setup, and then choose the related link.The User Setup page opens.
On the action bar, choose New.
A new row appears.
In User ID, specify MYSPARKROCK.
Assign all permissions to this specific user.
For example, select the checkboxes for the following fields:
- A/P Batch Admin
- Allow A/P Batch Creation
- Allow A/P Batch Auditing
- Allow A/P Batch Deletion
- Allow User to Access Compensation Data
- HR Request Reversal Allowed
Electronic Funds Transfer (EFT) errors
The following setup scenarios may result in an Electronic Funds Transfer (EFT) error:
On the Countries/Regions page, ISO Code and ISO Numeric Code are blank, and on the Field Mapping page of the respective data exchange definition, on the Bank No. row, the Optional checkbox is selected.
For this scenario, Sparkrock Finance may generate an EFT file successfully, but the bank may reject the file.
On the Countries/Regions page, ISO Code and ISO Numeric Code are blank, and on the Field Mapping page of the respective data exchange definition, on the Bank No. row, the Optional checkbox is clear.
For this scenario, when you try to generate an Electronic Funds Transfer (EFT) bank import file, Sparkrock Finance may display an error, for example:
Fin. Institution Transit No. must have a value in ACH RB Detail: Data Exch. Entry No.=3, Data Exch. Line Def Code=DETAIL. It cannot be zero or empty.
Workaround
On the Countries/Regions page, ensure that you have a value specified in ISO Code and ISO Numeric Code.
For Canadian banks, specify the following:
- In ISO Code, specify CA.
- In ISO Number Code, specify 124.
For United States of America banks, specify the following:
- In ISO Code, specify US.
- In ISO Number Code, specify 840.
Transaction cannot be completed because it will cause inconsistencies in the G/L Entry table error
When you try to post a purchase invoice for a vendor that has a foreign trade Currency Code set up, for example, USD, you may receive the following error:
This transaction cannot be completed because it will cause inconsistencies in the G/L Entry table. Check where and how the CONSISTENT function is used in the transaction to find the reason for the error.
Contact your system administrator.
Tables can be marked as inconsistent during comprehensive tasks, such as posting. This prevents data from being updated incorrectly.
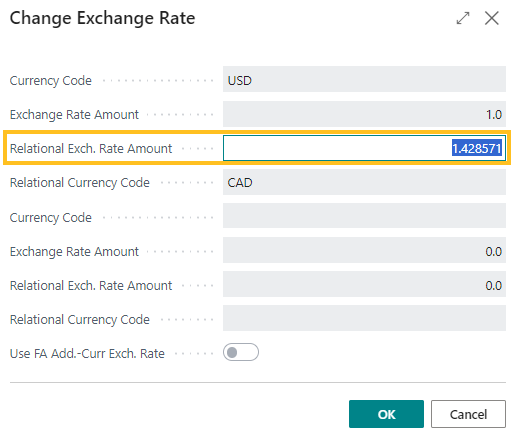
Workaround
On the Change Exchange Rate page for the specific invoice, increase the number of decimal places for the value in the Relational Exch. Rate Amount field, for example, from 1.4286 to 1.428571.
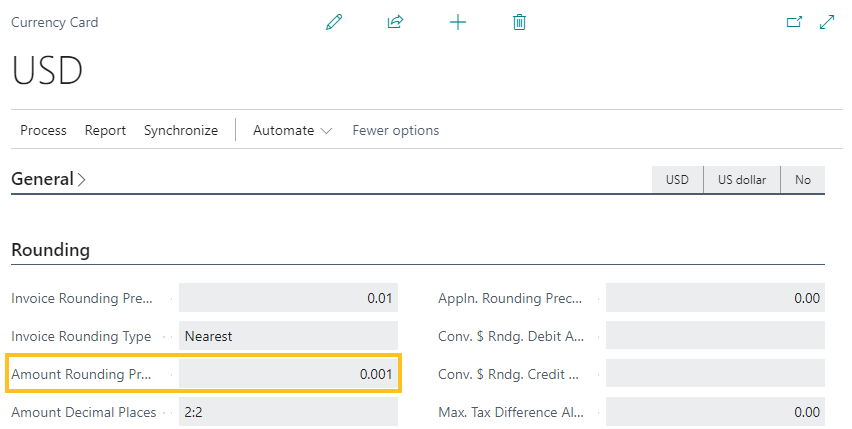
Alternate workaround
On the Currency Card page of the respective currency, increase the number of decimal places for the value in the Amount Rounding Precision field, for example, from 0.01 to 0.001.
Cannot open links in sent emails
When you open a sent email from the Sent Emails Last 30 Days page, and then select the link that appears in the body of the email, Sparkrock Finance becomes unresponsive.
Workaround
Open links in the body of sent emails from Gmail or Outlook, instead of from Sparkrock Finance.
Related information
New for Sparkrock Finance
Version 27.0 for mySparkrock 2025 release wave 2 release notes
Feedback
To send feedback about this page, select the following link: