Set up accounts payable checks
Sparkrock Impact includes functionality that provides the capability for you to produce checks that banking institutions accept. Nevertheless, if your organization is printing checks you are responsible for ensuring that you have the approved printer and toner as well and the correct font installed on the work station that produces the checks.
Sparkrock Impact supports a standard check stub check format for vendor payments. You can specify whether the check is pre-printed or printed on blank check paper (MICR). There is a specific Magnetic Ink Character Recognition (MICR) font that is required for the printed checks.
Sparkrock Impact does not cover the following check functionality:
Bilingual text
Single, or no signature lines
Special characters in MICR line or elsewhere, for example for USD checks
Multi-page checks that use a single check number
MICR checks
The supported MICR font for the printed checks is MICR E13B. If you want to use MICR checks, this font is required as well as blank check stock.
Pre-printed checks
The supported vendor for ordering checks is Print & Cheques Now. The vendor's web site is www.chequesnow.ca. The vendor's email address for ordering checks is orders@printnow.ca.
If you want to use your own print service for generating checks, Sparkrock has samples of pre-printed and blank stock format.
Understanding the MICR font
All checks that are used in the U.S. and Canada must be printed using a MICR font. The bottom line on a check must always be printed in the MICR typeface using special magnetic ink. The MICR encoding line on a check allows the check information to be automatically read and easily processed.
When you print with the MICR font, ensure that you have performed the following steps:
You have selected Regular for the Check Style.
You have font MICR E13B installed on your workstation.
You have a laser printer that prints Magnetic fonts.
Printing MICR is relatively difficult. The MICR line must be printed accurately to better than 1 part in 1,000. Your magnetic toner must stay on the paper under adverse conditions and have specific signal strength. The Canadian CPA 006 standard specifies the Canadian requirements. Your organization is responsible for ensuring your printer and toner adheres to these details.
You have the magnetic toner for printing magnetic fronts.
The following image provides a summary of all the symbols used by MICR.
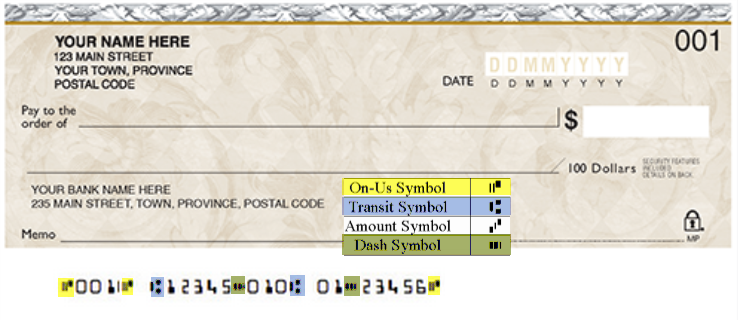
Transit Symbol is mapped to letter A. Amount symbol is mapped to letter B. On-us symbol is mapped to letter C. Dash symbol is mapped to letter D. All number symbols are mapped to their respective number.
Configuring the bank account card
Make configuration updates for standard check stub/check format on the respective Bank Account Card.
To update the bank account card for the standard check stub and check format
Choose
 , enter bank accounts, and then choose the related link.
The Bank Accounts page opens.
Select the bank account that you want to configure, and then on the action bar, choose Manage > Edit.
The Bank Account Card page opens.
On the Communication FastTab, in County/Region Code, specify the appropriate county code.
On the Posting FastTab, in Last Check No., specify the number of the last check used.
On the Standard Check FastTab, perform the following steps:
- In Check Date Format, specify your preferred date format.
- In Check Date Separator, specify a value or leave the field blank.
- In Check Style, specify Regular or Preprinted.
When Regular is selected, you must also perform the following steps:
- Complete the MICR configuration on the Transfer FastTab.
- Turn on Print Company Logo.
If required, to import the signature of the first signing authority, perform the following steps:
- On the FactBox pane, on the Details Tab, in Check Signature 1, choose the arrow, and then choose Import.
If there is an existing signature, a dialog box with the following text appears:
The existing picture will be replaced. Do you want to continue?
To continue, choose Yes.
A dialog box appears. - Choose Choose, browse to and select a file to upload, and then choose Open.
- On the FactBox pane, on the Details Tab, in Check Signature 1, choose the arrow, and then choose Import.
If required, in Signature 1 Max Amount, specify the maximum amount for the first signing authority.
If required, to import the signature of the second signing authority, perform the following steps:
- On the FactBox pane, on the Details Tab, in Check Signature 2, choose the arrow, and then choose Import.
If there is an existing signature, a dialog box with the following text appears:
The existing picture will be replaced. Do you want to continue?
To continue, choose Yes.
A dialog box appears. - Choose Choose, browse to and select a file to upload, and then choose Open.
- On the FactBox pane, on the Details Tab, in Check Signature 2, choose the arrow, and then choose Import.
If required, in Signature 2 Max Amount, specify the maximum amount for the second signing authority.
On the MICR Printing FastTab, perform the following steps:
- If you have selected Regular for Check Style, turn on Print MICR Encoding.
When testing and the MICR font is not installed, the value from field MICR Sample is printed on the check. - Specify values for other fields as per the requirements of your bank or check.
Look at your check and determine how the information is to be ordered, then order the information in the same way through the configuration. Certain symbols on the check correspond to specific letters. The following list includes sample instructions:- The MICR Sample field is read-only. The value is displayed as you populate the remaining MICR fields.
- Divider 1: Before the check number, specify code C.
- Format 1: Specify Check No., Sparkrock Impact continues from the last check number that you specified on the Posting FastTab.
- Divider 2: After the end of the check number, specify code C.
- Spacing 1: Between the check number and transit number, specify 1.
- Divider 3: Before the transit number, specify code A.
- Format 2: Specify Transit No.. This value is a combination of institution and branch numbers. These two separate fields are concatenated and separated by the dash symbol (-).
- Divider 4: At the end of transit number, specify code D.
- Spacing 2: Specify a value between transit number and account number.
- Divider 5: Before bank institution number, specify blank.
- Format 3: Specify Bank Institution No..
- Divider 6: Following bank institution number, specify code A.
- Spacing 3: Between bank institution number and bank account number, specify 4.
- Divider 7: Before bank account number, specify blank.
- Format 4: Specify Bank Account No..
- Divider 8: After bank account number, specify code C.
- If you have selected Regular for Check Style, turn on Print MICR Encoding.
On the Transfer FastTab, perform the following steps:
- If you specified Regular for Check Style, perform the following steps:
- In Transit No., specify a value.
- In Bank Branch No., specify a value.
- In Bank Account No., specify a value.
- In Bank Account No. (MICR), specify a valued.
When this field is populated, the value is displayed on the check, in the bank account section, on the MICR line.
- If you specified Regular for Check Style, perform the following steps:
Company information
You can import a separate logo that can be used on the printed checks to display the logo and the company information. If the check is preprinted, it is recommended that the company address, bank address, and check no. be part of the check stock.
To set up a logo to appear on company checks
Choose
, enter company information, and then choose the related link.The Company Information page opens.
On the FactBox pane, in Check Logo, choose the arrow, and then choose Import.
If there is an logo, a dialog box with the following text appears:
The existing picture will be replaced. Do you want to continue?
To continue, choose Yes.
A dialog box appears.Choose Choose, browse to and select a file to upload, and then choose Open.
Currency symbol
Ensure that the currency symbol is specified on the Currencies page so that the correct currency symbol is used for printing checks.
To set up the currency symbol
Choose
, enter currencies, and then choose the related link.The Currencies page opens.
Select the currency to which you want to add a symbol, and then choose Edit.
The Currency Card page opens.
On the General FastTab, in Symbol, specify an appropriate currency symbol.
Report Selection–Bank Account
You must specify the default check report to be used.
To make the standard check report the default
Choose
, enter report selection - bank account, and then choose the related link.The Report Selection - Bank Account page opens.
In Usage, specify Check.
In Report ID, specify 23020139.
The Report Caption is Standard Check (Stub/Check/Stub).
Feedback
To send feedback about this page, select the following link: