Capital tangible assets
Sparkrock Impact includes functionality to help you manage the value of capital tangible assets.
Recording acquisition costs
For every asset purchased, you must record the expense or cost to maintain a record of the asset. Additionally, recording the acquisition cost also enables you to track depreciation and salvage value.
Prerequisites
Before recording an expense, complete the following tasks:
Create a fixed asset card for the one or more assets to be purchased.
Check TCA expense posting for each asset.
Create an expense type that corresponds to each asset.
To record an expense
Select Search (Alt+Q)
 , enter purchase requisitions, and then choose the related link.
The Purchase Requisitions page opens.
On the action bar, choose New.
The Purchase Requisition page opens.
On the General FastTab, perform the following steps:
- In PR Type, specify a value.
- In Posting Description, specify a brief description for the purchase requisition.
- In Location Code, specify the code that represents an appropriate location for this expense.
On the Invoice Details FastTab, in Requested Receipt Date, specify the date on which you want the vendor to deliver the asset to the specified location.
On the Lines, for each asset that is to be included in this expense, perform the following steps:
- In Type, specify Expense Type.
- In No., specify the number that represents the asset for this expense.
- In Vendor Name, specify the vendor name.
- In Line Action, specify Create Purchase Order.
- In Quantity, specify the quantity.
- In Unit Cost, specify the unit cost.
- In Account Set Code, specify the code that represents the appropriate account set for this expense.
- In Vendor Item No., specify the vendor item number for this asset.
- Specify values for other fields as required.
- On the action bar, choose Request Approval > Send Approval Request.
Convert a purchase requisition into a purchase order
After a purchase requisition is created, you can use the original request document to create a purchase order, which saves time and reduces the possibility for error.
To convert a purchase request to a purchase order
Select Search (Alt+Q)
 , enter purchase requisitions, and then choose the related link.
The Purchase Requisitions page opens.
Select the purchase requisition that you want to convert to a purchase order, and then on the action bar, Home > Create Purchase Order.
The purchase order is created.
To release the new purchase order
Select Search (Alt+Q)
 , enter purchase orders, and then choose the related link.
The Purchase Orders page opens.
Select the purchase order that you want to view, and then on the action bar, choose Manage > View.
The Purchase Order page opens.
On the Lines, perform the following steps:
- Confirm that Type is set to G/L Account.
- In No., if not populated, specify the appropriate general ledger account.
- In Fixed Asset No., specify the fixed asset number that corresponds to the expense type.
- Update other field values as required.
Update fields on the purchase order as required.
On the action bar, choose Release > Release.
Post a vendor invoice
Follow the purchase posting process that is applicable to your organization.
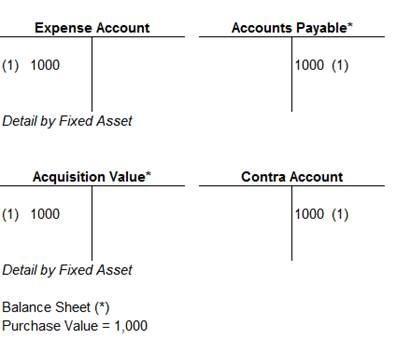
The entries that are created after the vendor invoice has been posted are illustrated through the following T accounts example:
Note
Note:
The Contra Account (Expense Capital Bal. Acc) and the Acquisition Value account are set up on the FA Posting Groups page.
The goal of the entry is to allow tracking of actuals vs. budget on the expense account. For Income Statement presentation purposes the Expense Account and the Contra account offset each other.
Salvage value
The salvage value is the residual value of a fixed asset when the asset can no longer be used.
Post the salvage value to a fixed asset journal
You can post the salvage value to a fixed asset journal.
Note
Note:
The salvage value can only be posted after the acquisition cost of an asset has been posted.
To post salvage
Select Search (Alt+Q)
 , enter fixed asset journals, and then choose the related link.
The Fixed Asset Journals page opens.
In FA Posting Type, specify Salvage Value.
The FA Posting Type of Salvage Value is not an allowable option on the Fixed Asset G/L Journals page because the salvage value is never posted to the general ledger.
In Salvage Value, specify the salvage value of the fixed asset.
Specify values for other fields as required.
On the action bar, choose Post.
A dialog box appears and displays the following text:
Do you want to post the journal lines?
Choose Yes.
To view the salvage value of a fixed asset
Select Search (Alt+Q)
 , enter fixed assets, and then choose the related link.
The Fixed Assets page opens.
Select the asset for which want view the salvage value, and then on the action bar, choose Manage > View.
The Fixed Asset Card page opens.
On the action bar, choose Related > Fixed Asset > Statistics.
The Fixed Asset Statistics page opens. On this page you can view the Salvage Value and the last fixed asset posting date on which a salvage value transaction was posted.
To view the fixed asset ledger entries that comprise the Salvage Value amount, select the link that appears for the value.
Calculate and post depreciation
Depreciation is used to allocate the cost of fixed assets, such as machinery and equipment, over their depreciable life. In Sparkrock Impact, you can choose how a fixed asset is to be depreciated. Depreciation can be performed manually or automatically. To perform depreciation manually, use the fixed asset general ledger journal or fixed asset journal. To perform depreciation automatically, run the Calculate Depreciation batch job.
Calculate Depreciation batch job
Once a month, or whenever you choose, such as March 31 and August 31, you can run the Calculate Depreciation batch job. This job ignores assets that have been sold, assets that are blocked or inactive on the fixed asset card, and assets that are set to use the manual depreciation method.
To run a calculate depreciation batch job for an asset
Select Search (Alt+Q)
 , enter calculate depreciation, and then choose the related link.
The Calculate Depreciation page opens.
On the Options FastTab, perform the following steps:
- In Depreciation Book, specify the code that represents the depreciation book that you want to use for this asset.
- In FA Posting Date, specify the fixed asset posting date that you want to use for this asset.
- In Posting Description, specify a posting description.
- To automatically insert fixed asset entries with balancing accounts, turn on Insert Bal. Account.
- Specify values for other fields as required.
To select the assets that you want to depreciate, specify filters.
To calculate the depreciation as of the posting date, choose OK.
The batch job calculates depreciation for the one or more specified fixed assets and creates lines in the fixed asset general ledger journal.
To post fixed asset general ledger journal lines
Select Search (Alt+Q)
 , enter fixed asset g/l journals, and then choose the related link.
The Fixed Asset G/L Journals page opens.
Specify values as required.
On the action bar, choose Post.
A dialog box appears and displays the following text:
Do you want to post the journal lines?
Choose Yes.
To view ledger entries for a depreciation
Select Search (Alt+Q)
 , enter fixed assets, and then choose the related link.
The Fixed Assets page opens.
Select the fixed asset that has been depreciated, and then on the action bar, choose Related > History > Ledger Entries.
The FA Ledger Entries page opens.
Select a line with the FA Posting Category of Depreciation, and then on the action bar, choose Find entries.
The Find entries page opens.
Select the G/L Entry line, and then on the action bar, choose Show Related Entries.
The General Ledger Entries page opens.
The depreciation transaction results in the following entries that are illustrated through the following T accounts example:
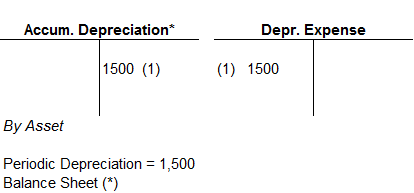
Account numbers that are related to depreciation are specified on the FA Posting Groups page, in Accum. Depreciation Account and Depreciation Expense Acc..
Using the Journals for Write-Downs
Sparkrock Impact includes functionality to write-down an asset when the value of the asset has decreased.
Enter a journal entry
Select Search (Alt+Q)
 , enter fixed asset G/L Journals, and then choose the related link.
The Fixed Asset G/L Journals page opens.
In Account Type, specify Fixed Asset.
In Account No., specify the number that represents the asset.
In FA Posting Type, specify Write-Down.
In Amount, specify the sale value with a negative sign.
Specify values for other fields as required.
On the action bar, choose Insert FA Bal. Account.
A second line appears with the balance entry.
On the action bar, choose Post.
A dialog box appears and displays the following text:
Do you want to post the journal lines?
Choose Yes.
The entry is posted to the journal.
To view the ledger entries for a write-down
Select Search (Alt+Q)
 , enter fixed assets, and then choose the related link.
The Fixed Assets page opens.
Select the fixed asset for which you want to view the ledger entries for a write-down, and then on the action bar, choose Related > History > Ledger Entries.
The FA Ledger Entries page opens.
Select a line with the FA Posting Category of Write-Down, and then on the action bar, choose Find entries.
The Find entries page opens.
Select the G/L Entry line, and then on the action bar, choose Show Related Entries.
The General Ledger Entries page opens.
The write-down transaction results in the following entries that are illustrated through the following T accounts example:
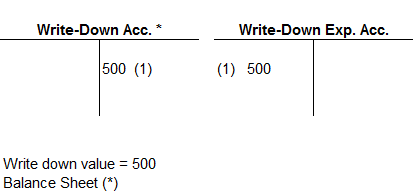
Account numbers that are related to write-down are specified on the FA Posting Groups page, in Write-Down Account and Write-Down Expense Acc..
Recording disposals and asset write-offs
Sparkrock Impact includes functionality to help you manage the disposal of a capital asset and to perform an asset write-off.
Post the disposal value for a capital asset to the journal
When you sell or otherwise dispose of a capital asset, the disposal value must be posted. Sparkrock Impact automatically calculates the gain or loss as the difference between the net book value of the asset and the disposable value of the asset.
To post the disposal value to the journal
Select Search (Alt+Q)
 , enter fixed asset G/L Journals, and then choose the related link.
The Fixed Asset G/L Journals page opens.
In Account Type, specify Fixed Asset.
In Account No., specify the number that represents the asset.
In FA Posting Type, specify Disposal.
In Amount, specify the sale value with a negative sign.
On the action bar, choose Insert FA Bal. Account.
A second line appears with the balance entry.
On the action bar, choose Post.
A dialog box appears and displays the following text:
Do you want to post the journal lines?
Choose Yes.
The entry is posted to the journal.
To view the ledger entries that are posted for a disposal
Select Search (Alt+Q)
 , enter fixed assets, and then choose the related link.
The Fixed Assets page opens.
Select the fixed asset for which you want to view the ledger entries for a disposal, and then on the action bar, choose Related > History > Ledger Entries.
The FA Ledger Entries page opens.
Select a line with the FA Posting Category of Disposal, and then on the action bar, choose Find entries.
The Find entries page opens.
Select the G/L Entry line, and then on the action bar, choose Show Related Entries.
The General Ledger Entries page opens.
The disposal transaction results in the following entries that are illustrated through the following T accounts example:
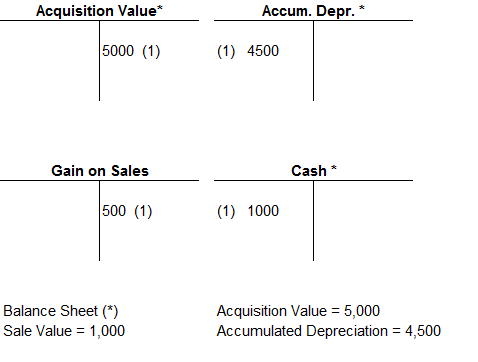
The gain or loss is calculated as follows:
Sales Price – Acquisition Cost + Depreciation
A positive amount is a gain, a negative one is a loss.
Account numbers that are related to disposals are specified on the FA Posting Groups page, in the Gains Acc. on Disposal, Acq. Cost Acc.on Disposal, and Accum. Depr. Acc. on Disposal fields.
Perform an asset write-off
To write-off assets with a net book value that is greater than 0, in the Amount column, specify -0.1, and then select as a balancing account the account for loss on sales of assets.
For a partial disposal, if you sell or otherwise dispose of part of a fixed asset, you must split up the asset into two capital assets before you can record the disposal transaction for one of them.
Tangible capital assets that are recorded using the pooled cost approach, have a deemed disposal at the end of their useful life. Typically, individual disposals are not recorded. If an asset is sold or disposed of before the asset has reached the end of its useful life, the proceeds, if any, are to be recorded as revenue.
Cancel a disposal
If required, you can cancel a disposal. Before reversing a disposal transaction verify that the action has been allowed.
To verify that the cancellation of a disposal is allowed
Select Search (Alt+Q)
 , enter depreciation books, and then choose the related link.
The Depreciation Books page opens.
Select the depreciation book for which you want to cancel a disposal, and then on the action bar, choose Manage > View.
The Depreciation Book Card page opens.
On the General FastTab, ensure that Allow Correction of Disposal is turned on.
To cancel a disposal
Select Search (Alt+Q)
 , enter fixed assets, and then choose the related link.
The Fixed Assets page opens.
Select the fixed asset for which you want to cancel a disposal, and then on the action bar, choose Related > History > Ledger Entries.
The FA Ledger Entries page opens.
Select the line with the FA Posting Category of Disposal, and then choose Find entries.
The Find entries page opens.
Select the FA Ledger Entry line, and then on the action bar, choose Show Related Entries.
The FA Ledger Entries page opens.
On the action bar, choose Actions > Functions > Cancel Entries.
The Cancel FA Entries page opens.
Specify values as required, and then choose OK.
Fixed asset general ledger lines are created.
Select Search (Alt+Q)
 , enter fixed asset g/l journals, and then choose the related link.
The Fixed Asset G/L Journals page opens.
In Bal. Account No., specify the appropriate account number.
To post the journal, on the action bar, choose Post.
A dialog box appears and displays the following text:
Do you want to post the journal lines?
Choose Yes.
The entry is posted to the journal.
To view the ledger entries for a cancelled disposal
Select Search (Alt+Q)
 , enter fixed assets, and then choose the related link.
The Fixed Assets page opens.
Select the asset for which you want to view the ledger entries for a cancelled disposal, and then on the action bar, choose Related > Fixed Asset > Depreciation Books.
The FA Depreciation Books page opens.
On the action bar, choose Related > Depr. Book > Error Ledger Entries.
The FA Error Ledger Entries page opens.
The cancellation reverses the general ledger entries that were made at the time of the original transaction.
Use the FA reclassification journal to split fixed assets
The fixed asset reclassification journal is used in the following scenarios:
When one fixed asset must be split into several fixed assets.
When several assets must be combined into one asset.
When one asset must be transferred to another asset.
Reclassifying a CIP asset
The acquisition cost of an asset under construction is to be transferred out to an asset assigned to the appropriate asset class, for example, a building, when the construction is substantially complete and the asset is ready for use. The Reclassification % must be 100%.
To create an FA reclass journal
Select Search (Alt+Q)
 , enter fixed asset reclassification journals, and then choose the related link.
If prompted, select a journal template that indicates the current status of the CIP asset. The only exception is disposal.
The Fixed Asset Reclassification Journal page opens.
In FA Posting Date, specify a date.
In FA No., specify the number of the fixed asset from which to reclassify.
Typically, this asset is an asset under construction.
In New FA No., specify the number of the fixed asset to which to reclassify.
Typically, this asset is a main asset or a component.
In Reclassify Acq. Cost %, specify 100.
Select the Reclassify Acquisition Cost checkbox.
If the balancing accounts have been setup on the FA Posting Group Card page, to have the balancing account lines created automatically, select the Insert Bal. Account checkbox.
On the action bar, choose Reclassify.
The fixed asset general ledger journal entry is created.
Select Search (Alt+Q)
 , enter fixed asset g/l journals, and then choose the related link.
The Fixed Asset G/L Journals page opens.
If the Bal. Account No. is not specified, before you post the line, specify a value.
To post the journal, on the action bar, choose Post.
A dialog box appears and displays the following text:
Do you want to post the journal lines?
Choose Yes.
The entry is posted to the journal and the CIP acquisition cost is transferred to the new completed asset.
The entries that are performed are illustrated in the following T accounts example:
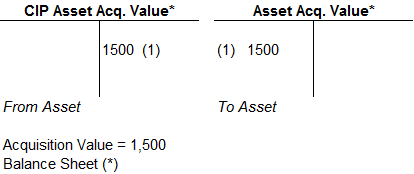
After the reclassification is complete, the new asset can be depreciated as part of the periodic depreciation process.
Transfer asset depreciation to another asset
The acquisition cost, the depreciation of an asset, or both can be transferred out to another asset.
To create a FA reclass journal
Select Search (Alt+Q)
 , enter fixed asset reclassification journals, and then choose the related link.
If prompted, select an appropriate journal template.
The Fixed Asset Reclassification Journal page opens.
In FA Posting Date, specify the fixed asset posting date.
In FA No., specify the number of the fixed asset from which to reclassify.
In New FA No., specify the number of the fixed asset to which to reclassify.
Typically, this asset is a main asset or a component.
In Reclassify Acq. Cost %, specify the percentage of the asset to be reclassified.
Select the Reclassify Acquisition Cost checkbox, Reclassify Depreciation checkbox, or both checkboxes.
If the balancing accounts have been setup on the FA Posting Group Card page, to automatically create the balancing account lines, select the Insert Bal. Account checkbox.
On the action bar, choose Reclassify.
The fixed asset general ledger journal entry is created.
Select Search (Alt+Q)
 , enter fixed asset g/l journals, and then choose the related link.
The Fixed Asset G/L Journals page opens.
If the Bal. Account No. is not specified, before you post the line, specify a value.
To post the journal, on the action bar, choose Post.
A dialog box appears and displays the following text:
Do you want to post the journal lines?
Choose Yes.
The entries that are performed by the batch for the transfer of the acquisition cost are illustrated in the following T Accounts example:
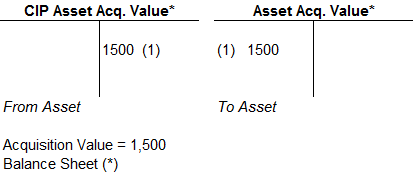
The CIP acquisition cost is transferred to the new completed asset.
Perform the year end closing process
Perform the year end closing process for assets for which TCA Expense Posting and Multi-Year TCA Expense are turned on. Typically, these assets are construction in progress assets.
Run the Close Income Statement task
To close the income statement against the retained earnings, run the Close Income Statement task as part of your year end closing procedure.
You must run a Close Income Statement task before you perform a fixed asset budget transfer.
To run the Close Income Statement task
Select Search (Alt+Q)
 , enter close income statement, and then choose the related link.
The Close Income Statement page opens.
Specify values for fields as required, and then choose OK.
A list of close income statement entries are created in the general journal.
To view the general journal, choose
 , enter general journals, and then choose the related link.
The General Journals page opens.
Review and change the data as required.
When you are satisfied with the entries, on the action bar, choose Post/Print > Post.
A dialog box appears and displays the following text:
Do you want to post the journal lines?
Choose Yes.
Create opening balances with the Fixed Asset Budget Transfer task
To create the opening balances for a multi-year budget, run the Fixed Asset Budget Transfer task.
Note
Note:
It is recommended that this task only be executed after the Close Income Statement task has been completed.
To create the opening balances with the Fixed Asset Budget Transfer task
Select Search (Alt+Q)
 , enter fixed asset budget transfer, and then choose the related link.
The Fixed Asset Budget Transfer page opens.
Specify values for fields as required, and then choose OK.
A list of fixed asset budget transfer entries are created in the general journal.
To view the general journal, choose
 , enter general journals, and then choose the related link.
The General Journals page opens.
Review and change the data as required.
When you are satisfied with the entries, on the action bar, choose Post/Print > Post.
A dialog box appears and displays the following text:
Do you want to post the journal lines?
Choose Yes.
The entries have a posting date of the beginning of the next fiscal year and are broken down by asset and dimension combination.
The entries that are performed are illustrated in the following T Accounts example:
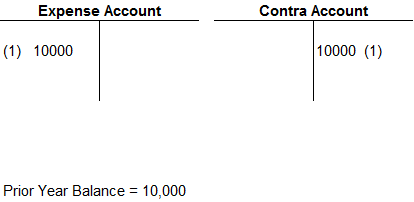
Sparkrock Impact creates an entry that takes the balances of the expense account and the contra account and books them with the same sign as an entry at the beginning of the next fiscal year, thus allowing multi-annual tracking of actuals versus budget.
Feedback
To send feedback about this page, select the following link:
