Classifying data sensitivity fields
To classify the fields that hold sensitive or personal data, a Microsoft partner can set the DataClassification property on fields. To set the property, you must have access to the database tables, either through the development environment or by running a Windows PowerShell script. To learn more, go to Classifying Data.
As a customer, you can add a second level of classification by specifying sensitivity levels for the data you store in standard and custom fields. Classifying data sensitivity helps ensure that you know where you keep personal data in your system, and makes it easier to respond to requests from data subjects. For example, if a contact or customer asks you to export their personal data. For more information, see Responding to Requests About Personal Data.
Important
Important:
Microsoft is providing this Data Sensitivity Classification feature as a matter of convenience only. It's your responsibility to classify the data appropriately and comply with any laws and regulations that are applicable to you. Microsoft disclaims all responsibility towards any claims related to your classification of the data.
The following table describes data sensitivity levels you can assign.
| Sensitivity | Description |
|---|---|
| Sensitive | Information about a data subject's racial or ethnic origin, political opinions, religious beliefs, involvement with trade unions, physical or mental health, sexuality, or details about criminal offenses. |
| Personal | Information that can be used to identify a data subject, either directly or in combination with other data or information. |
| Confidential | Business data that you use for accounting or other business purposes, and don't want to expose to other entities. For example, data such as ledger entries. |
| Normal | General data that doesn't belong to any other categories. |
How do I classify my data?
Classifying the sensitivity of a large number of fields one-by-one would take a long time. To help speed-up the process, we provide tools that you can use to bulk classify the sensitivity of fields, and then fine-tune classifications for specific fields. You can find tools on the Data Classification Worksheet page, which is available on the Administration of users, user groups, and permissions Role Center. You must be a system administrator to use the worksheet.
Important
Important:
The Data Classification Worksheet page is empty when you open it the first time. You must run the Data Classification guide to generate the list of fields. To start the guide, choose the Set Up Data Classifications action.
For example, the Data Classification Worksheet page lets you do things like:
- Use the Data Classification guide to export your fields to an Excel worksheet where you can bulk classify them. Using the Excel worksheet is useful if you're collaborating with a Microsoft partner. After you update the worksheet, you can use the guide to import and apply the classifications. You can also use the guide to classify fields manually.
- Choose a field and then filter the list to find similar fields that are likely to belong to the same classification as the field you based the search on.
- Investigate a field by viewing its contents.
Tip
Tip:
We defined sample sensitivity classifications for the tables and fields in the Cronus demonstration company. You can use those classifications as inspiration when you classify your own tables and fields.
Mask or show sensitive data in fields
You can protect sensitive information by masking field values on the screen. Masking helps protect sensitive data, such as personal identifiers, financial details, or confidential notes, from casual observation or shoulder surfing. For example, you might want to mask values when people work in shared or open work environments.
The following image shows a masked field value and highlights the reveal button.
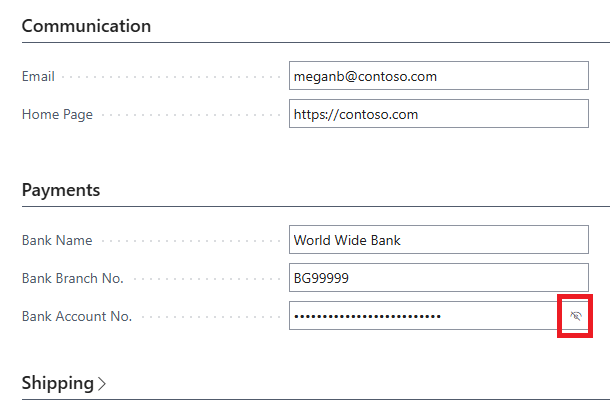
Masking is consistent across pages, and you can configure it to support role-based visibility or audit logging.
Note
Note:
Masking provides lightweight, UI-layer-only information protection only. The unmasked data transfers to the web browser anyway.
Additional information:
- List pages or grid controls don't support this feature. Only document and card pages do (not supported in repeater controls).
- The reveal button renders on the control that lets you toggle between mask and show states.
- Masking works on desktop and mobile devices.
Note
Note:
To use masking, you must enable Introduce UI support for masking sensitive data on the Feature Management page. To learn more, go to Introduce UI support for masking sensitive data feature key.
We introduced masking in 2025 release wave 2. We'll make the feature a standard part of Business Central in a future version and remove the feature key.
Information about masking for developers
The MaskType field-level property allows you to hide values in text fields. Learn more at MaskType Property.
When you apply the property, Business Central masks the field's value by default, and only shows the value when you choose the reveal button in the field.
The MaskType property is a field-level property. You can use the property on the following types of fields:
CodeTextDecimalInteger
You define the property as an enum MaskType with the following values:
None- Shows the field value by default. Masking isn't applied.Concealed- Masks the field value in the user interface by default.
Note
Note:
You can't define the MaskType property together with the ExtendedDatatype property set to Masked.